Chapter 5 Support for the MFC Feature Pack
Introduction
What is the FoundationEx library?
The Stingray Studio FoundationEx library is a new set of application, docking, frame, and user interface classes built on the MFC Feature Pack for Microsoft Visual Studio 2008 SP1 or later. The FoundationEx library is designed to be used with all Stingray Studio products. Some existing applications previously built with Stingray Studio 10.1 and earlier will need to be migrated to use the FoundationEx library in order to take advantage of any new features in the MFC Feature Pack.
NOTE >> This is not meant to be a comprehensive guide. Some custom application situations are not covered in this guide and require more coding effort. A collection of FoundationEx samples are provided in the <StingrayInstallDir>\Samples\FoundationEx directory to help give a better understanding of some common types of application migrations.
Features of the FoundationEx library
The FoundationEx library adds features for migration of existing Stingray Studio applications built on Stingray Studio 10.1 and earlier to the MFC Feature Pack framework. Features include categories such as Application, Dialog, Docking, Frame, and User Interface.
Application Features
Application level features are found in the SFLWinAppEx class, which is derived from the new CWinAppEx class.
Initialization
As a convenience we’ve provided an Initialize() function, which sets up your application with common defaults. It is defined and defaulted as follows:
BOOL Initialize( BOOL bInitOleLibs = TRUE,
BOOL bCtrlContainer = TRUE,
BOOL bRegistryKey = TRUE,
BOOL bInitKeyboardMgr= TRUE,
BOOL bInitMouseMgr = TRUE,
BOOL bInitContextMgr = TRUE,
BOOL bInitTooltipMgr = TRUE,
BOOL bInitShellMgr = TRUE
BOOL bRestartMgr= TRUE);
MyApp.cpp:
BEGIN_MESSAGE_MAP(MyApp, SFLWinAppEx), etc.
MyApp::InitInstance()
{
SFLWinAppEx::InitInstance();
// Set Registry variables, if needed, before Initialize().
SFLWinAppEx::Initialize(); // Using defaults
//…
}
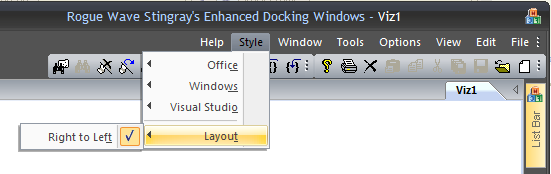
Right to Left Layout Features
Right to left layout features are part of the new SFLFrameWndEx and SFLMDIFrameWndEx classes.
Frames can change layout to Right to Left by calling SetRTL(). Also, the frame the SFLFrameWndEx and SFLMDIFrameWndEx classes have command handlers for the menu command ID_SFLEX_APPSTYLE_LAYOUT_RTL.
NOTE >> When calling SetRTL() manually, it should be called from the frame class, passing the frames this pointer and specifying with TRUE that the frame is the top level call.
Frame Features
Frame features are part of the new SFLFrameWndEx and SFLMDIFrameWndEx classes. Enhancements to the application frame are described in the following sections.
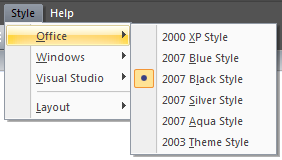
Look and Feel
The Look and Feel of the application frame and controls used in the MFC Feature Pack can be set with the SetAppplicationStyle() function.
MainFrm.h:
class CMainFrame : public SFL[MDI]FrameWndEx {};
MainFrm.cpp:
BEGIN_MESSAGE_MAP(CMainFrame, SFL[MDI]FrameWndEx), etc.
CMainFrame::CMainFrame()
{
// An example of setting the application
// look and feel to Office Black.
SFL[MDI]FrameWndEx::
SetApplicationStyle(SFLAppStyleEx::
APPSTYLE_OFFICE_BLACK);
}
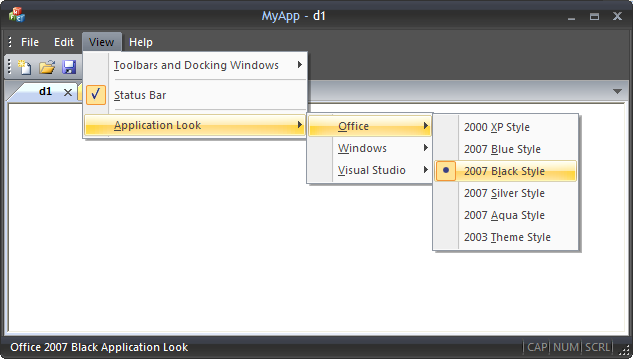
Applications that are generated with the Visual Studio 2008 SP1or later application wizard can be enabled with visual styles, which will generate functions such as OnApplicationLook() in the main frame class. Optionally, these functions and message handlers can be removed and replaced with the mappings provided by SFLFrameWndEx and SFLMDIFrameWndEx.
To handle application look and feel command messages, send the following IDs which are defined in SFLResEx.h:
ID_SFLEX_APPSTYLE_WIN_2000,
ID_SFLEX_APPSTYLE_WIN_XP,
ID_SFLEX_APPSTYLE_OFFICE_XP,
ID_SFLEX_APPSTYLE_OFFICE_2003,
ID_SFLEX_APPSTYLE_OFFICE_BLUE,
ID_SFLEX_APPSTYLE_OFFICE_BLACK,
ID_SFLEX_APPSTYLE_OFFICE_SILVER,
ID_SFLEX_APPSTYLE_OFFICE_AQUA,
ID_SFLEX_APPSTYLE_VS_2005,
ID_SFLEX_APPSTYLE_VS_2008
As of Stingray Studio 11.3, the resource ID’s have been extended to include the Office 2013 look and feel. The Office 2013 look and feel consists of two parts: a style and an accent. To handle application look and feel Style command messages, send the following extended IDs that are defined in SFLResEx.h:
ID_SFLEX_APPSTYLE_OFFICE_WHITE_2013
ID_SFLEX_APPSTYLE_OFFICE_DARKGRAY_2013
ID_SFLEX_APPSTYLE_OFFICE_LIGHTGRAY_2013
To handle application look and feel Accent command messages, send the following extended IDs that are defined in SFLResEx.h:
ID_SFLEX_APPACCENT_OFFICE_ACCENT_EXCEL
ID_SFLEX_APPACCENT_OFFICE_ACCENT_OUTLOOK
ID_SFLEX_APPACCENT_OFFICE_ACCENT_POWERPOINT
ID_SFLEX_APPACCENT_OFFICE_ACCENT_WORD
It may be convenient to copy and paste the ‘Style’ section of the IDR_SFLEX_MAINFRAME resource into the application resource. It may also be necessary to reassign the above IDs to the cut and pasted ‘Style’ menu option, as these have a tendency to get redefined in the local applications resource.h.
The enumeration values that are passed to SetApplicationStyle() are the same as those posted above but without the initial string “ID_SFLEX_”:
SetApplicationStyle((eAppStyle)theApp.GetInt(_T("ApplicationStyle"),
APPSTYLE_OFFICE_WHITE_2013), &ui.GetRibbonBar());
The OnApplicationStyle() handler of the SFLFrameWndEx and SFLMDIFrameWndEx classes also sends a WM_SFLEX_APPSTYLE windows message to descendant windows. If any other windows wish to handle these messages they can do so with an ON_MESSAGE() handler of the type LRESULT (WPARAM, LPARAM). The ID_SFLEX_APPSTYLE_* messages are passed in the WPARAM parameter.
For a demonstration of the WM_APPSTYLE message, look at the view class of the ExcelGrid sample located in the <StingrayInstallDir>\Samples\GridEx\ExcelGrid directory.
As of Stingray Studio 11.3, the enumeration values for the new Accents are passed to the new function, SetApplicationAccent(), are the same as posted above without the initial string “ID_SFLEX_”:
SetApplicationAccent((eAppAccent)theApp.GetInt(_T("ApplicationAccent"),
APPACCENT_OFFICE_ACCENT_EXCEL), &ui.GetRibbonBar());
Multiple Views in Single Document Interface
The SFLFrameWndEx class supports dynamic swapping of multiple CView- or CView-derived classes through the class SFLMultiViewMgr. Access the SFLMultiViewMgr class through the GetMultiViewMgr() function which is a member of the SFLFrameWndEx class.
Add multiple views to the SFLMultiViewMgr class in your SFLWinAppEx-derived class or in the Frames OnCreate() call:
MyView1* pView1 = new MyView1();
MyView2* pView2 = new MyView2();
GetMultiViewMgr()->AddView(pView1, ID_MYVIEW1);
GetMultiViewMgr()->AddView(pView2, ID_MYVIEW2);
Switch the views by calling SwitchView() with an enum index representing the associated view:
GetMultiViewMgr()-> SwitchView(SFLMultiViewMgr::MULTIVIEW_1);
Ideally, switching the views would be mapped to a menu command.
For further information on using multiple views in an SDI application refer to the MultiViewEx sample located in the <StingrayInstallDir>\Samples\FoundationEx\MultiViewEx directory.
To handle multiple SDI view command messages, send the following IDs which are defined in SFLResEx.h:
ID_SFLEX_MULTIVIEW_0, // Default view
// associated with CSingleDocTemplate
ID_SFLEX_MULTIVIEW_1,
ID_SFLEX_MULTIVIEW_2,
ID_SFLEX_MULTIVIEW_3,
//..
ID_SFLEX_MULTIVIEW_20
Fullscreen
Frames support Fullscreen mode by directly calling ShowFullScreen() and verifying with IsFullScreen(), or by handling the menu command ID_SFLEX_VIEW_FULLSCREEN in the frame class.
NOTE >> To enable menu commands, call EnableFullScreenMode(ID_SFLEX_VIEW_FULLSCREEN) in the frame class.
Docking Features
Several docking classes have been added to make docking controls easier.
SFLDockablePaneEx
The SFLDockablePaneEx class is derived from CDockablePane and handles the docking for the new MFC9 Feature Pack framework. Objective Toolkit classes that were using CControlBar or SECControlBar should instead derive their classes from SFLDockablePaneEx.
SFLDockableCtrlPaneEx<T>
The SFLDockableCtrlPaneEx template class is derived from SFLDockablePaneEx and allows a control class to be passed as the template type and be instantiated on creation. There are some functions can we recommend overriding in a derived class in order to gain greater control over creation and layout. These are CreateControl() and AdjustLayout().
MainFrm.h:
SFLDockableCtrlPaneEx<CMFCTreeCtrl> myDockTree;
MainFrm.cpp
CMainFrame::InitInstance()
{
//…
if(!myDockTree.Create(this))
{
return -1;
}
myDockTree.EnableDocking(CBRS_ALIGN_ANY);
DockPane(&myDockTree);
//…
}
NOTE >> For derived classes, you should use BEGIN_TEMPLATE_MESSAGE_MAP() instead of BEGIN_MESSAGE_MAP().
User Interface Features
Several default user interface classes have been added to make creating quick default toolbar, menu, status, and ribbonbar controls easier.
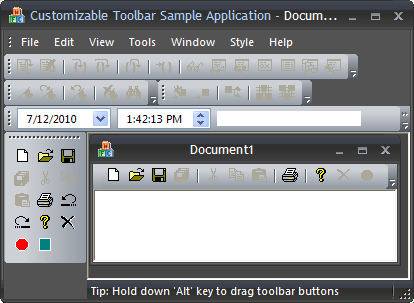
SFLStandardUI
The SFLStandardUI class creates a set of default user interface elements including a menubar, toolbar, and statusbar in an SDI or MDI frame. There are several overrides for the Create() call provided for convenience, but each basically gives you the ability to specify if you want all by default, or to choose from the toolbar and statusbar, as well as MDI tabs for the MDI frames.
NOTE >> By default, a menubar is created. See the Tips and Troubleshooting section for tips on applications without menus.
MainFrm.h:
SFLStandardUI ui;
MainFrm.cpp
CMainFrame::InitInstance()
{
//…
EnableDocking(CBRS_ALIGN_ANY);
If(!ui.Create(this))
{
return -1;
}
// No need to handle docking calls.
// The base class does this.
}
In MDI applications, in order to get the Standard UI menu, you’ll need to change the first parameter of the CMultiDockTemplate class constructor in your application’s InitInstance() function. It should use IDR_SFLEX_MAINFRAME. In addition, you’ll need to define any document types, etc, for resource files; otherwise, tabs will be labeled d1, d2, etc.
MyApp.cpp:
MyApp::InitInstance()
{
//…
CMultiDocTemplate* pDocTemplate;
//pDocTemplate = new CMultiDocTemplate(IDR_MyAppTYPE,
pDocTemplate = new CMultiDocTemplate(
IDR_SFLEX_MAINFRAME,
RUNTIME_CLASS(CSFLExTestDoc),
RUNTIME_CLASS(CChildFrame),
// custom MDI child frame
RUNTIME_CLASS(CSFLExTestView));
if (!pDocTemplate)
return FALSE;
AddDocTemplate(pDocTemplate);
//…
}
SFLFluentUI
The SFLFluentUI class creates a set of default user interface elements for RibbonBar-based applications. Per Microsoft guidelines on creating a Fluent UI, all elements of the Fluent UI are created by default, except for the optional CaptionBar, which can be specified for creation.
MainFrm.h:
SFLFluentUI ui;
MainFrm.cpp
CMainFrame::InitInstance()
{
//…
EnableDocking(CBRS_ALIGN_ANY);
CMDITabInfo* pTabInfo = new CMDITabInfo();
pTabInfo->m_style =
CMFCTabCtrl::STYLE_3D_ONENOTE;
pTabInfo->m_bActiveTabCloseButton = TRUE;
pTabInfo->m_bTabIcons = FALSE;
pTabInfo->m_bAutoColor = TRUE;
pTabInfo->m_bDocumentMenu = TRUE;
if(!ui.Create(this, pTabInfo))
{
return -1;
}
// No need to handle docking calls.
// The base class does this.
}
RibbonBar Editor Support in VS 2010
As of the Stingray Studio 10.4 Release, with the support of Microsoft Visual Studio 2010, RibbonBars can be designed and edited in the 2010 IDE as a resource. The RibbonBar resource is saved in an XML format.
To load the RibbonBar that has been saved as an XML resource, the SFLFluentUI function LoadResource() can be called with the ID of the RibbonBar resource.
SFLMenuBarEx
The SFLMenuBarEx class is derived from CMFCMenuBar and replaces the SECMenuBar used in Objective Toolkit. Menubars use the Create() method for creation such as:
// CMainFrame::OnCreate()
if(!m_wndMenuBar.Create(this))
{
return -1;
}
m_wndMenuBar.SetPaneStyle(
m_wndMenuBar.GetPaneStyle()|
CBRS_SIZE_DYNAMIC|CBRS_TOOLTIPS|CBRS_FLYBY);
// Menu will not take focus on activation.
CMFCPopupMenu::SetForceMenuFocus(FALSE);
DockPane(&m_wndMenuBar);
NOTE >> All applications must have a default MenuBar created otherwise the frames will have drawing artifacts where the menu is supposed to be located. See the Tips and Troubleshooting section for applications without a menu.
SFLToolBarEx
The SFLToolBarEx class is derived from CMFCToolBar and replaces the SECToolBar and SECCustomToolBar classes in Objective Toolkit. It is no longer necessary to use the SECControlBarManager class when using the SFLToolBarEx class.
Use the Create() method to create Toolbars as such:
// CMainFrame::OnCreate()
if(!m_wndToolBar.Create(this,
WS_VISIBLE | CBRS_TOP |
CBRS_TOOLTIPS | CBRS_FLYBY |
CBRS_HIDE_INPLACE |
CBRS_SIZE_DYNAMIC | CBRS_GRIPPER |
CBRS_BORDER_3D, ID_TOOLBAR) ||
!m_wndToolBar.LoadToolBar(IDR_MAINFRAME))
{
return -1;
}
m_wndToolBar.EnableCustomizeButton(TRUE, ID_SFLEX_VIEW_CUSTOMIZE, _T(“Customize…”));
m_wndToolBar.EnableDocking(CBRS_ALIGN_ANY);
DockPane(&m_wndToolBar);
NOTE >> DockControlBar() is not used with SFLToolBarEx. Instead use DockPane() or DockPaneLeftOf().
NOTE >> A unique toolbar ID should be given to each toolbar created so that layout persistence works correctly.
SFLStatusBarEx
The SFLStatusBarEx class is derived from CMFCStatusBar and replaces the SECStatusBar class in Objective Toolkit. Use the Create() method to create StatusBars as such:
//CMainFrame::OnCreate()
static UINT indicators[] =
{
ID_SEPARATOR, ID_INDICATOR_CAPS, ID_INDICATOR_NUM, ID_INDICATOR_SCRL,
};
if(!m_wndStatusBar.Create(this) ||
!m_wndStatusBar.SetIndicators(indicators,
sizeof(indicators)/sizeof(UINT)))
{
return -1;
}
Multi-Column Vertical Toolbars
As of the Stingray Studio 11.0 (CD55) release, Multi-Column Vertical Toolbars are available that allow setting the number of columns displayed in a toolbar when docked vertically.
NOTE >> When multi-column vertical toolbars are used, chevrons and separators are disabled and not visible.
To enable multiple vertical columns on a SFLToolBarEx toolbar, call the following function to set the number of vertical columns:
SetColumnCount(UINT iNumColumns)
The maximum number of vertical columns is defined by SFLEX_MULTI_COLUMN_TOOLBAR_MAX in SflToolBarEx.h. The maximum number of columns less than or below the defined internal max can be set by calling:
SetMaxColumnCount(UINT iMaxNumColumns)
Auto Recovery Features
In Stingray Studio Release 10.4, along with support for Microsoft Visual Studio 2010, Auto Recovery features were added that allow an application to restart and recover data after an unexpected application crash.
NOTE >> The Auto Recover and Restart features are supported only on Microsoft Visual Studio 2010 and higher.
EnableRestartManager(DWORD dwRestartFlags)
In the SFLWinAppEx class is a function called EnableRestartManager() that takes a set of flags as the argument. These flags specify how the restart behavior will work. These flags are listed as follows:
// Definitions from afxwin.h-------------------------------------
// Restart Manager support flags
//#define AFX_RESTART_MANAGER_SUPPORT_RESTART 0x01 // restart support, means application is registered via RegisterApplicationRestart
//#define AFX_RESTART_MANAGER_SUPPORT_RECOVERY 0x02 // recovery support, means application is registered via RegisterApplicationRecoveryCallback
//#define AFX_RESTART_MANAGER_AUTOSAVE_AT_RESTART 0x04 // auto-save support is enabled, documents will be autosaved at restart by restart manager
//#define AFX_RESTART_MANAGER_AUTOSAVE_AT_INTERVAL 0x08 // auto-save support is enabled, documents will be autosaved periodically for crash recovery
//#define AFX_RESTART_MANAGER_REOPEN_PREVIOUS_FILES 0x10 // reopen of previously opened documents is enabled, on restart all previous documents will be opened
//#define AFX_RESTART_MANAGER_RESTORE_AUTOSAVED_FILES0x20 // restoration of auto-saved documents is enabled, on restart user will be prompted to open auto-saved documents intead of last saved
//#define AFX_RESTART_MANAGER_SUPPORT_NO_AUTOSAVE AFX_RESTART_MANAGER_SUPPORT_RESTART | AFX_RESTART_MANAGER_SUPPORT_RECOVERY | AFX_RESTART_MANAGER_REOPEN_PREVIOUS_FILES
//#define AFX_RESTART_MANAGER_SUPPORT_ALL_ASPECTS AFX_RESTART_MANAGER_SUPPORT_NO_AUTOSAVE | AFX_RESTART_MANAGER_AUTOSAVE_AT_RESTART | AFX_RESTART_MANAGER_AUTOSAVE_AT_INTERVAL | AFX_RESTART_MANAGER_RESTORE_AUTOSAVED_FILES
//#define AFX_RESTART_MANAGER_SUPPORT_RESTART_ASPECTSAFX_RESTART_MANAGER_SUPPORT_RESTART | AFX_RESTART_MANAGER_AUTOSAVE_AT_RESTART | AFX_RESTART_MANAGER_REOPEN_PREVIOUS_FILES | AFX_RESTART_MANAGER_RESTORE_AUTOSAVED_FILES
//#define AFX_RESTART_MANAGER_SUPPORT_RECOVERY_ASPECTSAFX_RESTART_MANAGER_SUPPORT_RECOVERY | AFX_RESTART_MANAGER_AUTOSAVE_AT_INTERVAL | AFX_RESTART_MANAGER_REOPEN_PREVIOUS_FILES | AFX_RESTART_MANAGER_RESTORE_AUTOSAVED_FILES
By default the Restart Manager / Auto Recovery features are enabled when using the SFLWinAppEx class’s Initialize() function. Set the bRestartManager parameter to TRUE. To change this behavior, override the EnableRestartManager() function in your derived application class.
InitRestartManager()
The function InitRestartManager() is called if the bRestartManager parameter of the SFLWinAppEx::Initialize() function is set to TRUE. By default, this option is set to TRUE to enable Restart Manager / Auto Recovery features.
RestartMgrEx Sample
The sample RestartMgrEx10 located in the <StingrayInstallDir>\Samples\FoundationEx directory demonstrates the functionality of the Restart Manager / Auto Recovery. The sample allows you to type some text in the document, and then after 60 seconds to crash the application by pressing a button. The application asks if you want to restart and shows you any available document recovery options.
Windows 7 Taskbar Features
In the Stingray Studio 10.4 Release, with the support of Microsoft Visual Studio 2010, features for supporting the Windows 7 Taskbar where added. These features allow applications running on Microsoft Windows 7 to show in the taskbar: icon overlays, progress bars, and jump list options.
SFLTaskbarMgr
The class SFLTaskbarMgr located in <StingrayInstallDir>\Include\FoundationEx\Manager supports the functionality for Windows 7 taskbars. This class supports icon overlays, progress bar states, and jump lists. The frame classes SFLFrameWndEx and SFLMDIFrameWndEx contain a member called GetTaskbarMgr() which should be used to access the single instance of the SFLTaskbarMgr class.
Icon Overlay
Icon overlays are icons that display over the top of the Windows 7 taskbar section for the running application. Icons are normally used to indicate to the user the state of the application, such as an information symbol or error symbol. Functions are available for setting and getting the taskbar icon.
Progress State
Progress state of the application can also be displayed in the Windows 7 taskbar of the running application. Progress can indicate the position from 0 to 100 in a normal, indeterminate, error, paused or no state. The flags for progress states are defined as follows:
TBPF_NOPROGRESS = 0
TBPF_INDETERMINATE = 0X1
TBPF_NORMAL = 0X2
TBPF_ERROR = 0X4
TBPF_PAUSED = 0X8
To set the state of the taskbar progress, call GetTaskbarMgr()->SetProgressBarState() in the application’s frame class with the appropriate flag.
Progress Position
Progress position of the application can also be displayed in the Windows 7 taskbar of the running application. Normally this is used to indicate the status of a running task such as loading a file. To set the position of the taskbar progress, call GetTaskbarMgr()->SetProgressBarPosition() from the application’s frame class with the appropriate position.
Jump List File Registration
A file type of any extension can be associated with the Windows 7 taskbar for the application. To register a file type with the application call GetTaskbarMgr()->RegisterFileType() with the appropriate file type parameters. This function calls the SFLFileRegistrationMgr helper class internally.
Jump List Frequent / Recent Categories
Frequent and Recent categories can also be added to the application’s taskbar jump list. To add a frequent or known category to the jump list call GetTasbarMgr()->AddKnownCategory() with the flags for recent or frequent categories. The flags are defined as:
KDC_FREQUENT
KDC_RECENT
Jump List Tasks and Icon Paths
Tasks and Icon Paths can also be added using the functions GetTaskbarMgr()->AddTask() and GetTaskbarMgr()->AddDestination(). Once the final jump list is set up, it must be committed by calling GetTaskbarMgr()->CommitList().
Taskbar Sample
The Win7TaskbarEx10 sample, located in the <StingrayInstallDir>\Samples\FoundationEx directory, demonstrates how to use the features of the SFLTaskbarMgr class.
Cache Classes
The FoundationEx library has three Cache helper classes for keeping track of items in a list and their frequency of usage. The classes are independent helper classes for managing caches. Use them individually to manage caches of items. As described later, the SFLFluentUI class makes use of the LRUCache to implement a Most Recently Used Ribbon Command Panel. The Cache classes are:
LRUCache
MRUCache
RandomCache
The implementations for the Cache classes are located in: <StingrayInstallDir>\Include\FoundationEx\Utils\SflCache.h.
Subsequent cache classes are derived from the SFLCache class.
LRUCache
The LRUCache is used for removing Least Recently Used items from a cache of items when the cache has reached its maximum limit. Items that are stored in the cache are added in such a manner that the least recently used items are removed from the list if the maximum capacity is reached.
MRUCache
The MRUCache is used for removing Most Recently Used items from a cache of items when the cache has reached its maximum limit. Items that are stored in the cached are added in such a manner that the most recently used items are removed from the list if the maximum capacity is reached.
RandomCache
The RandomCache is used for removing Random items from a cache of items when the cache has reached its maximum limit. Unlike the most or least recently used caches, the Random cache can select a random item to remove. Items that are stored in the cache are added in such a manner that a random item is removed from the list if the maximum capacity is reached.
Most Recently Used Controls RibbonBar Panel
The SFLFluentUI class from the FoundationEx library allows placement of frequently used controls in a panel on the RibbonBar. This RibbonBar panel is commonly referred to as the Most Recently Used panel or MRU panel.
Internally, the SFLFluentUI class uses an LRUCache. In order to preserve the Most Recently Used items in the panel, the Least Recently Used item(s) are removed. If a MRUCache was used then the Most Recently Used Items would be removed from the cache leaving the Least Recently Used Items left over in the panel, which is incorrect for this panel.
Sample:
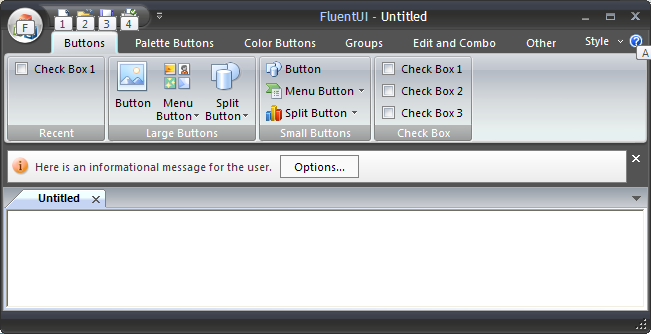
The FluentUI sample demonstrates the features of the Most Recently Used Command Panel. The FluentUI sample is located in the <StingrayInstallDir>\Samples\FoundationEx\FluentUI directory.
The FluentUI sample has a RibbonBar with several categories for different types of controls. Categories include: Buttons, Palette Buttons, Color Buttons, Groups, Edit, Combo, and Other. Different types of controls can be added to the Most Recently Used Command Panel.
The following control classes can be added to the SFLFluentUI Most Recently Used Command Panel:
CMFCRibbonButton
CMFCRibbonCheckBox / SFLRibbonCheckBoxEx
CMFCRibbonEdit / SFLRibbonEditEx
CMFCRibbonComboBox
CMFCRibbonFontComboBox / SFLRibbonFontComboBoxEx
CMFCRibbonGallery / SFLRibbonGalleryEx
CMFCRibbonColorButton / SFLRibbonColorButtonEx
CMFCRibbonLinkCtrl
CMFCRibbonButtonsGroup
CMFCRibbonSlider / SFLRibbonSliderEx
Most Recently Used Command
There are two methods of creating the SFLFluentUI class depending on which compiler you are using.
MainFrm.h
class CMainFrame
{
//…
SFLFluentUI ui;
//…
};
MainFrm.cpp
int CMainFrame::OnCreate(LPCREATESTRUCT lpCreateStruct)
{
//…
#if (_MSC_VER >= 1600)
if(!ui.CreateAndLoadFromResource(this, &mti, IDR_RIBBON_GADGETS, TRUE, TRUE, TRUE, TRUE, TRUE, TRUE))
{
TRACE("Unable to create SFLFluentUI\n");
return -1;
}
#else
if(!ui.Create(this, &mti, TRUE, TRUE, TRUE, TRUE))
{
TRACE("Unable to create SFLFluentUI\n");
return -1;
}
InitRibbon();
ui.EnableFreqCmdPanelPostCreation();
ui.LoadState();
ui.Refresh();
#endif
//…
}
As of Microsoft Visual Studio 2008 (VC9), the SFLFluentUI class is created with the call to Create() or CreateAndInitialize(). If just using Create(), you must manually set up the first Panel in each category of the RibbonBar to be the Frequently Used Panel. In the sample above this is manually done in the InitRibbon() call. After the Frequently Used Panel is created, call EnableFreqCmdPanelPostCreation(), which will go through and set up the panel.
If using the CreateAndInitialize() call, the 8th parameter should be set to TRUE for creating the Frequently Used Panel. The call to CreateAndInitialize() automatically creates a first panel in each category of the RibbonBar as a Frequently Used Panel.
As of Microsoft Visual Studio 2010 (VC10), you create the SFLFluentUI class in the exact same way as in Microsoft Visual Studio 2008 SP1. In addition, there is an option to load a RibbonBar from a resource file. In the example above CreateAndLoadFromResource() is called with a resource ID of IDR_RIBBON_GADGETS.
Weighted Values and Capacity
The controls placed in the panel are weighted based on the number of times the control is used. A maximum capacity is set to a default of 10 controls. The default capacity can be changed by calling SetFrequentCmdsMax(UINT uiMax). For example: ui.SetFrequentCmdsMax(20).
Adding a Recent Command
For each control on the RibbonBar that you would like to have added to the Most Recently Used Command Panel when it is used, call AddRecentCommand() with the resource ID of the control. It is recommended that this be done through an ON_COMMAND() handler.
Example:
ON_COMMAND(ID_CHECK_1, &CMainFrame::OnCheck1)
void CMainFrame::OnCheck1()
{
ui.AddRecentCommand(ID_CHECK_1);
}
Clearing Recent Commands
The entire Most Recent Command command panel can be cleared by calling the function ClearRecentCommands().
Saving Current Commands to the Registry
Commands from the current session can be saved to the registry by calling the function SaveState().
Loading Previous Commands from the Registry
Commands from a previous session can be loaded from the registry by calling the function LoadState().
Most Recent
If you wish to force a redraw of the Most Recent Command Panel, call the function RedrawRecentCommandPanel(). Pass TRUE as the parameter to redraw the items based on the commands stored in the Registry.
Resetting the Frequent Command Panel
The Most Recent Command Panel can be reset back to zero controls in the panel by calling the function ClearRecentCommands().
Custom Theme Colors
As of the Stingray Studio 11.0 (CD55) release, there is the ability to tweak the colors of the theme styles, with some exceptions, to the Office 2007 styles. Theme colors can be saved and loaded from an INI file.
As of the Stingray Studio 11.3 (CD58) release, the SflColorPropertiesWndEx class has been moved from the StyleEditorEx Sample into the SFLEx library. This allows the end-user the ability to simply create and use the color property docking window in any of their applications.
StyleEditorEx Sample
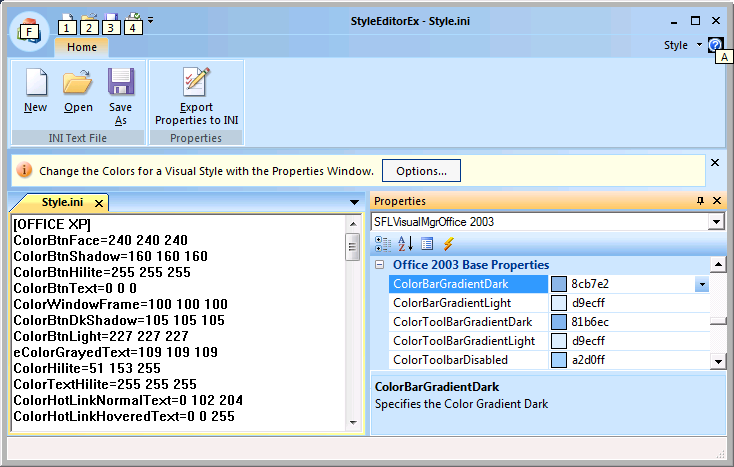
Theme colors are edited using the Stingray Studio StyleEditorEx sample, which is located in the <StingrayInstallDir>\Samples\FoundationEx\StyleEditorEx directory.
The left pane is an INI file of the properties of the sample when the application is loaded.
NOTE >> If you change the theme to a new theme style via the ‘Style’ menu in the upper right corner, the current INI file will no longer reflect the color values of the new theme. To load a new text file of the current colors, choose the ‘New’ button in the ribbon bar.
The right pane contains a properties window with the colors of the current color parts of the current theme. The name of the color part is in the left section of the properties window and the color value is in the right section of the properties window.
Editing Theme Colors
Changing the color with the associated color part in the properties window updates the corresponding part in the application. For example, with the Office 2003 style currently selected, if you change the ColorBarFace to a color of 800080, ColorBarGradientDark to a color value of 5757ff, and the ColorToolBarGradientDark to 800000, you would get a application which looks like this:
Also, you can change the colors of the color parts directly via the INI text file in the left window. However, these changes will not take effect until the text file is saved and reloaded. See below.
Note about Office 2007 Colors
The Office 2007 theme colors are customizable to an extent. The contents of ribbon bar categories and panels are saved in an XML format that is not recognized by the custom theme colors INI at this time. Any changes made to these color parts will be overwritten with their default MFC colors for the corresponding Office 2007 theme.
Saving Theme Colors via an INI Text File
If you’ve make changes in the properties pane, it does not update the Style.ini text file that is displayed in the left window. To refresh the Style.ini file with the current color settings of the application, close the Style.ini file and then select the ‘New’ button from the ribbon bar to open a new Style.ini file. This new file will display the current color settings.
If you’ve changed the values of the colors directly in the Style.ini text file, the changes will not take effect until they are saved and reloaded.
To save the Style.ini text file, select the ‘Save As’ button on the Ribbon Bar or select ‘Save As’ from the application menu. You are prompted for a name and location to save the file. If you choose, you can overwrite an existing INI file with new values.
Exporting Theme Colors from the Properties Window
If you’ve made changes to the theme colors via the Properties window, you can export these changes directly to an INI text file by clicking on the ‘Export Properties to INI’ button on the ribbon bar. You are prompted for a name and location to save the file. If you choose, you can overwrite an existing INI file with new values.
In order to programmatically export theme data to an INI file in your own application, use code similar to that found in the StyleEditorEx class’s OnExportProperties() method:
MainFrm.cpp
void CMainFrame::OnExportProperties()
{
CString strFilter = _T("Style Files (*.ini)|*.ini|All Files (*.*)|*.*||");
CFileDialog fileDlg(FALSE, ".ini", NULL, 0, strFilter);
if(fileDlg.DoModal() == IDOK)
{
// Create file if it does not exist.
CFile f;
f.Open(fileDlg.GetPathName(), CFile::modeCreate | CFile::modeWrite);
f.Close();
// Now actually save the data.
CString strPath = fileDlg.GetPathName();
theApp.SaveApplicationStyle(strPath);
}
}
Similarly, you may want to investigate the code in the OnClose() method for how to save an INI for the application upon closing.
Loading Theme Colors via an INI Text File
After you have saved a custom theme to an INI file, it can be loaded into the sample by clicking the ‘Open’ button and choosing the INI file to load.
To programmatically load an INI file in your own application, use code similar to that found in the StyleEditorEx class’s OnFileOpen() method:
StyleEditorEx.cpp
void CStyleEditorExApp::OnFileOpen()
{
//SFLWinAppEx::OnFileOpen();
CString strFilter = _T("Style Files (*.ini)|*.ini|All Files (*.*)|*.*||");
CFileDialog fileDlg(TRUE, ".ini", NULL, 0, strFilter);
if( fileDlg.DoModal() == IDOK )
{
CString strPath = fileDlg.GetPathName();
if(theApp.LoadApplicationStyle(strPath))
{
AfxGetApp()->OpenDocumentFile(strPath);
CMFCVisualManager* pVisualMgr = CMFCVisualManager::GetInstance();
if(pVisualMgr)
{
pVisualMgr->RedrawAll();
}
}
}
}