Step 2: Adding the Ability to Read Tab-Delimited Data Files
All spreadsheets are able to output their data in the form of a tab-delimited text file. This file contains a snapshot of the grid or spreadsheet surface. It very often includes row and column headers and even a spreadsheet name.
As its name suggests, the tab-delimited file contains groups of text or numerical data that are horizontally separated from one another by tab characters.
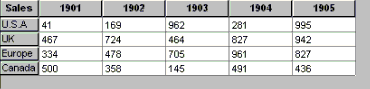
The Objective Grid shown below produces the tab-delimited file below on demand by exporting its contents as text to a file.
Table 3 – Tab-delimited output file
Sales | 1901 | 1902 | 1903 | 1904 | 1905 |
U.S.A | 41 | 169 | 962 | 281 | 995 |
UK | 467 | 724 | 464 | 827 | 942 |
Europe | 334 | 478 | 705 | 961 | 827 |
Canada | 500 | 358 | 145 | 491 | 436 |
Others | 169 | 464 | 961 | 436 | 292 |
Notice how the row and column headers are exported and how the numbers are separated from one another.
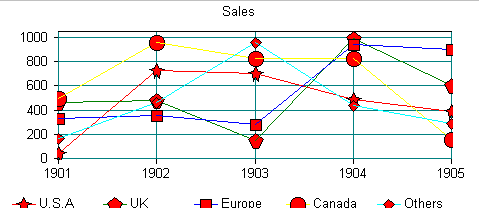
Objective Chart can read this data and convert it to a fully annotated graph using the row and column headers to produce legend keys, x-axis labels, and the graph’s title.
In this section, we will change the existing chart application to accept this kind of text file and produce a formatted chart with a title and legend. Again, you can either follow along and build your own application from scratch, or you can open the sample tutorial project
...\Chart\tutorial\tutorial\Steps\Step2, available from the Rogue Wave Web site, as explained in
“Location of Sample Code” in the
Getting Started part.
In the following subsections, you will:
• Add text file handles to the document.
• Read the tab delimited file.
• Reassess the ChartApp’s capabilities.
Adding Text File Handling to the Document
In Step 1, we made the OnNewDocument() function build an empty document with a basic graph and some dummy data. We must now change it to build our basic component structure. Modify the OnNewDocument() command again.
BOOL CChartAppDoc::OnNewDocument()
{
if (!CDocument::OnNewDocument())
return FALSE;
// In this example, we add graph elements with fixed vertical sizes
// just for demonstration purposes.
// create a title component
SRGraphTitle *pTitle=new SRGraphTitle;
// use percent measurement
pTitle->SetMeasurement(CX_PERCENT);
// title use the top 10 percent of the client area
pTitle->SetRect(-1,-1,-1,10);
//add the title to the component list
m_Graph.AddComponent((SRGraphComponent *)pTitle);
// build a display component
SRGraphDisplay *pDisplay=new SRGraphDisplay;
// just a simple line graph
pDisplay->GetStyle()->SetGraphStyle(CX_GRAPH_LINE);
// with a classic axis
pDisplay->GetStyle()->SetAxisStyle(CX_AXIS_CLASSIC);
// use percent measurement
pDisplay->SetMeasurement(CX_PERCENT);
// occupying the middle 80 percent of the client area
pDisplay->SetRect(-1,10,-1,90);
// add the display to the list
m_Graph.AddComponent((SRGraphComponent *)pDisplay);
// next, create a legend
SRGraphLegend *pLegend=new SRGraphLegend;
// use percent measurement
pLegend->SetMeasurement(CX_PERCENT);
// legend use the bottom 10 percent of the client area
pLegend->SetRect(-1,90,-1,-1);
// put legend key first
pLegend->GetStyle()->SetLegendKeyFirst(TRUE);
// add the legend to the list
m_Graph.AddComponent((SRGraphComponent *)pLegend);
return TRUE;
}
Here the three components have been added to the graph structure. The title component will take its text from the title of the grid, if there is one. The data will be displayed as before but using the values loaded from the file. The legend looks at the display’s parameters to decide what keys it will show.
Reading the Tab Delimited File
The SRGraph::ParseText() function decodes tab delimited files. Pull the text off the disk and send it to the SRGraph object. This process is not the same as serialization, which saves or loads all of the objects and data structures for the document. For this reason, rather than use OnOpenDocument or a similar built-in function, we will add a Read Text menu item and handler.
Using the resource editor, add a menu item called Read Text... to the File menu of the IDR_CHARTATYPE menu. Set the command ID to ID_FILE_READTEXT. You may want to duplicate the item prompt as well, which is:
"Read Tab Delimited file\nReadText"
Note that there is provision for a tool tip for an optional toolbar button.
In the document, add a command handler for the ID_FILE_READTEXT menu item. To the menu handler we will add a File Open dialog, followed by a piece of code that loads the file into memory and passes the text to the SRGraph::ParseText() routine:
void CChartAppDoc::OnFileReadtext()
{
if(!m_Graph.GetDataList()->IsEmpty())
return; // we only load data once for this example
CFileDialog dlg(TRUE,".TXT",NULL,0l,
"Text files (*.txt)|*.txt||",NULL);
if(dlg.DoModal()==IDOK)
{
HGLOBAL hMem; // A global memory handle.
DWORD dwFileSize;
// read the file into a global memory block
TRY {
CFile f(dlg.GetPathName(),CFile::modeRead);
dwFileSize=f.GetLength();
hMem=GlobalAlloc(GMEM_MOVEABLE | GMEM_ZEROINIT,
dwFileSize);
if(hMem==NULL)
{
f.Close();
AfxMessageBox("Error allocating memory for text file");
return;
}
void *pMem=GlobalLock(hMem);
if(pMem==NULL)
{
f.Close();
GlobalFree(hMem);
AfxMessageBox("Error while locking memory for text file");
return;
}
f.ReadHuge(pMem,dwFileSize);
f.Close();
// pass the text to the graph object
m_Graph.ParseText((LPCSTR)pMem);
GlobalUnlock(hMem);
GlobalFree(hMem);
}
CATCH(CFileException,e)
{
AfxMessageBox("Error loading file");
}
END_CATCH;
UpdateAllViews(NULL);
}
}
After the tab-delimited text file is read into memory, the simple call to ParseText() processes it, extracts labels and data, and adds the values to the graph. The call to UpdateAllViews() causes the graph with the new data to be displayed when the view is redrawn. The figure below shows our chart with some test data.
Reassessing the ChartApp’s Capabilities
In addition to the capabilities listed for Step 1, ChartApp now has the following features:
• It can load in any tab-delimited spreadsheet file and display its data in a graph.
• The ParseText() routine automatically reads the title from the top-left text string.
• The column headers are used to annotate the x-axis (or other axis depending on the chosen graph type).
• The row headers are used to annotate the groups and, in turn, the legend keys.
The ParseText() function also does sensible things with items that are not understood as numbers. For example, if a column contains names or addresses, a data entry is created, but the data value is flagged as null and isn’t used in the chart.
NOTE >> Some chart types, particularly the scatter charts, require certain data items. If null data is found where a valid number is required, chart exceptions may occur.
Before we leave this tutorial section, let’s review the chart components that have been used in this sample program.
Our first component is SRGraphTitle. Note how its rectangle has been programmed to place the title into the top 10 percent of the client area. The top, left, and right rectangle parameters were set to –1. As a result, they will automatically snap to their window edges. The bottom remains at position 10 percent of the height of the client area. SRGraphTitle uses the title stored in its owner or parent graph object to make the title text. Specify a title in the grid text file. This example demonstrates the component’s GetParentContent() function in action.
As in Step 1, we added an SRGraphDisplay to our component list. This display component also uses the abilities of its SRGraphRect member to fit the chart into a band from 10 percent position to 90 percent position vertically and to take all available space horizontally. The display component performs the most interesting work in positioning and drawing of axes and data elements.
Finally, the legend is programmed to take up all available space below 90 percent position. The SRGraphLegend is placed onto the component list immediately after the SRGraphDisplay; doing so allows the legend to obtain important information from the display component and automatically configure itself to use the same scope as the display. The scope is the rectangular area of data upon which a component works. For example, a chart may have a data array of 10*10 items, but a particular display may only use a 3*5 area of the array.
The legend shows legend keys for this chart as the same colored polygonal objects (called wigets) used in the chart. You may be interested to see that if you change the chart style, the legends also change style accordingly. For example, for a bar graph, the legend keys are small rectangles. You can change the chart style by invoking the Chart Editor and double clicking on the display component. Choose a new graph style and axis style property.