1stGrid - Step 1
Step 1 will guide you through the process of creating a skeleton application using a CGXGridView-derived view class.
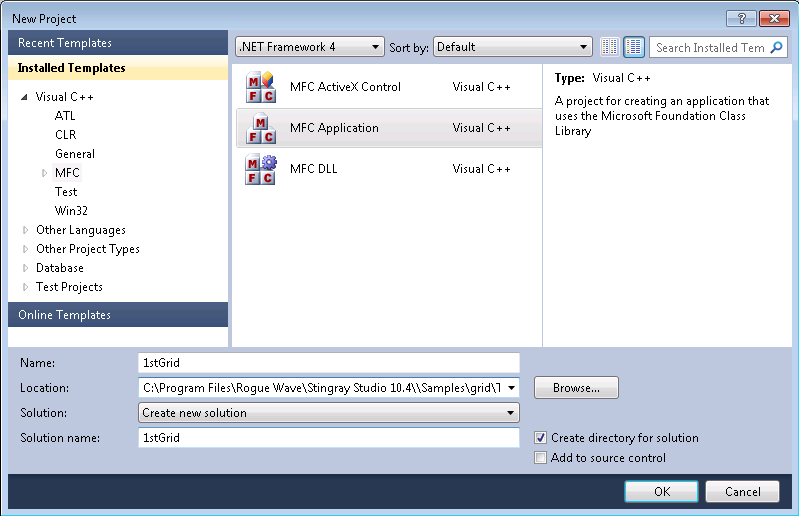
Create a New 1stGrid Project
1. Start up Microsoft Visual Studio.
2. Select File|New | Project from the menu.
3. The New dialog box appears.
4. In the dialog, select the Visual C++ Projects folder.
5. Enter 1stGrid for the Project name and <stingray-installdir>\Samples\Grid\Tutorial\1stgrid\1stgrid for the Location.
6. Select MFC Application from the Templates list box.
7. Click OK.
1stGrid AppWizard Options
1. The MFC Application Wizard dialog box will appear.
You can scan through the settings by clicking the links, or click Finish at any time to create the project.
2. Open Application Type page, then:
— Uncheck Tabbed documents.
— Select MFC standard for Project style.
— Uncheck Enable visual style switching.
— Select Windows Native/Default for Visual style and color.
— Uncheck Use Unicode libraries.
— Click Finish.
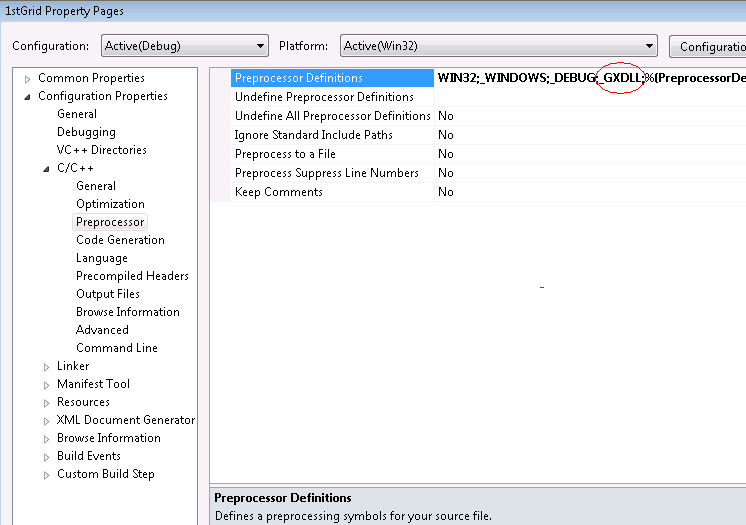
1stGrid Project Settings
This step specifies that the application should use Objective Grid as a shared library. You should skip this step if you want to link statically to the Objective Grid libraries.
1. Select View|Solution Explorer from the menu.
2. The Solution Explorer docking view appears.
3. Right click on 1stgrid and select Properties.
4. Expand the C/C++ node and select Preprocessor. Add _GXDLL to the Preprocessor definitions. This step indicates that the application will link dynamically to Objective Grid. Do not specify _GXDLL if you wish to link to Objective Grid as a static library. _GXDLL is similar to the _AFXDLL preprocessor in that _AFXDLL specifies that the application will link to MFC as a dynamic library.
5. Click OK.
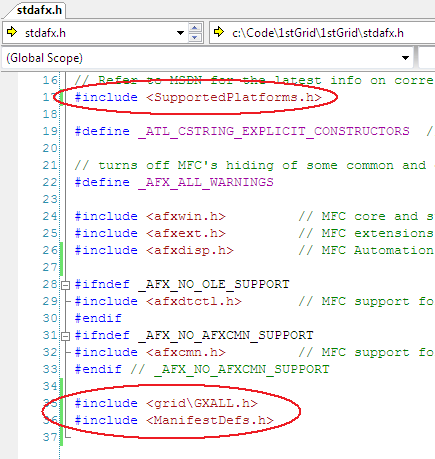
Modify 1stGrid's stdafx.h
1. Open stdafx.h.
2. Add the following lines:
— Add #include <grid\GXALL.h> at the end of the includes in this file.
GXALL.h is the core Objective Grid header file. Once this file is added, all required classes are available to you inside your application. This is similar to including afx*.h.
— Add #include <ManifestDefs.h> again at the end of the includes.
This file facilitates the inclusion of manifest definitions for Windows Visual Styles.
— Add #include <SupportedPlatforms.h> at the top of the includes.
The conditional platform information is displayed in the application's output window. The output information is helpful when developing and deploying across one or more platforms.
3. Save and close stdafx.h.
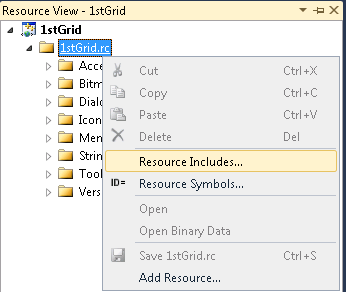
Include Objective Grid Resources in 1stGrid
Including the Objective Grid resource header file in your application's resource script gives your application access to the Objective Grid Resources. When linking statically to the Objective Grid libraries, it is also necessary to include the Objective Grid resource script. The following steps demonstrate how to add the Objective Grid resource files to your project.
1. Open the Resource View in Microsoft Visual Studio.
2. Select the root of the Resource View tree (1stGrid.rc) and click with the right button on your mouse.
A context menu pops up.
3. Choose Resource Includes.
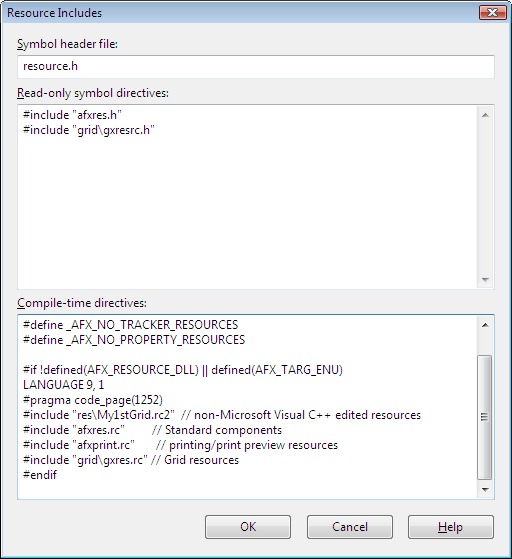
4. The Resource Includes dialog box appears.
5. Add the following line to the Read-only symbol directives box.
#include "grid\gxresrc.h"
6. Add the following line to the end of the Compile-time directives box.
#include "grid\gxres.rc"
NOTE >> Skip this step if your application is linking to Objective Grid as a shared library (DLL). Including the following file will not upset the function of your application, but it will cause unnecessary bloat to the final application file size. The Objective Grid resources are already included in Objective Grid DLLs and therefore do not need to be included in the application.
7. Click OK.
8. A message box pops up warning you that the "Directive text will be written verbatim into your resource script and may render it uncompilable." This is fine. You can safely choose OK.
9. Save 1stGrid.rc (press CTRL+S).
Modify the 1stGrid Application Implementation File
GXInit() initializes resources and variables used by Objective Grid. It should be called from your application's InitInstance() to be sure Objective Grid is initialized before calling any Objective Grid functions. For more information about GXInit(), please refer to the Objective Grid Class Reference.
1. Open 1stgrid.cpp and search for InitInstance().
2. Add the following two lines to the beginning of InitInstance():
// This call will initialize the grid library
GXInit();
3. Save and close 1stGrid.cpp.
Modify 1stGrid View's Header File
In this step, the application's view class is changed from a CView derivative to a CGXGridView derivative.
1. Open 1stGridView.h.
2. Change the derivation of the view by replacing all occurrences of CView with CGXGridView.
3. Save and close 1stGridView.h.
Modify 1stGrid View's Implementation File
This step modifies the OnDraw(), OnBeginPrint(), and OnEndPrinting() methods to call the CGXGridView base class versions. This is essential for the Objective Grid view to work properly.
Note: You need to uncomment the parameter names for OnDraw(), OnBeginPrinting() and OnEndPrinting().
1. Open 1stGridView.cpp.
2. Replace all occurrences of CView with CGXGridView.
3. Modify OnDraw() to call the CGXGridView implementation by replacing the // TODO: … line with:
// Delegate drawing to the base class
CGXGridView::OnDraw(pDC);
4. Modify OnBeginPrinting(…) to call the CGXGridView implementation by replacing the // TODO: … line with:
CGXGridView::OnBeginPrinting(pDC, pInfo);
5. Modify OnEndPrinting(…) to call the CGXGridView implementation by replacing the // TODO: … line with:
CGXGridView::OnEndPrinting(pDC, pInfo);
6. Save 1stGridView.cpp.
Override CMy1stGridView::OnInitialUpdate()
OnInitialUpdate() is the primary location for initializing the grid object.
1. Select View|Class View from the menu.
2. Select the CMy1stGridView node under 1stGrid.
3. Right click on CMy1stGridView and select Properties.
4. Click Overrides in the properties box.
5. Select <Add> OnInitialUpdate from the OnInitialUpdate field pull down combo box.
6. The OnInitialUpdate() member function is added to the CMy1stGridView class.
7. Replace the existing OnInitialUpdate() function with the following:
void CMy1stGridView::OnInitialUpdate()
{
// Call the base class OnInitialUpdate. This call is
// essential for grid specific intialization (In
// contrast to GXInit which performs application specific
// intialization)
CGXGridView::OnInitialUpdate();
// Disable Undo mechanism for the following commands.
// Objective Grid has a built in Undo/Redo architecture
// that can be disabled/enabled with this call.
// We disable it here so that users are not able to
// rollback changes that we make in code.
GetParam()->EnableUndo(FALSE);
// Initialize grid with 30 rows and 10 columns
SetRowCount(30); // 30 rows
SetColCount(10); // 10 columns
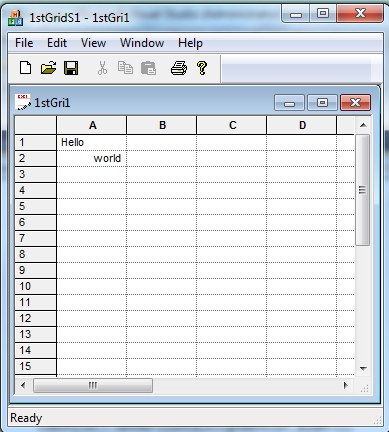
// Display "Hello world" in the first two cells. A
// range in the grid is simply an object that is a range
// of cells defined by four coordinates (top, left,
// bottom, right)
SetValueRange(CGXRange(1, 1), "Hello");
// SetValueRange() is the call that is to be used to
// set simple text to grid cells.
SetValueRange(CGXRange(2, 1), "world");
// "world" should be displayed right aligned.
// SetStyleRange() is to be used to set other formatting,
// control type, etc... along with the value
SetStyleRange(CGXRange(2,1),
CGXStyle().SetHorizontalAlignment(DT_RIGHT));
// Re-enable undo mechanism
GetParam()->EnableUndo(TRUE);
}
8. Save and close 1stGridView.cpp.
Compile and Run 1stGrid - Step 1
If you are using Visual Studio 2010, you must add the user property sheet that defines paths needed by the project.
1. Open the Propery Manager and expand the 1stGrid node to see the available build configurations.
2. Right click on Debug|Win32 (or whatever configuration you want ot build with), and select Add Existing Property Sheet ...
3. Navigate to the file SS-Win32-PropSheets.props in <stingray-installdir>\src and add this file to the project.
To complete this first step in the tutorial:
1. Compile the application and run it.
2. Interact with the grid object in the view.
NOTE >> If the tutorial is run under Windows XP, the VC++ Application Wizard, by default, enables the XP Visual Styles. The Application Wizard does this by including a manifest resource pointing the application to
COMCTRL32.DLL ver 6.0. If you would like the grid to work with XP Visual Styles, or any of the other supported Visual Styles, please refer to
“Vista Look and Feel.”