
Section 3.4 explained the general questions which you must always answer when creating a buildspec.
This section explains questions that only appear when specific modules are included in a buildspec. Some of the questions listed in this section are only displayed if advanced questions are set to be available.
These modules generate additional build option questions:
Essential Tools Module (see Section 3.5.1)
Internationalization Module (see Section 3.5.2)
Threads Module (see Section 3.5.3)
Secure Communication Module (see Section 3.5.4)
DB Modules (see Section 3.5.5)
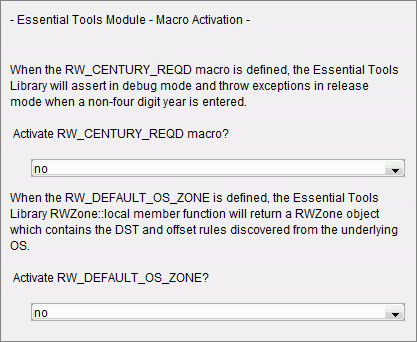
This screen provides choices on how to set two macros that affect the behavior of the Essential Tools Module.
This is an advanced question that is only visible when the Show advanced questions box is selected on the Options dialog's Advanced Questions tab.
Enabling the RW_CENTURY_REQD macro causes a debug assertion in debug mode or an exception in release mode if a non-four-digit year is entered. This is useful mainly for debugging. The default setting is no.
Enabling the RW_DEFAULT_OS_ZONE macro causes the RWZone class to use information obtained from the operating system, rather than from hard-coded rules in the RWZone code.
The Internationalization Module is dependent on the IBM International Components for Unicode (ICU). RCB asks two questions regarding your copy of the ICU.
When installing the Internationalization Module, you must select whether you want to use an ICU installation provided by Rogue Wave or an ICU that is already installed on your machine.
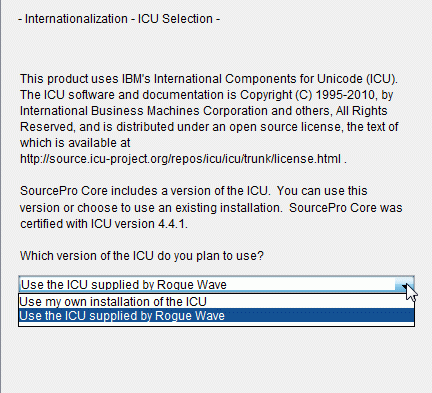
If you select Use the ICU supplied by Rogue Wave, RCB will automatically find the path to the ICU installation. If you choose Use my own installation of the ICU, you must specify the path. The default value is Use the ICU supplied by Rogue Wave.
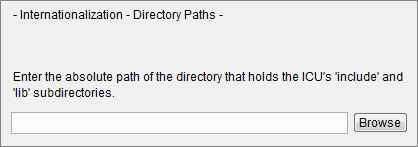
If you chose Use my own installation of the ICU, you must specify the path to the ICU installation.
When specifying the absolute path, be sure to provide the path up to, but not including, the lib and include directories. For example, use C:\icu instead of C:\icu\lib or C:\icu\include.
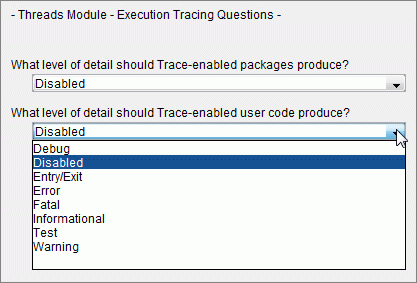
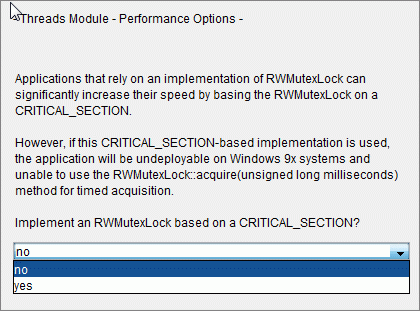
All questions related to the Threads Modules are advanced questions. They will only be visible when the Show advanced questions box is selected on the Options dialog's Advanced Questions tab.
This option sets the level of trace information produced from trace-enabled packages or trace-enabled user code.
The setting for trace-enabled packages dictates what level of trace information is produced from SourcePro C++ packages and modules that support tracing.
The setting for trace-enabled user code dictates what level of trace information is preserved for your own code.
The default setting, Disabled, preserves no tracing output, and will result in all references to the tracing package being compiled out of code. This results in smaller, faster executables at the cost of execution tracing information. Each successive level saves more information at the cost of larger executables, ending at Entry/Exit, which logs every function entry and exit. For more information about the tracing mechanism, refer to the Threads Module User's Guide.
If you are using a Windows-based operating system, you must select whether or not you want to implement an RWMutexLock based on CRITICAL_SECTION.
Applications that use this implementation can significantly increase their performance speed. However, implementing this feature will make those applications undeployable on some platforms and unable to use certain methods.
When installing the Secure Communication Module, you must select your cryptography library. Rogue Wave ships with a pre-built version of OpenSSL, or you can choose to use your own installation.
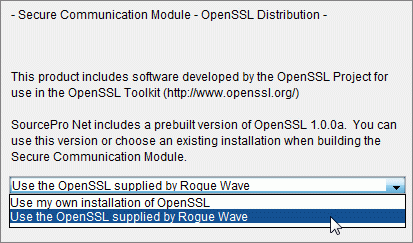
If you select the OpenSSL installation supplied by Rogue Wave, you do not need to specify its location. If you select to use your own installation of OpenSSL, the Library Location screen launches.
The Library Location screen requires you to enter the path to your cryptography library.
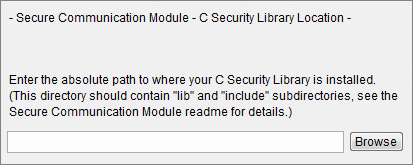
Library Path
When specifying the location of the cryptography library, be sure to provide the path up to, but not including, the lib and include directories.
For example, on a Windows platform, use D:\openssl instead of D:\openssl\include or D:\openssl\lib. On a UNIX platform, use /usr/local/openssl instead of /usr/local/openssl/lib or /usr/local/openssl/include.
Installation Directory
If your OS is Windows-based and your installation directory contains spaces, you must surround the directory with quotes to allow the Visual C++ compiler to properly parse the compile and link commands.
When specifying the C Security Library installation path, enter:
"C:\Program Files\openssl\library" |
instead of
C:\Program Files\openssl\library |
DOS 8.3 Naming
Windows provides a mechanism for replacing long directory names with their DOS 8.3 equivalent names. The command DIR /X displays a directory listing that includes the DOS 8.3 names for long directory names or directories that contain spaces. For the example above, the DOS 8.3-compatible directory is:
C:\Progra~1\openssl\library |
Note that your installation may reduce long file names in a different manner.
DIR /X gives the correct name for your installation.
RCB allows you to choose between eight different database access modules: DB2 CLI, MS SQL Server, MySQL, ODBC, Oracle OCI, PostgreSQL, and Sybase CT. When installing any of these access modules, as well as its examples, you must specify a number of fields to allow your examples to connect to a relational database server with a valid user name and password.
While each of the DB Access Modules prompts have minor differences, they follow the same pattern as the screen below.
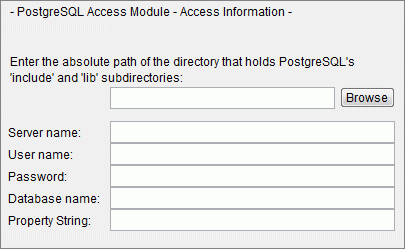
To connect your examples to the database, you must provide all required connection information. The table below lists all the potential fields that may be used when installing a DB Access Module.
Client Version Number
Specify the version of the database to be used. Some databases have multiple supported versions. Others have only one supported version.
Data Source Name
Specify the name of the database server you want to connect to.
Service Name
Specify the name of the service that you want to connect to.
Server Name
Specify the name of the database server you want to connect to.
User Name
Specify the user name to be used when logging on to the database server.
Password
Specify the password to be used when logging on to the database server.
Database Name
Specify the name of the database or server partition that you want to access.
Property String
Specify other options, such as the packet-size for the Sybase CT client. If no options are specified, leave this field blank.
If you have any questions about the required options, see the access module user's guide, located at buildspace\docs\html\<access-lib-mnemonic>ug. For example, the Oracle OCI user guide is located at buildspace\docs\html\oracleociug.
You can also access any of the documentation from the general index at buildspace\docs\html\index.html.
Information on environment variable settings for the various database clients can be found in the Building Your Applications.
For MS SQL Access Module, there is an extra option, SQL Server Client. This option can have following values:
SQL Server Driver - For building SourcePro applications with the MS SQL Server driver provided by MDAC.
SQL Native Client Driver - For building applications with SQL Native Client Driver shipped with Microsoft SQL Server . SQL Native Client SDK is required for this option. It is generally installed at the following location:
C:\Program Files\Microsoft SQL Server\100\SDK |
If this option is selected, the path to the SDK needs to be entered on the following screen.

If the build of the examples failed because of incorrect information entered for the database connection parameters, you must delete the examples directory where the failed build results were placed before you rebuild the examples. For example, if you attempted to build examples for ODBC in the 8s configuration and the build failed, you must first delete buildspace\examples\odbc\8s before you can rebuild the examples.
If you do not delete the directory, RCB fails to re-parse the connection information and continues to use the erroneous information, resulting in another failed build.
Alternatively, to rebuild the examples, do the following. Go to the build directory (for example, buildspace\examples\odbc\8s), edit the file tutdefs.h and update the values. Execute the make clean (or nmake clean) command, and then execute the make (or nmake) command.
Information about installing and building the DB XA Module is in Appendix A.
Support for the DB XA Module is available only when Rogue Wave Professional Services installs and configures the DB XA Module for specific platforms and XA-compliant Transaction Processing Monitors (TPMs). Please contact your Rogue Wave account representative for more information.
When building the Essential Math Module, you must indicate the type of Basic Linear Algebra Library to be used.
Select which Basic Linear Algebra (BLA) library to use, which is required by the Math Module.
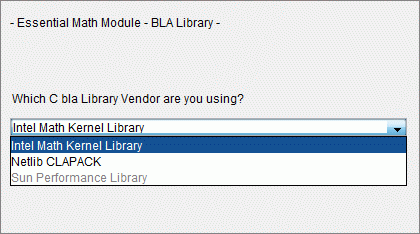
The Intel Math Kernel Library (MKL) and the Sun Performance Library (SPL) are performance-enhanced libraries for their respective platforms.
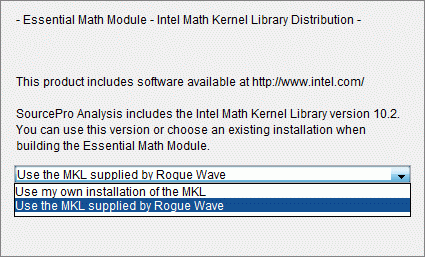
If you select the MKL, you must specify whether you want to use the version provided by Rogue Wave or a previously installed version, which is the default:
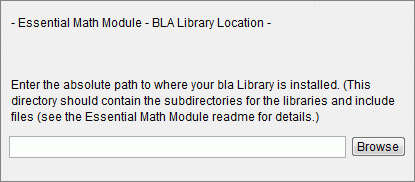
If you selected "Use my own installation of the MKL" in the MKL Selection window, specify the location of the previously installed version of MKL.
When entering the absolute path to the MKL, be sure to enter the path up to the subdirectory where the library is stored. For example, C:\program files\intel\mkl\ia32\lib.
Copyright © Rogue Wave Software, Inc. All Rights Reserved.
The Rogue Wave name and logo, and SourcePro, are registered trademarks of Rogue Wave Software. All other trademarks are the property of their respective owners.
Contact Rogue Wave about documentation or support issues.