Creating Basic 2D Plots
PV‑WAVE provides routines for plotting data in a variety of ways. These routines allow general X versus Y plots, contouring, mesh surface plots, perspective plotting, and data clipping in an extremely flexible manner without requiring you to write complicated programs. These plotting and graphic routines are designed to allow easy visualization of data during data analysis.
Optional keyword parameters and system variables allow straightforward customization of the appearance of the results: (i.e., specification of scaling, axis style, colors, etc.).
This section demonstrates how to create the following types of 2D Plots:
Linear Plots
This section illustrates the use of the basic x versus y plotting routines, PLOT and OPLOT.
The PLOT procedure produces linear-linear plots. The procedures PLOT_IO, PLOT_OI, and PLOT_OO are identical to PLOT, except they produce linear-log, log-linear, and log-log plots, respectively.
The following statements create and initialize the variables VERBM, VERBF, MATHM, and MATHF, which contain the verbal and math scores for males and females for 11 observations:
VERBM = [463, 459, 437, 433, 431, 433, 431, 428, 430, 431, 430]
VERBF = [468, 461, 431, 430, 427, 425, 423, 420, 418, 421, 420]
MATHM = [514, 509, 495, 497, 497, 494, 493, 491, 492, 493, 493]
MATHF = [467, 465, 449, 446, 445, 444, 443, 443, 443, 443, 445]
A vector in which each element contains the year of the score is constructed with the statement:
YEAR = [1967, 1970, INDGEN(9) + 1975]
The PLOT procedure, which produces an
x versus
y plot on a new set of axes, requires one or two parameters: a vector of
y–values, or a vector of
x–values followed by a vector of
y–values.
Figure 5-1: Initial 2D Plot on page 47 is produced using the statement:
PLOT, YEAR, VERBM
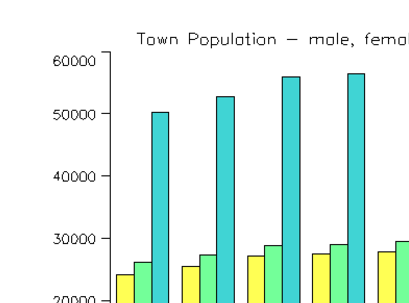
Bar Charts
Bar charts are useful in comparing a small number of measurements within a few discrete data sets. PV‑WAVE can produce many types of business-style plots with a little effort.
The following example produces a bar-style chart. The program used to draw
Bar Chart is shown below and annotated.
; Town population data
year = [1950, 1960, 1970, 1980, 1990, 2000]
male_data = [24151, 25528, 27167, 27411, 27909, 28490]
female_data = [26138, 27279, 28761, 28946, 29530, 30153]
total_data = [50289, 52807, 55928, 56357, 57439, 58643]
TEK_COLOR
!P.Region = [0.05, 0.05, 0.8, 0.95]
BAR, TRANSPOSE([[male_data], [female_data], [total_data]]), $
XTickname=STRTRIM(year, 2), $
Ytickname=STRTRIM(LINDGEN(7)*10000,2), $
FillColors=WoColorConvert([16,18,20]), $
Background=WoColorConvert(1), Color=WoColorConvert(0), $
Axiscolor=WoColorConvert(0), $
OutlineColor=WoColorConvert(0), $
/DrawLegendBox, LegendTextColor=WoColorConvert(0), $
LegendBoxColor=WoColorConvert(0), $
LegendLabels=['Male', 'Female', 'Total'], $
Title='Town Population - male, female, total'
Polar Plots
The PLOT procedure converts its coordinates from cartesian to polar coordinates when plotting if the Polar keyword parameter is set. The first parameter to plot is the radius, R, and the second is θ, expressed in radians. Polar plots are produced using the standard axis and label styles—with box axes enclosing the plot area.
Figure 5-3: Polar Plot on page 49 illustrates using AXIS to draw centered axes, dividing the plot window into the four quadrants centered about the origin. This method uses PLOT to plot the polar data and to establish the coordinate scaling, but suppresses the axes. Next, two calls to AXIS add the
x– and
y–axes, drawn through data coordinate (0,0):
; Make a radius vector and add a theta vector.
r = FINDGEN(100)
theta = r/5
; Plot the data, suppressing axes by setting their styles to 4.
PLOT, r, theta, Subtitle='Polar Plot', XStyle=4, $
YStyle=4, /Polar
; Draw the x– and y–axes through (0,0).
AXIS, XAxis=0, 0, 0
AXIS, YAxis=0, 0, 0
Histogram Mode Plots
You can produce a histogram-style plot by setting the Psym keyword to 10 in the PLOT procedure call:
Psym=10
This connects data points with vertical and horizontal lines, producing the histogram.
Figure 5-4: Histogram Plot on page 50 illustrates this by comparing the distribution of the normally distributed random number function (RANDOMN), to the theoretical normal distribution:
This figure is produced using the following statements:
; Generate 200 values ranging from –5 to 5.
X = FINDGEN(200) / 20. - 5.
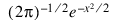
; Theoretical normal distribution, integral scaled to one.
Y = 1 / SQRT(2. * !PI) * EXP(-X^2 / 2) * (10. / 200)
; Approximate a normal distribution with RANDOM and then
; form the histogram.
H = HISTOGRAM(RANDOMN(Seed, 2000), $
BINSIZE=0.4, min=-5., max=5.)/2000.
; Plot the approximation using “histogram mode”.
PLOT, FINDGEN(26) * 0.4 - 4.8, H, PSYM=10
; Overplot actual distribution.
OPLOT, X, Y*8.
Version 2017.1
Copyright © 2019, Rogue Wave Software, Inc. All Rights Reserved.