Lesson 1: Basic 2D Plotting
Line plots are the basic expression of many mathematical equations. The PLOT procedure is a rapid method to display data. Your data may be in the form of a named variable.
This example demonstrates how to create and label a line plot. You will do the following in this example:
Create the Data
Before creating a plot, you need data for the plot. Create data by using the FINDGEN function, which returns a single-precision floating-point array with the specified dimensions. Each element of the array is set to the value of its one-dimensional subscript.
note | Press the <Return> key after you type or paste text at the WAVE> prompt. |
1. Create an 801-element vector to hold the values for x. Divide each element of the vector by 5, then subtract 80 from each element to scale the values from –80 to 80. Type (or cut and paste):
x = FINDGEN(801)/5 - 80
2. Set y equal to xsin(x), by doing the following:
y = x*SIN(x)
You are now ready to plot the data.
Draw the Plot
Typing PLOT, followed by the name of the variable you wish to plot, displays a line plot. The PLOT command automatically draws x- and y-axes and places tick marks on them.
Type:
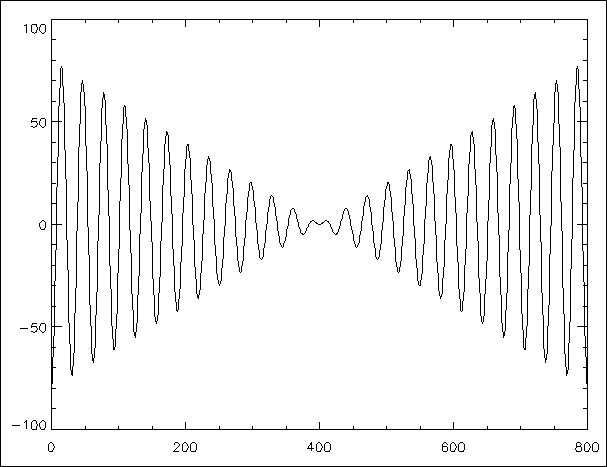
PLOT, y
A plot of the indices versus function appears as shown in
Indices versus Function Plot. This plot is shown with black lines and white background, which is the reverse of what appears on your monitor. Reverse printing is used often in this tutorial to improve readability.
Modify the Plot Window and Data Range Using Keywords
PV-WAVE assigns an index number between 0 and 31 to a window if you do not. The initial default window index number, printed across the title bar, is 0. The default window size is 640 pixels wide by 512 pixels in height.
1. Load a colortable that specifies the first 32 distinct colors in the lower end of the colortable:
TEK_COLOR
2. To change the size of the window, use the XSize and YSize keywords. Add a title by using the Title keyword.
WINDOW, 0, XSize=575, YSize=500, Title='PV-WAVE'
The original window is replaced by a new, empty, larger window that has the title PV-WAVE.
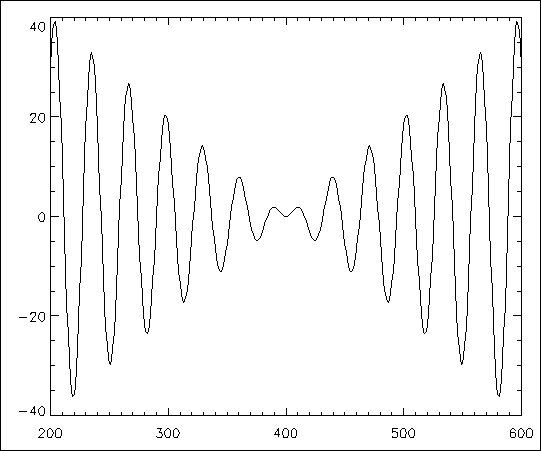
The previous plot depicted all of the data. You can explicitly define the data range using the XRange and YRange keywords.
3. Specify the data range.
PLOT, y, XRange=[200, 600], YRange=[-40, 40]
New Plot shows a line with
x values ranging from 200 to 400.
Obtain Information About Your Data
PV-WAVE can display information about your data in several ways.
1. To determine the type and dimensions of your variables, enter
INFO
PV-WAVE returns a list of your variables and of saved procedures and functions. Note that x and y are listed as floating-point arrays and the dimensions of each are given. If you ran the lesson preview, several saved variables, procedures, and functions also are listed.
You can print any PV-WAVE data variables to the screen; they are displayed as ASCII characters.
2. Print each value of x to the screen.
PRINT, x
All values of x are displayed in the PV-WAVE window.
3. Print the values in y.
PRINT, y
To print a specific value, specify the array subscript of the value in the vector.
4. Print the 604th value of y, enter
PRINT, y(603)
Arrays are indexed from zero, so this must be taken into account.
5. To print the range of third through the sixteenth values, enter:
PRINT, y(2:15)
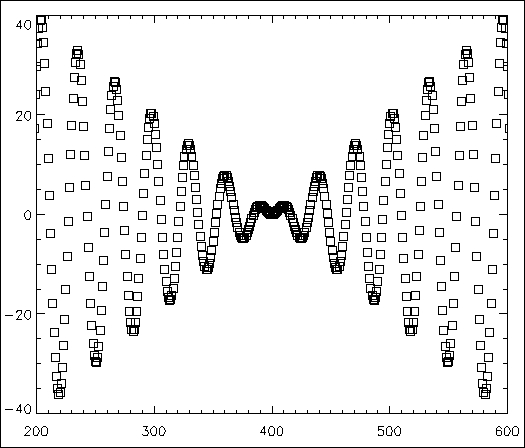
Add Symbols
PV-WAVE offers eight different types of plotting symbols that you can use to mark the points. In this example, you will add square symbols and connect them.
To add symbols to a plot, use the PSym keyword:
1. For square symbols, type:
PLOT, y, XRange=[200, 600], YRange=[-40, 40], PSym=6
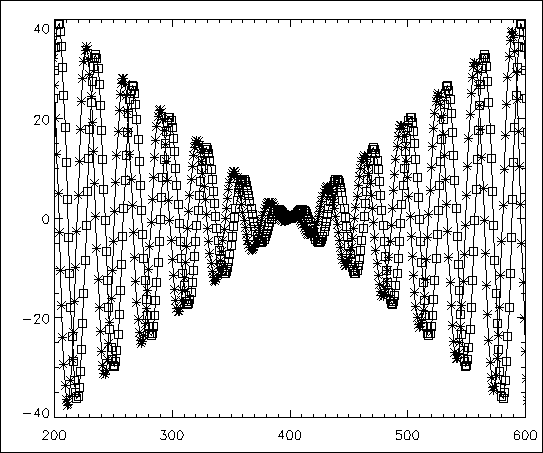
Setting PSym equal to 6 did not draw the connections between the points. Assigning a negative value to the symbol number associated with PSym, i.e., adding a single character, the minus sign (–), is all that is necessary to specify that points be connected with lines.
2. To connect the symbols type:
PLOT, y, XRange=[200, 600], YRange=[-40, 40], PSym=-6
The squares representing data points are connected by solid lines.
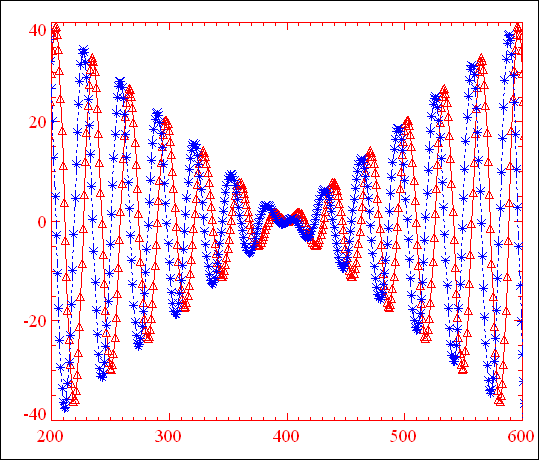
Add Another Line to the Plot
You can plot more than one line on a single plot. The OPLOT function overplots data on the same axes as an existing line. More than 75 keywords can be used with this function:
To overlay a plot on an existing plot, do the following:
1. First, create another data set, w, which is a cosine variation of y.
w = x*COS(x)
2. Plot w over the existing plot of y.
OPLOT, w, XRange=[200, 600], YRange=[-40, 40], PSym=-2
The new line is plotted with the same axis range as the first line, as shown in
Figure 5-14: Plot with Multiple Lines on page 73.
Change the Colors and Linestyle
This section illustrates how to change the color of the lines and background and how to change the style of the lines.
There are many ways to change and specify color in your plots. This section illustrates just one. Refer to PV‑WAVE User’s Guide for more information on changing the colors of plots.
note | The total number of available colors will vary because other programs allocate colors also, but PV-WAVE distributes the colors of a colortable across the available range. !D.N_Colors is a system variable that is also useful in writing code for colors, as shown in the this example. |
To change the color and linestyle of the plot, do the following:
1. Plot the lines in red and change the background color to white. When you loaded TEK_COLOR, you loaded 32 distinct colors at the start of the color palette. Type:
PLOT, y, XRange=[200, 600], YRange=[-40, 40], PSym=-5, $
Color=WoColorConvert(2), Back=WoColorConvert(1)
The Color keyword specifies the number of the color to use for drawing. The Back keyword specifies the number of the color to use for the background.
2. Overplot the other set of data in a different linestyle. The default linestyle, 0, is a solid line. Five other styles of dotted and dashed lines are available. For example, linestyle 4 specifies a dash-dot-dot-dot line. To change the linestyle of the overplot, enter the following:
OPLOT, w, XRange=[200, 600], YRange=[-40, 40], PSym=-2, $
Color=WoColorConvert(4), LineStyle=4
The linestyles and their index numbers are:

0—Solid
1—Dotted
2—Dashed
3—Dash Dot
4—Dash Dot Dot Dot
5—Long Dashes
Add Titles to the Plot
You can place labels on the x- and y-axes, as well as a title and subtitle on your plot. You can use the default font, Simplex Roman, or select from any of 15 other built-in fonts. You can also set PV-WAVE to use hardware fonts, which gives you access to a greater number of fonts.
To set PV-WAVE to use hardware fonts, enter the following command.
!P.Font = 0
By default, the Title is automatically set to 1.25 times as large as the titles on the x- and y-axes.
Add titles to the
x- and
y-axes and to the top of the plot:
PLOT, y, XRange=[200, 600], YRange=[-40, 40], $
Color=WoColorConvert(2), Back=WoColorConvert(1), $
XTitle='Index', YTitle='Function', $
Title='!17PV-WAVE 2D Plot'
The designated titles are added to your plot.
The font designated for the Title was inherited by all other characters in the plot. Font specification remains in effect until another font is specified. If you wanted to have all titles in font 17 and all axis numbers in the default font (3), you would need to enter:
XTitle='!17Index!3',YTitle='!17Function!3', $
Title='!17PV-WAVE 2D Plot!3'
Adding the “!3” at the end of the text string drawn last (the YTitle string in this case) would cause the default font to be used thereafter, in this and in subsequent plots.
Add Today’s Date to the Plot
Information relating to dates and times is essential to many types of data processing. PV-WAVE has many ways to incorporate and manipulate calendar-based information.
1. Create the variable a to hold today’s date by using the TODAY function.
a = TODAY()
2. Print the contents of a.
DT_PRINT, a
3. Convert the variable to a character string and specify that it prints only the day, month, and year.
DT_TO_STR, a, b, Date_Fmt=1
4. Add a subtitle that incorporates today’s date into a sentence.
PLOT, y, XRange=[200, 600], YRange=[-40, 40], Thick=2, $
Color=WoColorConvert(2), Back=WoColorConvert(1), $
XTitle='Index', YTitle='Function', $
Title='!8PV-WAVE 2D Plot', $
SubTitle='I made this PV-WAVE plot on ' + b + '.'
note | The plus (+) character concatenates multiple strings into a single string for output and storage and also allows you to break up long strings in your code for readability. |
Today’s date is placed within the character string in the subtitle.
5. Plot the data from w over the existing plot:
OPLOT, w, XRange=[200,600], YRange=[-40, 40], Thick=2, $
Color=WoColorConvert(4), Linestyle=4
Place Labels Within the Plot
The plot would be more informative if it had a legend, such as “Sine” and “Cosine”, to distinguish the two lines. The XYOUTS procedure can draw text at any designated position in the window.
1. Place a text string at a position that begins at x = 320 and y = –30.
XYOUTS, 320, -30, '!8Sine!3', CharSize=1.2, $
Color=WoColorConvert(2)
The word “Sine” is placed at the specified coordinates.
2. Overplot a horizontal line from x = 380 to x = 450 to represent the first function.
OPLOT, [380, 450], [-30, -30], LineStyle=0, Thick=2, $
Color=WoColorConvert(2)
3. Place a text string at a position that begins at x = 320 and y = –35.
XYOUTS, 320, -35, '!8Cosine!3', CharSize=1.2, $
Color=WoColorConvert(4)
The word “Cosine” is placed at the specified coordinates.
4. Overplot a horizontal line from x = 380 to x = 450 to represent the second function.
OPLOT, [380, 450], [-35, -35], LineStyle=4, Thick=2, $
Color=WoColorConvert(4)
Version 2017.1
Copyright © 2019, Rogue Wave Software, Inc. All Rights Reserved.