SHIFT Function
Shifts the elements of a vector or array along any dimension by any number of elements.
Usage
result = SHIFT(array, shift1, ... , shiftn)
Input Parameters
array—The array to be shifted.
shifti—The shift parameters (see Discussion).
Returned Value
result—The shifted array.
Keywords
None.
Discussion
The SHIFT function is used to perform a circular shift upon the elements of a vector or an array. The resulting array has the same dimension and data type as the input array. Shifts are handled similarly, regardless of the number of dimensions in the input array, as detailed below:
 Shifts on One-Dimensional Arrays—
A shift performed on a one-dimensional array (a vector) shifts the contents of each element to the right or left, depending on the number of elements specified in the second parameter: a positive number shifts elements to the right, while a negative number shifts them to the left.
Shifts on Two-Dimensional Arrays—A shift performed on a two-dimensional array (such as a raster image) is done in a similar way. The contents of entire rows and/or columns are shifted to the rows above or below, or to the columns to the right or left, depending on the number of rows and columns specified by the second and third parameters of the process, respectively.
Positive numbers for the second and third parameters shift rows in an up direction (or columns to the right), while negative numbers shift rows in a down direction (or columns to the left).
Shifts on Arrays with More than Two Dimensions—For arrays of more than two dimensions, the parameter
shiftn specifies the shift applied to the
nth dimension. For example,
shift1 specifies the shift along the first dimension. If you specify 0 for
shiftn, this means that no shift is to be performed along that dimension.
Regardless of the number of dimensions, all shifts are circular, meaning that values that are pushed off the beginning or end of the array by the shift operation are automatically inserted back onto the opposite end of the array. No values in the array are lost.
If only one shift parameter is present and the parameter is an array, the array is treated as a vector.
Sample Usage
Typical uses of the SHIFT function include:
To force elements of one array to align with elements of another array.
To force the elements of one array to be misaligned with the elements of another array (some statistical analysis techniques require this).
To line up (or
register) the edges of an image to match those of another image. This can be used to compensate for an image that was initially digitized out of alignment with respect to the edges of another image.
To shift the beginning and ending point of a color table in an image.
To do an edge enhancement technique for images commonly known as
Shift and Difference Edge Enhancement (see
Example 2).
Example 1
The following demonstrates one-dimensional shifting using the SHIFT function with a vector:
; Make a small vector.
a = INDGEN(5)
; Print vector, the vector shifted one position to the right, and
; the vector shifted one position to the left.
PRINT, a, SHIFT(a,1), SHIFT(a,-1)
; Executing these statements gives the result:
; 0 1 2 3 4
; 4 0 1 2 3
; 1 2 3 4 0
Notice how elements of the vector that shift off the end wrap around to the other end. This “wrap around” occurs when shifting arrays of any dimension.
Example 2
SHIFT can be used to create an edge enhancement technique for images. In this technique, a copy of an array may be shifted by one or more elements (pixels) in any direction, and then subtracted from the original image.
When performed on a binary image (containing only black and white pixels), edges that are opposite the direction of the shift are enhanced.
When performed on a gray scale or pseudocolor image, an embossing effect is created opposite the direction of the shift.
By carefully selecting the direction and amount of the shift, you can make certain details (for example, only vertical or horizontal lines) be discernible in an otherwise jumbled image.
Typically, single-element (one pixel) shifts are most pronounced, while any shift beyond ten elements (pixels) tends to start blurring the features in the image.
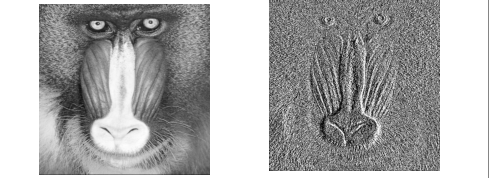
For example, to shift a mandrill image to highlight the edges to the left of each feature, you would first run the SHIFT function and then subtract the resulting image from the original image to create a third image:
shift_mandril = SHIFT(mandril, 1, 0)
shift_diff_mand = mandril - shift_mandril
Shifted Image for Left Edge Enhancement shows the effects of shifting on the mandrill image. The SHIFT function previously described has been used with this 512-by-512 mandrill image for edge enhancement. Notice how the dark edges to the left of each feature in the image are highlighted by using SHIFT with a positive number for the first parameter (which causes the image to be shifted to the right).
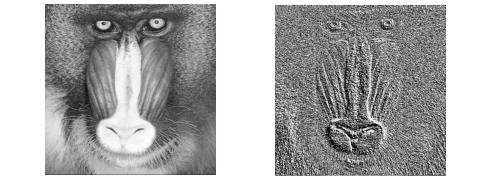
To shift a mandrill image to highlight the edges below and to the left of each feature:
shift_mandril = SHIFT(mandril, 1, 1)
shift_diff_mand = mandril - shift_mandril
Shifted Image for Bottom Edge Enhancement shows the results of this shifting. Notice how the dark edges to the southwest of each feature in the image are now highlighted by using the SHIFT function with a positive number for the first and second parameter (which causes the image to be shifted both up and to the right).
See Also
For more information about Shift and Difference Edge Enhancement, see Digital Image Processing, by Gregory Baxes, Cascade Press, Denver, 1988.
Version 2017.1
Copyright © 2019, Rogue Wave Software, Inc. All Rights Reserved.