PostScript Output
PostScript is a programming language designed to convey a description of virtually any desired page containing text and graphics. It is widely available on laser printers and typesetters.
note | The default PostScript font is 14 point Times Roman. You can change the default font by editing the file fontmap_ps, which is discussed in the chapter Using Fonts in the PV‑WAVE User’s Guide. |
To direct graphics output to a PostScript file, enter the command:
SET_PLOT, 'PS'
This causes PV‑WAVE to use the PostScript driver for producing graphical output. Once the PostScript driver is enabled via SET_PLOT, the DEVICE procedure controls its actions, as described in
"Controlling PostScript Output with DEVICE Keywords". The default settings for the PostScript driver are given in
PostScript Driver Default Settings.
note | Please keep the following points in mind:  Unlike monitors where white is the most visible color, PostScript writes black on white paper. Setting the output color index to 0, the default when PostScript output is selected, writes black. A color index of 255 writes white which is invisible on white paper. Color tables are not used with PostScript unless the color mode has been enabled using the DEVICE procedure. See below for information on using PV‑WAVE with color PostScript. All PostScript printers impose a limit on the number of vertices a polygon may contain. This limit (750 vertices for most printers) is checked, and an error message is printed if it is exceeded. Use INFO, /Device to view the driver’s current settings. PostScript hardware fonts can be rotated and transformed by general 3D transforms in PV‑WAVE. |
Additional Text Formatting Commands
The following text formatting commands are new and can be used with the PostScript, WIN32, WMF, and X drivers:
!FB—Switch to the bold face of the current font.
!FI—Switch to the italic face of the current font.
!FU—Underline the current font.
!FN—Switch to the normal form of the current font.
!Pxx—Switch to point size
xx of the current font, where
xx is a two digit integer (01-99).
Refer to the PV‑WAVE User’s Guide for a comprehensive list of text formatting commands.
Controlling PostScript Output with DEVICE Keywords
The following keywords to the DEVICE procedure provide control over the PostScript driver:
PostScript fonts are selected using DEVICE keywords. For example:
DEVICE, /Helvetica, /Bold
See
"Using PostScript Fonts" for a complete list of these keywords.
Bits_Per_Pixel—PV‑WAVE is capable of producing PostScript images with 1, 2, 4, or 8 bits per pixel. Using more bits per pixel gives higher resolution at the cost of generating larger files. Bits_Per_Pixel is used to specify the number of bits to use. The default number of bits is four.
The Apple Laserwriter is capable of only 32 different shades of gray (which can be represented by 5 bits). Thus, specifying 8 bits per pixel does not give 256 levels of gray as might be expected, only 32, at a cost of sending twice the number of bits to the printer. Often, 4 bits (16 levels of gray) will give acceptable results with a large savings in file size.
Close_File—PV‑WAVE creates, opens and writes a file containing the generated graphics output. The Close_File keyword outputs any buffered commands and closes the file.
caution | Under UNIX, if you close the output file with the Close_File DEVICE keyword, and then execute a command (such as PLOT) that creates more output, PV-WAVE reopens the same file, erasing the previous contents. To avoid losing the contents of an output file, use the Filename keyword to specify a different filename, or use SET_PLOT to switch to a different graphics driver, or be sure to print the closed output file before creating more output. |
Color—Enables color PostScript output if nonzero. For details on using color PostScript see
"Using Color PostScript Devices".
Encapsulated—Specifies that the PostScript produced by PV‑WAVE is to be included in another PostScript document, such as one produced by TEX, LATEX, FrameMaker, Microsoft Word, or Ventura Publisher.
By default PV‑WAVE assumes that its PostScript-generated output will be sent directly to a printer. It therefore includes PostScript commands to center the plot on the page and to eject the page from the printer. These commands are undesirable if the output is going to be inserted into the middle of another PostScript document. If Encapsulated is present and nonzero, PV‑WAVE does not generate these commands.
PV‑WAVE follows standard PostScript convention for encapsulated files. It assumes standard PostScript scaling is in effect (72 points per inch). In addition, it declares the size, or bounding box, of the plotting region at the top of the output file. This size is determined when the output file is opened (when the first graphics command is given) by multiplying the size of the plotting region (as specified with the Xsize and Ysize keywords) by the current scale factor (as specified by the Scale_Factor keyword). Changing the size of the plotting region or scale factor once any graphics have been output will not be reflected in the declared bounding box, and will confuse programs that attempt to import the resulting graphics. Therefore, when generating encapsulated PostScript do not change the plot region size of scaling factor after issuing graphics commands. If you want to change these parameters, use Filename to start a new file.
To explicitly disable the encapsulated PostScript option, use DEVICE, encaps=0.
note | You cannot reposition encapsulated output (including EPSI output) via Xoffset or Yoffset keywords. This allows full positioning control for the including product, such as MS Word. |
Epsi—Produces an output file in encapsulated PostScript interchange (EPSI) format. When the Epsi keyword is present and nonzero, the Encapsulated keyword is automatically assumed. For detailed information on the Encapsulated keyword, see the description given previously in this section.
Like normal encapsulated PostScript files, EPSI files can be imported into many desktop publishing and word processing systems; however, EPSI format provides a previewing capability that allows an approximation of the printed PostScript output to be displayed on the screen. Previewed EPSI graphics are displayed in monochrome only.
note | Printed EPSI images sometimes appear different from the image displayed on screen. This occurs because the driver’s EPSI bitmap size is fixed no matter what the size of the original PV‑WAVE image, and the PV‑WAVE image is scaled into this bitmap. In addition, printed PostScript files can take advantage of scalable pixels, while pixels on the screen are static. Try experimenting with the other DEVICE keywords when you specify /Epsi to see which combination gives the best results with your particular size image. The driver’s EPSI bitmap size (888-by-635 pixels) works well in many cases. You can print EPSI files directly, but only when the file is generated in portrait mode (see the description of the Portrait keyword below). |
Filename—By default all generated output is sent to a file named wave.ps. The Filename keyword can be used to change this default. If you specify a filename, one or both of the following actions occur:
If the file is already open (as happens if plotting commands have been directed to the file since the call to SET_PLOT), then the file is completed and closed as if
Close_File had been specified.
The specified file is opened for subsequent graphics output.
Font_Size—Specifies the default height used for displayed text. Font_Size is given in points (a common unit of measure used in typesetting). The default size is 12 point text.
Get_Fontmap—Returns list of current font map settings. If /Get_Fontmap is specified, the information is printed to the screen. If a variable name is specified (e.g., Get_Fontmap=varname), a string array is returned.
The information returned by Get_Fontmap is in the same form as the strings specified with Set_Fontmap. The only exception to this pattern is that the first string returned in a string array is labeled as font 0 and is the current default font.
Inches—By default, the Xoffset, Xsize, Yoffset, and Ysize keywords are specified in centimeters. However, if Inches is present and nonzero, they are taken to be in inches instead.
Landscape—PV-WAVE normally generates plots with portrait orientation (with the x-axis along the short dimension of the page). If Landscape is present, landscape orientation (with the x-axis is along the long dimension of the page) is used instead.
note | In both portrait and landscape mode, the x offset is measured as a displacement along the page’s short dimension, and y offset is measured as a displacement along the page’s long dimension. This may cause you some confusion when you are trying to orient graphics on a landscape page. |
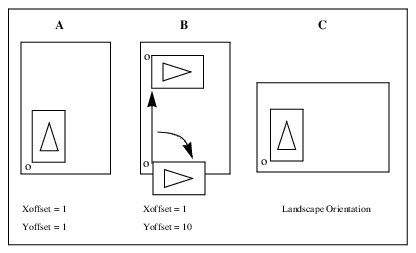
Figure B-1: Xoffset and Yoffset Keyword Use on page 2154 illustrates the way in which the Xoffset and Yoffset keywords are used to position graphics on a page in both portrait and landscape orientation. Assume that the page size is 8.5 × 11 inches. Portrait orientation is shown in A. The graphic is oriented with its origin (o) in the lower-left corner of the page. The x offset is 1 inch and the y offset is 1 inch. The graphic’s x-axis falls along the page’s short dimension. The same graphic shown in B is, in effect, rotated 90 degrees clockwise and offset 10 inches vertically (y offset) to produce the landscape orientation shown in C. The important point to note is that the y offset needed to position the graphic as shown in C is 10 inches, not 1 inch as you might expect.
Output—Specifies a scalar string that is sent directly to the graphics output file without any processing, allowing you to send arbitrary commands to the file. Since PV-WAVE does not examine the string, it is your responsibility to ensure that the string will be recognized by the target device.
Papername—Specifies the size of paper to be used for printing. If you set the keyword value to ‘Letter’, then standard 8.5x11-inch paper is used; ‘tabloid’ is 11x17-inch paper (Default: ‘Letter’)
note | For 11x17 output, you must be using a PostScript Level 2-compliant device. The PostScript driver does not automatically scale up for 11x17 output. You may want to adjust the Xsize, Ysize, Xoffset, Yoffset keywords accordingly. |
Path_Points—Lets you change the maximum number of points in any PostScript path. The PostScript Language Reference Manual defines this limit as “Maximum number of points specified in all active path descriptions, including the current path, clip path, and paths saved by save and gsave”. The default value is 750 because that is the maximum that some printers can handle. The PostScript Language Reference Manual states that 1500 is a typical limit for Level 1 implementations. The maximum for any particular printer can depend on the PostScript implementation being used, the amount of memory in the printer itself and other software being used to access the printer. If you set Path_Points to a number larger than the default and your printer reports a PostScript memory error, then reduce the Path_Points number.
Portrait—If Portrait is present, PV-WAVE generates plots using portrait orientation (the default).
Scale_Factor—Specifies a scale factor applied to the entire plot. Its default value is 1.0, allowing output to appear at its normal size. Scale_Factor magnifies or shrinks the resulting output.
Set_Fontmap—Associates specific font characteristics with a particular hardware font command. This keyword can be used to specify a single string containing the information for one font, or an array of strings containing the information for multiple fonts.
For example, to associate 16 point Helvetica italic with font command !5, use the following DEVICE call:
DEVICE, Set_Fontmap='5 Helvetica-Oblique, 16'
Now, whenever the !5 font command appears in a text string, the text output appears in 16 point Helvetica italic. This keyword only affects hardware fonts (that is, when !P.Font=0).
note | A default font mapping is defined in a configuration file that is read when the PS driver is initialized. For information on this configuration file, see the Using Fonts chapter in the PV‑WAVE User’s Guide. |
User_Font—A scalar string that gives the name of a PostScript font to use. This font name must be specified exactly as the PostScript interpreter expects it, with the correct case and spelling. User_Font lets you use fonts not known to PV‑WAVE.
Xoffset—Specifies the x position on the page of the lower-left corner of output generated by PV‑WAVE. By default, Xoffset is specified in centimeters unless the Inches keyword is specified. Scale_Factor does not affect the value of Xoffset.
Xsize—Specifies the width of output. By default, Xsize is specified in centimeters unless the Inches keyword is specified Scale_Factor modifies the value of Xsize. Hence, the statement:
DEVICE, /Inches, Xsize=7.0, Scale_Factor=0.5
results in a real width of 3.5 inches.
Yoffset—Specifies the y position on the page of the lower-left corner of output generated by PV‑WAVE, which shifts graphics up. By default, Yoffset is specified in centimeters unless the Inches keyword is specified. Scale_Factor does not affect the value of Yoffset.
Ysize—Specifies the height of output. By default, Ysize is specified in centimeters unless the Inches keyword is specified. Scale_Factor modifies the value of Ysize. Hence, the statement:
DEVICE, /Inches, Ysize=5.0, Scale_Factor=0.5
results in a real width of 2.5 inches.
Using PostScript Fonts
By default, PV‑WAVE uses software characters for annotating plots (i.e., !P.Font is –1). These characters are of good quality and are extremely flexible. However, if this flexibility is not required, higher quality characters are available via PostScript fonts. In order to get PV‑WAVE to use the PostScript fonts, do one of the following:
Set !P.Font to 0 by entering:
!P.Font = 0
Use the
Font keyword with the plotting and graphics procedures to specify font 0. For example:
PLOT, temps, Title='Average Temp', Font=0
The default PostScript font is 12-point Helvetica. To change this font, use the DEVICE procedure keywords, as shown in
DEVICE Keywords. Note that not all fonts may be available on a particular device.
note | When generating three-dimensional plots, it is best to use the software fonts, because PV‑WAVE can draw them in perspective with the rest of the plot. For details on software fonts, see the PV‑WAVE User’s Guide. |
When using PostScript fonts, commands may be inserted into the text in order to specify positioning and special characters. These commands are described in the following list. They are similar to the commands provided for the standard software characters.
!A—Shift above the division line.
!E—Shift up to the exponent level and decrease the character size by a factor of 0.44.
!MX—Insert a bullet character.
!N—Shift back to the normal level and original character size.
!B—Shift below the division line.
!I—Shift down to the index level and decrease the character size by a factor of 0.44.
!!—Display the ! symbol.
Using Color PostScript Devices
If you have a color PostScript device you can enable the use of color with the statement:
DEVICE, /Color
Enabling color also enables the color tables. Text and graphic color indices are translated to RGB by dividing the red, green, and blue color table values by 255. As with most display devices, color indices range from 0 to 255. Zero is normally black and white is normally represented by an index of 255.
PostScript Supports Color Images
As with black and white PostScript, images may be output with 1, 2, 3, 4 or 8 bits, yielding 1, 2, 16, or 256 possible colors. In addition, images can be either pseudo-color or true color. For a thorough comparison of pseudo-color and true color, see the PV‑WAVE User’s Guide.
Changing the Image Background Color
Images that are displayed with a black background on a monitor frequently look better if the background is changed to white when displayed with PostScript. This is easily done with the following statement, where A is the image variable:
A(WHERE(A EQ 0B)) = 255B
Creating Publication-quality Documents
The combination of PV‑WAVE and the PostScript page description language gives you a powerful tool for creating publication-quality documents with text, graphics, and images arranged together on the page. Three examples of how to insert PostScript output into text documents follow, but these are not exclusive. Consult your word processing or desktop publishing manual to see how your software handles encapsulated PostScript files.
Inserting PV‑WAVE Plots into LATEX Documents
LATEX is a special version of the TEX page formatting language developed by Donald E. Knuth for producing publication-quality documents. LATEX was developed by Leslie Lamport to make the TEX language easier to use. Although TEX is released into the public domain, commercial versions of TEX are supported by private vendors. One such vendor is ArborText, Inc., of Ann Arbor, Michigan. The examples below describe how Rogue Wave has used ArborText’s TEX, LATEX, and DVILASER/PS software on Sun workstations to incorporate PV-WAVE graphs and images into publication-quality documents.
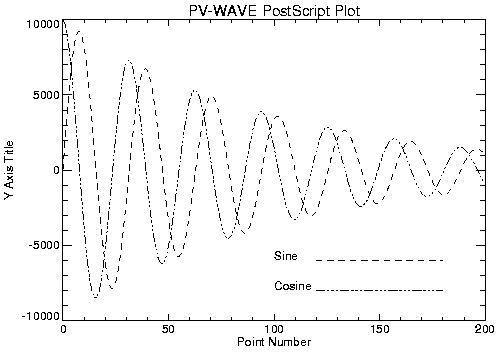
Figure B-2: Sample PostScript Plot on page 2161 is an example of a PV‑WAVE-generated PostScript plot that has been inserted into a LAT
EX document. It was produced with the following statements:
; Select the PostScript driver.
SET_PLOT, 'PS'
; Use ENCAPSULATED because output is for use with LATEX.
DEVICE, /Encapsulated, Filename='pic1.ps'
x = FINDGEN(200)
; Plot the sine wave. Set the font to hardware font.
PLOT, 10000 * SIN(x/5) / EXP(x/100), Linestyle=2, $
Title='PV-WAVE ' + 'PostScript plot', $
Xtitle='Point Number', Ytitle='Y Axis Title', Font=0
; Add the cosine.
OPLOT, 10000 * COS(x/5) / EXP(x/100), Linestyle=4
; Annotate the plot.
XYOUTS, 100, -6000, 'Sine', Font=0
; Annotate the plot
OPLOT, [120, 180], [-6000, -6000], Linestyle=2
; Annotate the plot
XYOUTS, 100, -8000, 'Cosine', Font=0
OPLOT, [120, 180], [-8000, -8000], Linestyle=4
Note the use of the Encapsulated keyword in the call to DEVICE. This is what allows you to import the file into a LATEX document. Simply omit the Encapsulated keyword from the call to DEVICE if you want to produce a plot that can be printed directly.
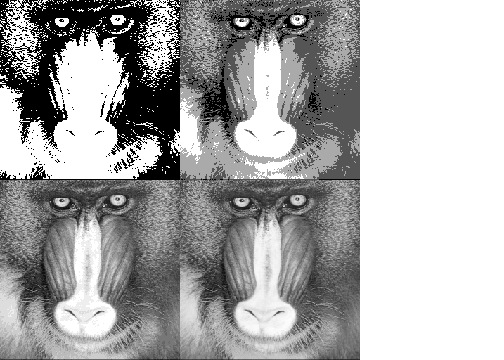
Any kind of PostScript plot can be included in LAT
EX documents. In
Figure B-3: 1, 2, 4, and 8-bit PostScript Images on page 2162, a PV‑WAVE PostScript image has been included. In this case, the same image is reproduced four times. Each time, a different number of bits are used per image pixel. The illustration was produced with the following statements:
SET_PLOT, 'PS'
DEVICE, /Encapsulated, Filename='pic4.ps'
; Open image file.
OPENR, 1, !Dir+'/data/mandril.img'
; Variable to hold image.
a = BYTARR(256, 256, /Nozero)
; Input the image.
READU, 1, a
; Done with the file.
CLOSE, 1
; Output the image four times.
FOR i = 0,3 DO BEGIN
; Use 1, 2,4, and 8 bits per pixel.
DEVICE, Bits_Per_Pixel=2^i
; Output using TV with position numbers 0, 1, 2, and 3.
TV,a,i ,Xsize=2.5, Ysize=2.5, /Inches
ENDFOR
The LATEX Insertplot Macro
The following LATEX macro, named insertplot, is used to insert PV‑WAVE-generated PostScript files into LATEX documents. The definition of this macro depends upon the TEX DVI to PostScript translation program used and is therefore not portable between various DVI programs.
However, given familiarity with TEX it is relatively easy to modify the macro to suit the various DVI programs encountered in practice. The insertplot macro is as follows:
% Insert a PostScript plot made by PV-WAVE
% into a LATEX document:
% For the ArborText program dvips.
%
% This macro creates a captioned figure
% of the specified size and uses the
% \special command to insert the Post
% Script.
%
% Usage: \insertplot{file}{caption}% {label}{width}{height} % file = name of file containing the PostScript.
% caption = caption of figure
% label = latex \label{} for figure to% be used by \ref{} macro.% width = width of figure, in inches.
% height = height of figure, in inches.
%
% Insert a plot.
\newcommand{\insertplot}[5]{%% Usage: \insertplot{file}{caption}% {label}{width in inches}{height}\begin{figure}%\hfill\hbox to 0.05in{\vbox to #5in{\vfil%\inputplot{#1}{#4}{#5}%Include the plot% file
}\hfill}%
\hfill\vspace{-.1in}% Fudge factor to % tighten things up a bit.
\caption{#2}\label{#3}\end{figure}}%
%
% Include a PostScript File, this varies
% according to the DVI program: Usage:
% \inputplot{filename}{width}{height}% When called from insertplot, the current
% position is at the bottom CENTER of the
% figure box.
\newcommand{\inputplot}[3]{%% Output PostScript commands to scale
% default sized (7 wide by 5 high) PV-WAVE
% plot into the specified size. Also
% set origin to the current point less
% half the width of the box, centering the
% box above the current point.
\special{ps:: gsave #2 -36 mul 0 rmoveto
currentpoint translate #2 7.0 div #3 5.0
div scale}%
\special{ps: plotfile #1}\special{ps::grestore}}%
%
Version 2017.1
Copyright © 2019, Rogue Wave Software, Inc. All Rights Reserved.