Office 2013 Look and Feel
Office 2013 Look and Feel is available in the FoundationEx Library (SFLEX). It is a visual style used with the CVisualManager framework provided with the MFC Feature Pack. Office 2013 Look and Feel provides a flat look similar to that found in Microsoft Office 2013.
Applications wanting to utilize this look and feel need to be ported to the Stingray Foundation Library (SFLEX). Refer to the migration guide for steps on how to migrate an application.
The Office 2013 Look and Feel introduces a new File menu referred to as the Backstage View. The Backstage View replaces the familiar Application Button located in the upper left corner of the application.
Sample
The BackstageViewEx sample demonstrates the Office 2013 Look and Feel. The sample demonstrates the Styles and Accents, Backstage File Tab, Backstage Property Sheets, and Custom Dialog Boxes.
The sample is located in the directory: <InstallDir>\Samples\FoundationEx\
All explanations of the Office 2013 Look and Feel will reference the BackstageViewEx sample.
Accents and Styles
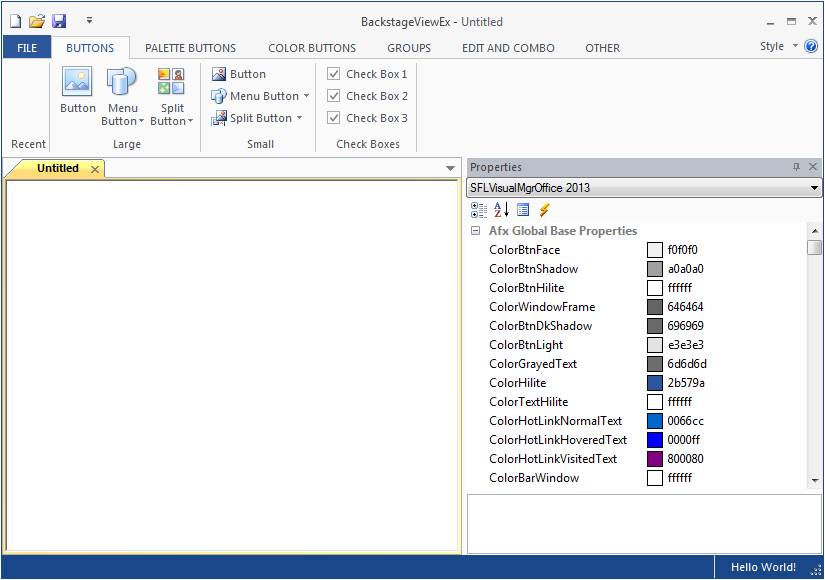
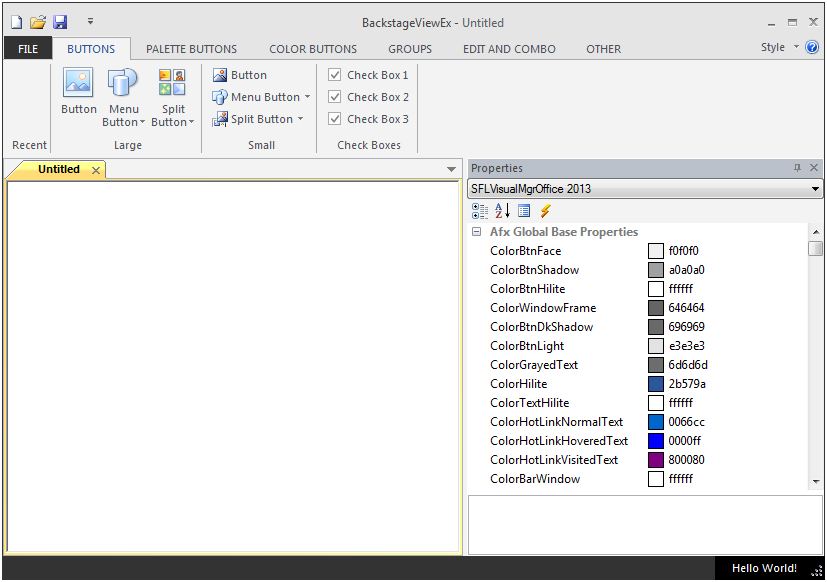
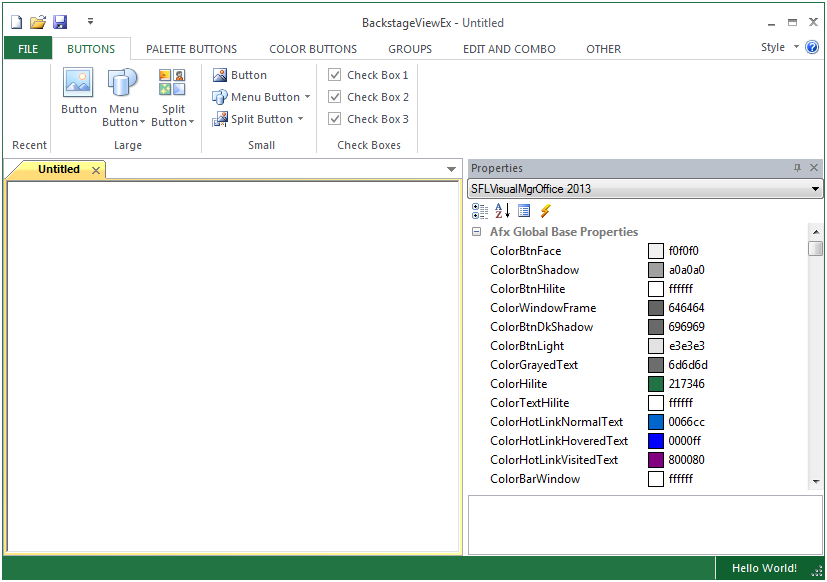
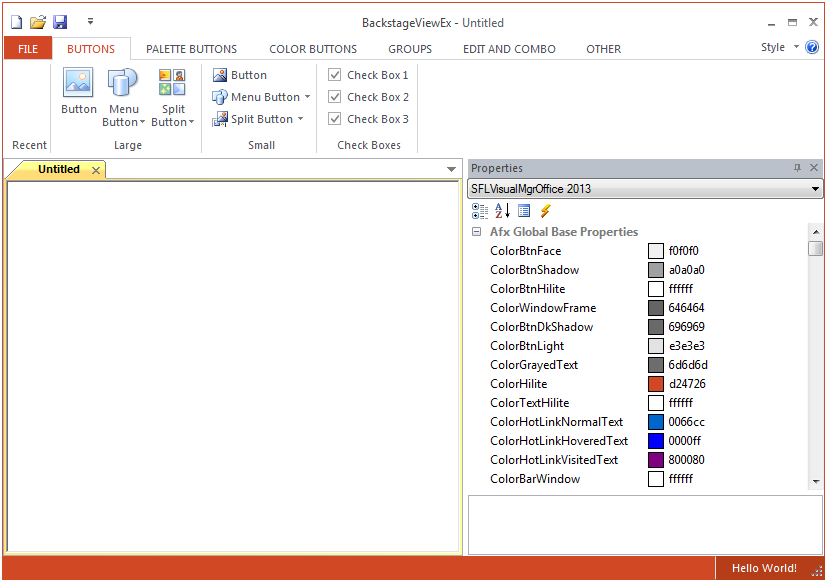
Office 2013 Look and Feel has two visual counterparts. Styles which follow an overall theme of White, Light Gray, and Dark Gray. And Accents which follow a color scheme of Excel, Outlook, Powerpoint, and Word. A combination of Style and Accent gives the Office 2013 coloring.
Styles
Styles are defined with the following eAppStyle enumerations in SflAppStyleEx.h:
APPSTYLE_OFFICE_WHITE_2013
APPSTYLE_OFFICE_LIGHTGRAY_2013
APPSTYLE_OFFICE_DARKGRAY_2013
To set the Office 2013 Application Style use the following code:
CMainFrame.cpp
SetApplicationStyle(sflex::APPSTYLE_OFFICE_WHITE_2013), &ui.GetRibbonBar());
// Where ui is an SFLFluentUI object.
The Application's Style is retrieved with the GetApplicationStyle() function. As a shortcut, call the SFLWinAppEx classes IsOffice2013Style() function to determine if the style is Office 2013.
This is an example of how to retrieve the current Style from the registry:
SetApplicationStyle((sflex::eAppStyle)theApp.GetInt(_T("ApplicationStyle"),
sflex::APPSTYLE_OFFICE_XP), &ui.GetRibbonBar());
Accents
Accents are defined with the following eAppAccent enumerations in SflAppStyleEx.h:
APPACCENT_OFFICE_EXCEL
APPACCENT_OFFICE_OUTLOOK
APPACCENT_OFFICE_POWERPOINT
APPACCENT_OFFICE_WORD
APPACCENT_OFFICE_CUSTOM
To set the Office 2013 Application Accent use the following code:
CMainFrame.cpp:
SetApplicationAccent(sflex::APPACCENT_OFFICE_WORD, &ui.GetRibbonBar());
// Where ui is an SFLFluentUI object.
This is an example of how to retrieve the current Accent from the registry:
SetApplicationAccent((sflex::eAppAccent)theApp.GetInt(_T("ApplicationAccent"),
sflex::APPACCENT_OFFICE_WORD), &ui.GetRibbonBar());
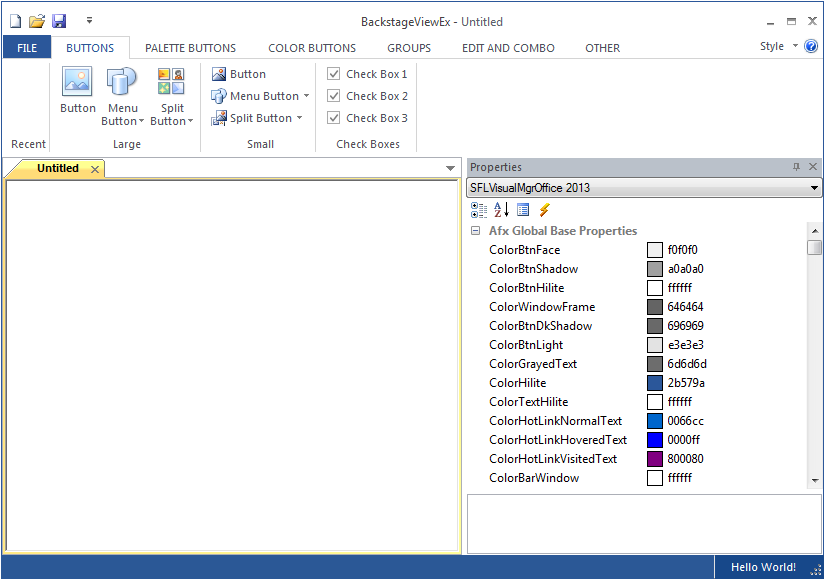
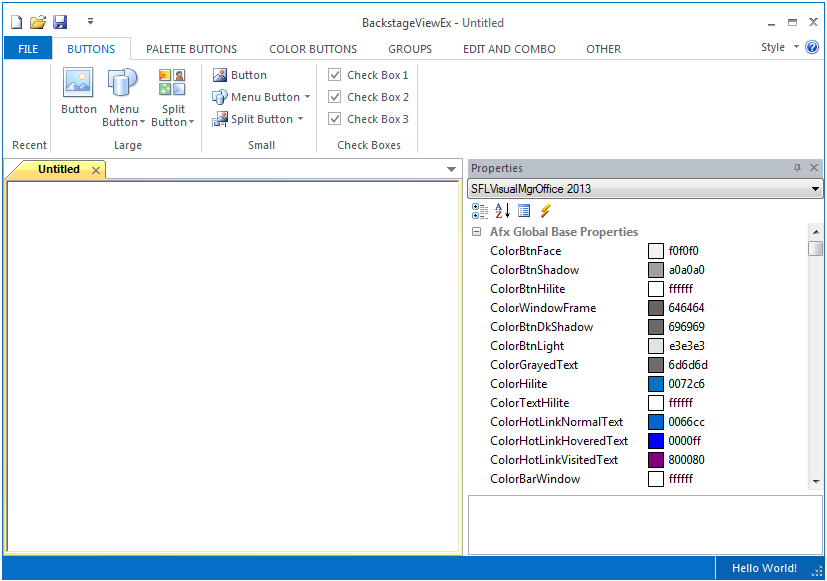
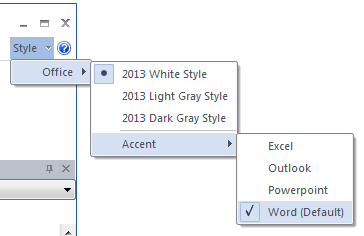
Styles and Accents are accessed through the optional Style menu in the upper right hand corner of an application.
During creation of the FluentUI through the call CreateBackstageFileTabAndLoadFromResource(), the 6th parameter is TRUE by default enabling the Style menu to show up. The menu that is loaded during implementation is IDR_SFLEX_THEME_2013_MENU. To implement a custom menu different than the one provided by the FoundationEx library override the following function in a derived class:
BOOL SFLFluentUI::Create(CWnd* pParentWnd, CMDITabInfo* pTabInfo /*= NULL*/,
BOOL bCreateQuickAccessToolBar /*= TRUE*/, BOOL bCreateCaptionBar /*= TRUE*/,
BOOL bCreateAppStyleMenu /*= TRUE*/, BOOL bCreateAboutButton /*= TRUE*/,
BOOL bCreateAppButton /*= TRUE*/)
Visual Manager Architecture
The key class for Office 2013 Look and Feel is SFLVisualMgrOffice2013. It is derived from CMFCVisualMgrOffice2007.
The header file SflVisualMgrOffice2013.h is located: <InstallDir>\Include\FoundationEx\Manager\Visual
The source file SflVisualMgrOffice2013.cpp is located: <InstallDir>\Src\FoundationEx\Manager\Visual
Backstage View Architecture
The full application file menu used in the Office 2013 style is known as the Backstage View. It replaces the Application Button in previous styles 2007 and earlier.
The "FILE" button is the first category in the FluentUI RibbonBar and is of class type SFLBackstageFileCategoryEx.
Creating the Backstage View’s FILE Tab
In order to create an application with the Office 2013 Look and Feel, the FluentUI architecture must be used which will include the RibbonBar. In addition, the creation of the Backstage File Tab must be specified. This is accomplished with the following SFLFluentUI function:
FOUNDATIONEX_API virtual BOOL CreateBackstageFileTabAndLoadFromResource(
CWnd* pParentWnd, CMDITabInfo* pTabInfo,
UINT uiXMLResID,
BOOL bCreateQuickAccessToolBar = TRUE,
BOOL bCreateCaptionBar = TRUE,
BOOL bCreateAppStyleMenu = TRUE,
BOOL bCreateAboutButton = TRUE,
BOOL bCreateAppButton = FALSE,
BOOL bCreateFreqCmdPanel = FALSE);
Here is an example of creating the FILE tab, from CMainFrame.cpp:
CMDITabInfo mti;mti.m_style = CMFCTabCtrl::STYLE_3D_ONENOTE; // other styles available...mti.m_bActiveTabCloseButton = TRUE; // Set to FALSE to place close button at right of tab area.mti.m_bTabIcons = FALSE; // Set to TRUE to enable document icons on MDI tabs.mti.m_bAutoColor = TRUE; // Set to FALSE to disable auto-coloring of MDI tabs.mti.m_bDocumentMenu = TRUE; // Enable the document menu at the right edge of the tab area.EnableMDITabbedGroups(TRUE, mti); // NOTE: IDR_RIBBON_BACKSTAGE has the Main Button section removed from XML!if (!ui.CreateBackstageFileTabAndLoadFromResource(this, &mti, IDR_RIBBON_BACKSTAGE, TRUE, TRUE, TRUE, TRUE, FALSE, TRUE)){TRACE("Unable to create SFLFluentUI with Backstage File Tab\n");return -1;// For Office 2013 and Higher Look and Feel, Enable or Disable CAPS for the category tabs. ui.SetMenuCapsEnabled(TRUE); // TRUE by default.ui.AddBackstagePropertyPage(new SFLBackstagePropertyPageEx(IDD_SFLEX_BACKSTAGEFILE_PROPERTYPAGE_INFO));ui.AddBackstagePropertyPage(new SFLBackstagePropertyPageEx(IDD_SFLEX_BACKSTAGEFILE_PROPERTYPAGE_NEW));ui.AddBackstagePropertyPage(new SFLBackstagePropertyPageEx(IDD_SFLEX_BACKSTAGEFILE_PROPERTYPAGE_OPEN));ui.AddBackstagePropertyPage(new SFLBackstagePropertyPageEx(IDD_SFLEX_BACKSTAGEFILE_PROPERTYPAGE_SAVEAS));ui.AddBackstagePropertyPage(new SFLBackstagePropertyPageEx(IDD_SFLEX_BACKSTAGEFILE_PROPERTYPAGE_PRINT));
Flat Style RibbonBar Controls
The controls used on the RibbonBar have been Stylized and Accented to match the flatter look of Office 2013. Non-RibbonBar controls have not been stylized or accented.
Category Capitalization
By default, the style of the text on the RibbonBar's category tabs is all CAPS. However, calling the function ui.SetMenuCapsEnabled(…) with the parameter value of TRUE (CAPS) or FALSE (Camel Case) will give the option to choose caps or non-caps. IsMenuCapsEnabled() is also provided for querying the Boolean usage of menu caps.
Removing the Application Button from the RibbonBar's Resource
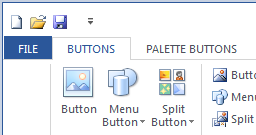
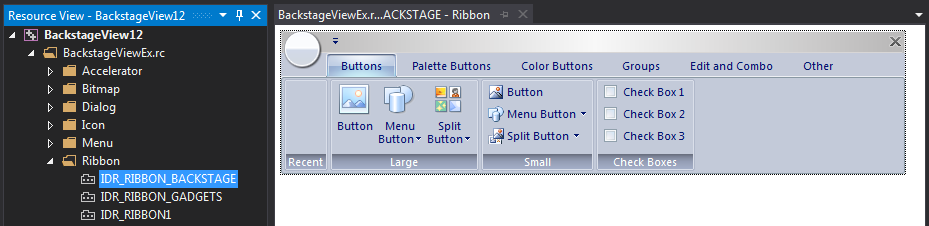
By default, Microsoft Visual Studio 2010 and higher provides a RibbonBar Resource editor. The editor is located under the Resources Property Page under the resource category of Ribbon. The Resource View for Microsoft Visual Studio 2013 is shown below:
An Application Button (the round circle in the upper left corner) is provided for the Visual Styles of Office 2007 and earlier. However, the Office 2013 Visual Style replaces this with a FILE Category Tab.
NOTE >> Every time the RibbonBar is edited in the Visual Studio RibbonBar editor, the section for the Main Application Button must be manually removed.
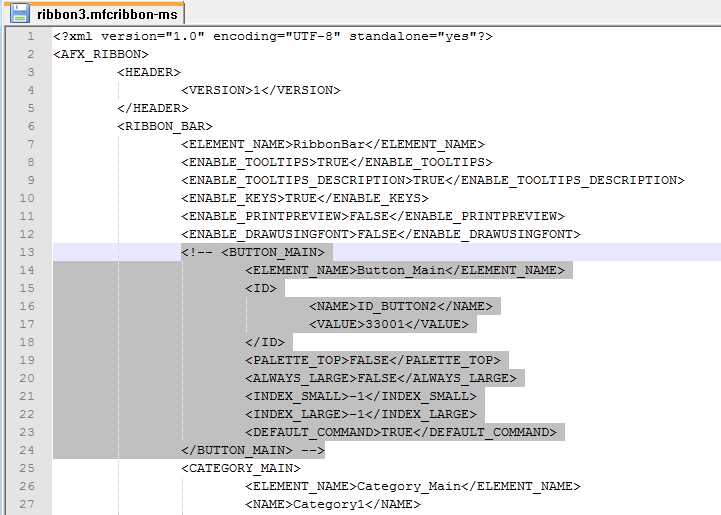
Remove the Application Main Button from the ribbon*.mfcribbon-ms.xml file by adding the comment tag <!-- and end comment tag --> the XML section labeled <BUTTON_MAIN>. Save the file with the commented out changes. This manual step needs to be done each time changes are made in the Visual Studio RibbonBar Resource Editor!
BackstageView Property Pages
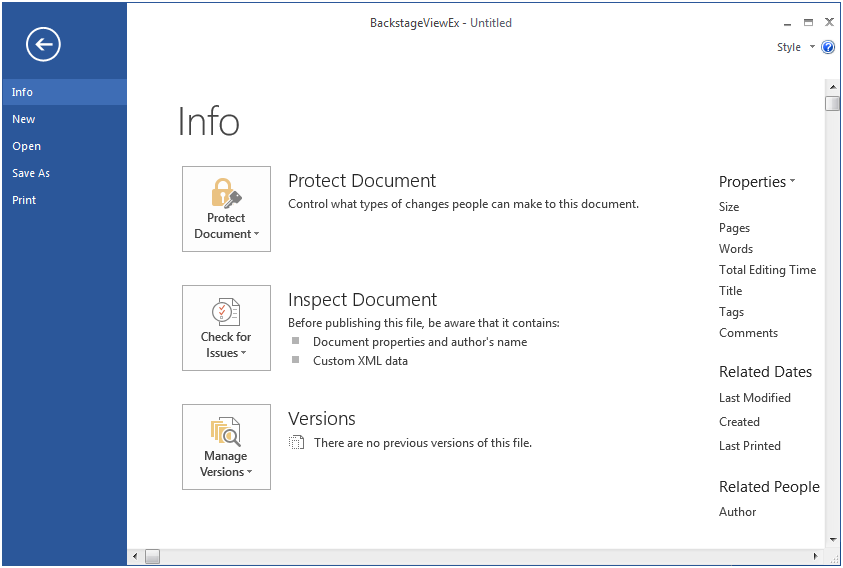
Clicking the BackstageView FILE Tab opens up a property sheet which encompasses the full application screen. This screen is the BackstageView. In the upper left corner is a back arrow which allows the user to exit the BackstageView. Underneath the back arrow button is a series of menu items which navigate property pages on the right side of the BackstageView.
The BackstageView provides property pages derived from SFLBackstagePropertyPageEx. The property sheets work just like any other tabbed document in MFC. The property pages themselves are created as Dialogs in the Visual Studio Resource Editor.
Menu Text
The name of the dialog's title bar is the name of the menu item on the left-hand side of the BackstageView.
Adding SFLBackstagePropertyPageEx Pages to an Application
The SFLFluentUI class provides a function called AddBackstagePropertyPage() which accepts the command IDs (IDD_*) of the dialog pages used to create the property page content.
Here is an example of adding property pages from the FoundationEx library, from CMainFrm.cpp:
ui.AddBackstagePropertyPage(new SFLBackstagePropertyPageEx(IDD_SFLEX_BACKSTAGEFILE_PROPERTYPAGE_INFO));
ui.AddBackstagePropertyPage(new SFLBackstagePropertyPageEx(IDD_SFLEX_BACKSTAGEFILE_PROPERTYPAGE_NEW));
ui.AddBackstagePropertyPage(new SFLBackstagePropertyPageEx(IDD_SFLEX_BACKSTAGEFILE_PROPERTYPAGE_OPEN));
ui.AddBackstagePropertyPage(new SFLBackstagePropertyPageEx(IDD_SFLEX_BACKSTAGEFILE_PROPERTYPAGE_SAVEAS));
ui.AddBackstagePropertyPage(new SFLBackstagePropertyPageEx(IDD_SFLEX_BACKSTAGEFILE_PROPERTYPAGE_PRINT));
The application's derived SFLBackstagePropertyPageEx class is responsible for handling allocation, subclassing, and cleanup of any controls associated with the property page.
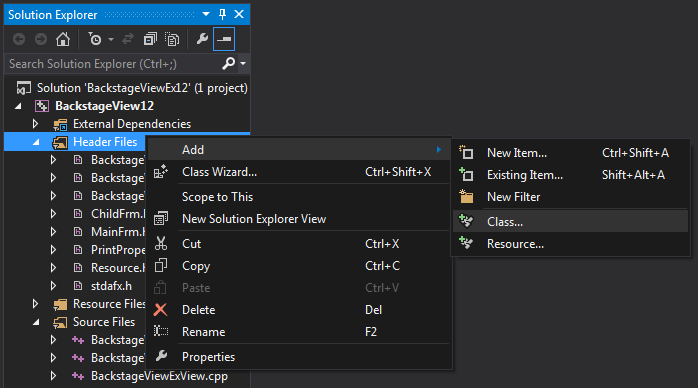
Property Pages, custom to the application, will be created and added on the application side. To do this derive a property page class from SFLBackstagePropertyPageEx. In Visual Studio's Solution Explorer, Right Click and select Add > Class…
In the dialog that pops up, select 'MFC Class' and click OK. This will bring up the 'MFC Add Class Wizard.' Select 'CPropertyPage' as the base class of the new derived class.
The files MyPropertyPage.h and MyPropertyPage.cpp are created in the project. Open those files and replace instances of CPropertyPage with SFLBackstagePropertyPageEx. Reference the header file:
MyPropertyPage.h add:
#include "FoundationEx\UI\SflBackstagePropertyPageEx.h"
MyPropertyPage.cpp add:
#include "resource.h" // For reference to IDD_MYPROPERTYPAGE
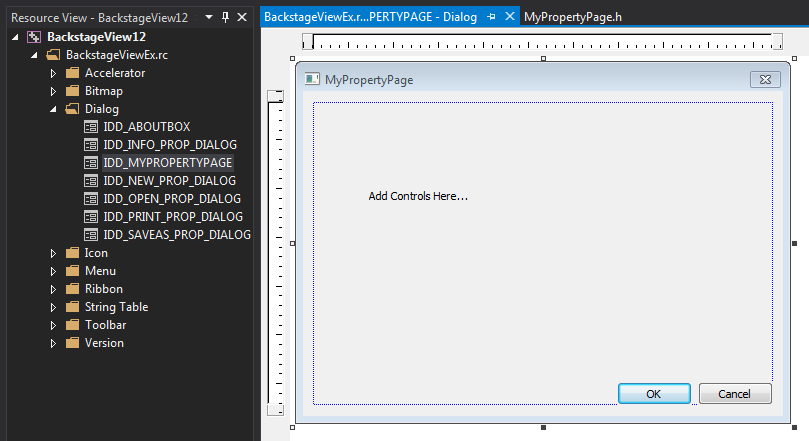
A dialog is created with the ID of the Dialog ID from the wizard. Add controls to the dialog in Visual Studio's 'Resource View.'
Change the name of the dialog to MyPropertyPage. This will be the text that shows up on the left side of the Backstage View's navigation menu.
In the application's MainFrm.h, add a pointer to the newly derived class and reference the class in the top of the file.
#include "MyPropertyPage.h"//…MyPropertyPage* m_MyPropertyPage;
In the application's MainFrm.cpp OnCreate(), add the property page after setting up the FluentUI.
ui.AddBackstagePropertyPage(m_MyPropertyPage = new MyPropertyPage());
NOTE >> The property page m_MyPropertyPage will get cleaned up the the SFLFluentUI class. There is no need to delete m_MyPropertyPage.
Handling SFLBackstagePropertyPageEx Events and Messages
Events triggered in the applications derived property page happen through command ID's of the controls. The command ID's should be intercepted in the derived classes message map. For example:
BEGIN_MESSAGE_MAP(MyPropertyPage, CPropertyPage)
ON_COMMAND(IDC_MY_PROP_BUTTON, OnButtonClick)
END_MESSAGE_MAP()
Routing Backstage Property Page Messages to CMainFrame
Routing Backstage Property Page Messages to CMainFrameOptionally, it is possible to route messages from the derived property page, MyPropertyPage, to CMainFrame. To do this override the following:
In MainFrm.h:
public:BOOL GetOnCommand(WPARAM wParam, LPARAM lParam) { return SFLMDIFrameWndEx::OnCommand(wParam, lParam); }
My
PropertyPage.h:
BOOL OnCommand(WPARAM wParam, LPARAM lParam);
MyPropertyPage.cpp:
#include "MainFrm.h"BOOL MyPropertyPage::OnCommand(WPARAM wParam, LPARAM lParam){ return ((CMainFrame*)(AfxGetApp()->GetMainWnd()))->GetOnCommand(wParam, lParam);}
Mock Up Images
Mock up images have been provided in the BackstageViewEx sample. The images provide example of how to layout dialog controls on the property pages.
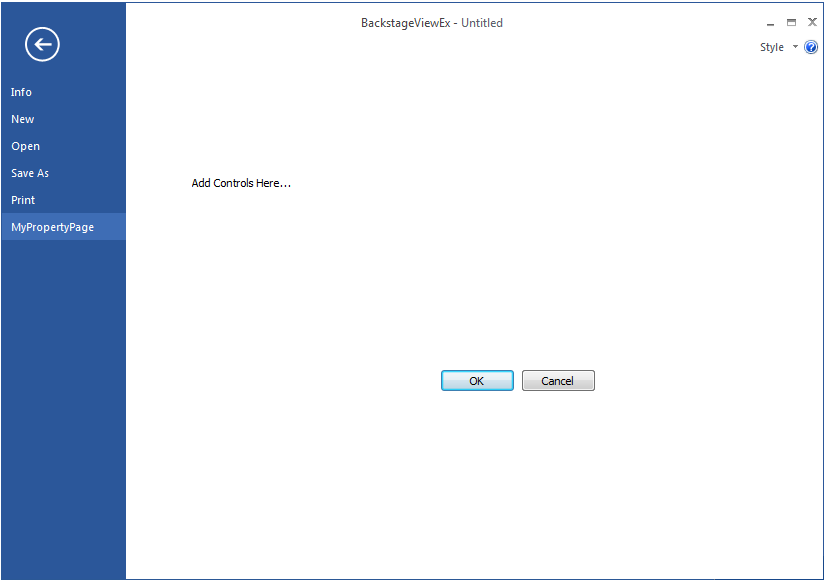
When the application is run and the FILE category is clicked, the newly created page is displayed as the last property page:
Any interaction with the Backstage Property Page is handled the same way as any other dialog, through Message IDs. In the above example, clicking OK would send the ID IDOK and clicking Cancel would send the message IDCANCEL which get be handled in the CMainFrame class.
Print Button Demo
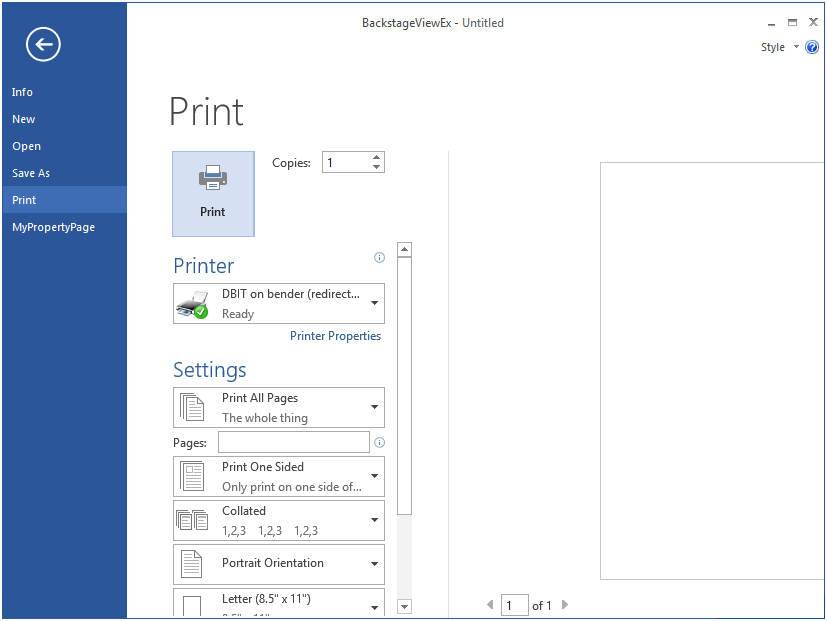
The BackstageViewEx sample demonstrates how to add a themed image to the Print Button. Notice the blue accent highlight in the image below.
The Print Property Page Dialog uses a mock up image of Microsoft Office 2013 Word. However, a CButton is overlaid onto the Print Button in the Resource View Editor for the dialog IDD_PRINT_PROP_DIALOG.
A derived class is created CPrintPropertyPage which derives from SFLBackstagePropertyPageEx. The header and source files in the BackstageViewEx sample are PrintPropertyPage.h and PrintPropertyPage.cpp.
Inside the class CPrintPropertyPage a member variable of type SFLButtonEx is created:
PrintPropertyPage.h:
SFLButtonEx m_PrintButton;
Also, a variable for keeping track of the previous accent color:
sflex:eAppAccent m_PrevAccent;
An override of OnDrawItem() is also provided:
afx_msg void OnDrawItem(int nIDCtl, LPDRAWITEMSTRUCT lpDrawItemStruct);
In OnInitDialog, as defined in PrintPropertyPage.cpp, subclass the button, which in this example is assigned the ID, ID_FILE_PRINT. Set the buttons default images, and keep track of the accent color.
BOOL CPrintPropertyPage::OnInitDialog()
{
//UpdateData(FALSE);
CPropertyPageEx::OnInitDialog();
if (CWnd* pWnd = GetDlgItem(ID_FILE_PRINT))
{
m_PrintButton.SubclassDlgItem(ID_FILE_PRINT, pWnd);
}
// Set the image of the Print button.
m_PrintButton.SetImage(IDB_PRINT_BUTTON_BITMAP, IDB_PRINT_BUTTON_HOT_BITMAP,
IDB_PRINT_BUTTON_BITMAP);
m_PrevAccent = static_cast<SFLWinAppEx*>(AfxGetApp())->GetAppAccent();
return TRUE;
}
In OnDrawItem() we switch the color of the buttons based on the application's accent color.
void CPrintPropertyPage::OnDrawItem(int nIDCtl, LPDRAWITEMSTRUCT lpDrawItemStruct)
{
sflex::eAppAccent curAccent = static_cast<SFLWinAppEx*>(AfxGetApp())->GetAppAccent();
if (m_PrevAccent != curAccent)
{
m_PrevAccent = curAccent;
switch (curAccent)
{
case APPACCENT_OFFICE_WORD:
m_PrintButton.SetImage(IDB_PRINT_BUTTON_BITMAP,
IDB_PRINT_BUTTON_HOT_WORD_BITMAP, IDB_PRINT_BUTTON_BITMAP);
break;
case APPACCENT_OFFICE_EXCEL:
m_PrintButton.SetImage(IDB_PRINT_BUTTON_BITMAP,
IDB_PRINT_BUTTON_HOT_EXCEL_BITMAP, IDB_PRINT_BUTTON_BITMAP);
break;
case APPACCENT_OFFICE_OUTLOOK:
m_PrintButton.SetImage(IDB_PRINT_BUTTON_BITMAP,
IDB_PRINT_BUTTON_HOT_OUTLOOK_BITMAP, IDB_PRINT_BUTTON_BITMAP);
break;
case APPACCENT_OFFICE_POWERPOINT:
m_PrintButton.SetImage(IDB_PRINT_BUTTON_BITMAP,
IDB_PRINT_BUTTON_HOT_POWERPOINT_BITMAP, IDB_PRINT_BUTTON_BITMAP);
break;
}
}
SFLBackstagePropertyPageEx::OnDrawItem(nIDCtl, lpDrawItemStruct);
}
BackstageView Helper Functions
The SFLFluentUI class provides the following helper functions with regard to the BackstageView:
virtual BOOL IsUsingMainApplicationButton()
virtual SFLRibbonBackstageFileCategoryEx* GetBackstageFileCategory()
virtual void ShowBackstageFileWindow(BOOL bShow = TRUE)
virtual void AddBackstagePropertyPage(SFLBackstagePropertyPageEx* pPropPage)
virtual BOOL IsBackstageFileWindowVisible()
virtual void SetRibbonMinimizedBeforeBackstage(BOOL bMinimized)
The main property sheet which contains the backstage property pages is retrieved with the following function from SFLFluentUI:
ui.GetBackstagePropertySheet();
Similarly, pages are retrieved by calling:
ui.GetBackstagePropertySheet()->GetPage(idx); // Where idx is a 0 based index.
Custom Dialog and MessageBoxes
A new class has been added to the FoundationEx library. This class hooks into the global AfxMessageBox using the framework from CWinApp or CWinApp-derived classes to implement a custom AfxMessageBox which is styled to match the Office 2013 Look and Feel. This new message box also offers an optional timer feature to automatically close itself, with an optional progress indicator to show the remaining time.
The public API for the SFLMessageBox is:
Table 8 –
Function name | Description |
SFLMessageBox() | Default Constructor |
SFLMessageBox(CWnd* pParent /* = NULL*/) | Constructor |
virtual ~SFLMessageBox() | Destructor |
BOOL Hook() | Default CWinApp or CWinApp derived class hook |
BOOL Hook(UINT nTimeOut, BOOL bShowProgress) | Custom CWinApp or CWinApp-derived class hook with timer and progress control |
void SetButtonText(UINT idButton, CString strText) | Call to change the label on a button |
The FoundationEx library provides the following in order to use customized AfxMessageBoxes within an MFC application.
• "The SFLWinAppEx class has been extended to include an override of CWinApp::DoMessageBox
• "The SFLMessageBox class contains
— a hook to catch the message box creation throughout an application.
— a callback function to subclass the message box procedure
— an optional timer with an optional progress control which can be programmatically set at runtime.
— a function to easily change the text on the buttons of the custom message box
Applications based upon SFLWinAppEx will automatically inherit these features. Existing calls to AfxMessageBox will produce message boxes with the Office 2013 style. To use the auto-close and progress indicator features, only a few changes are needed:
Example
The BackstageViewEx sample illustrates the implementation of these FoundationEx library extensions. The basic usage is:
1. Add the MB_TIMED style bit to the nType parameter in the AfxMessageBox call.
2. Specify the time in seconds and whether to display the progress indicator in the nIDHelp parameter.
— The seconds in the low word.
— Non-zero in the high word to enable the progress indicator.
For example, to display a message box with just an OK button with a 10-second timeout and a progress indicator:
AfxMessageBox("Self-closing message box", MB_OK | MB_TIMED,
MAKELONG(10, true));
References
This discussion makes use of the following from MSDN:
• AfxMessageBox
• CWinApp::DoMessageBox
• SetWindowsHookEx function
• CBTProc callback function
Customization
Below are the steps necessary to customize your own AfxMessageBox implementation using the FoundationEx library.
To hook the SFLMessageBox class to the AfxMessageBox calls:
1. Derive your application's CWinApp class from the FoundationEx SFLWinAppEx class.
2. Override SFLWinAppEx's DoMessageBox(lpszPrompt, nType, nIDPrompt) function.
Example of custom header:
virtual int DoMessageBox(LPCTSTR lpszPrompt, UINT nType, UINT nIDPrompt);
Example of custom implementation:
int CBackstageViewExApp::DoMessageBox(LPCTSTR lpszPrompt, UINT nType,
UINT nIDPrompt)
{
// Add your own implementation or simply call the base class call
// to ::DoMessageBox()
return SFLWinAppEx::DoMessageBox(lpszPrompt, nType, nIDPrompt);}
Migration to Office 2013
Migration to the Office 2013 Look and Feel builds on top of the migration to the Visual Studio MFC Feature Pack. Refer to the section Getting Started Chapter 5, Support for the MFC Feature Pack, in order to migrate an existing application, new application, or Wizard Generated application. The migration should include the Fluent UI RibbonBar.
For reference, the FluentUI sample, located in <InstallDir>\Samples\FoundationEx\FluentUI contains the base migration code before proceeding with migration to the Office 2013 Look and Feel.
Below are the steps needed to migrate the SFLFluentUI sample to the Office 2013 look and feel.
Step 1: Changes to MainFrm.cpp
In the FluentUI sample, the OnCreate() method has a specific SFLFluentUI create call, CreateAndLoadFromResource(), however, for the Office 2013 version, a new create function, CreateBackstageFileTabAndLoadFromResource() should be used. Replace the call to CreateAndLoadFromResource() with CreateBackstageFileTabAndLoadFromResource(). This will enable the creation of the "FILE" tab as the very first category, then the rest of the categories from the provided Ribbon resource are loaded.
#if(_MSC_VER >= 1700)
// NOTE: IDR_RIBBON_BACKSTAGE has the Main Button section removed from XML!
if (!ui.CreateBackstageFileTabAndLoadFromResource(this, &mti,
IDR_RIBBON_BACKSTAGE, TRUE, TRUE, TRUE, TRUE, FALSE, TRUE))
{
TRACE("Unable to create SFLFluentUI with Backstage File Tab\n");
return -1;
}
// For Office 2013 and Higher Look and Feel, Enable or Disable CAPS
// for the category tabs.
ui.SetMenuCapsEnabled(TRUE); // TRUE by default.
// ...
#endif
Step 2: Caps
After the creation of the Backstage FILE Tab and the loading of the Ribbon resource, the option for Category caps is called. In this case, a demonstration of all CAPS is show with the call SetMenuCapsEnabled(TRUE). All the text on the category tabs will be CAPITALIZED. If FALSE is specified the text will be Camel Case.
Step 3: Application Style Setting
Replace the calls of SetApplicationStyle() and add a new call to SetApplicationAccent(). SetApplicationAccent() is new and will save the application's Office 2013 accent.
// Get Style from Registry otherwise set to Office 2013 White Style.
SetApplicationStyle( (sflex::eAppStyle)theApp.GetInt(_T("ApplicationStyle"),
sflex::APPSTYLE_OFFICE_WHITE_2013), &ui.GetRibbonBar());
SetApplicationAccent((sflex::eAppAccent)theApp.GetInt(_T("ApplicationAccent"),
sflex::APPACCENT_OFFICE_WORD), &ui.GetRibbonBar());
Step 4: Close Event
In CMainFrame::OnClose() add the option to write the applications Style and Accent to the registry.
theApp.WriteInt(_T("ApplicationStyle"), theApp.GetAppStyle());
theApp.WriteInt(_T("ApplicationAccent"), theApp.GetAppAccent());
Remember to remove the application button:
As described earlier, the application button in the RibbonBar resource should be commented out or removed.
<!-- <BUTTON_MAIN>
...
</BUTTON_MAIN> -->
Step 5: File Tab Property Pages
As described earlier, property pages should be added to the application providing functionality for the user. Handling of property page events and any flat style controls will also need to be managed like regular property page controls.
Add property pages with the call AddBackstagePropertyPage().