Objective Chart Wizard
In addition to the Chart Editor, the Chart Wizard allows the user to modify chart settings. Chart Wizard allows new components to be added and changed interactively. The results of changes are displayed immediately in a view window. The user can easily experiment with various chart and axis types to determine the best combination for representing his data.
Chart Wizard Features
The Chart Wizard can help the developer or end user create a chart from scratch or it can reconfigure an existing chart.
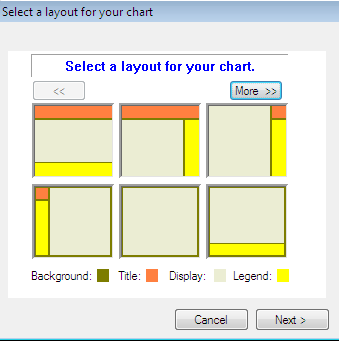
Figure 123 shows the Chart Layout page of the Wizard, while
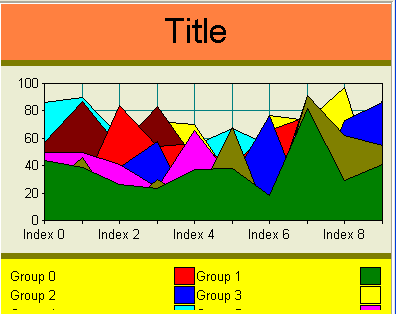
Figure 124 shows the layout preview window.
If the SRGraph object passed to the Wizard has an empty component list, The Wizard displays the Chart Layout page. The user selects a basic chart layout from a number of choices, and the Wizard adds components to the chart accordingly. Then, the user selects an initial graph type for the display. The newly configured chart is displayed in a view window as it will appear in your application. Obviously, the display component looks best if the chart contains some data that it can graph. The Wizard can either copy the data in original SRGraph object or it can use its own arbitrary data set.
After the initial chart configuration, the Advanced editing pages are presented. These are the initial pages shown if the original SRGraph object has components in its list.
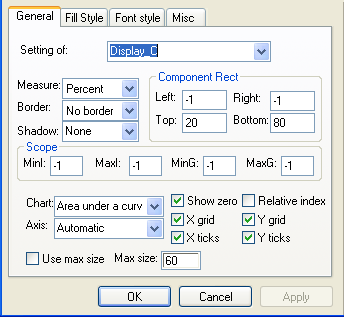
Figure 125 shows the General property page for the display component and
Figure 126 shows the chart view window.
The Advanced pages can be used to interactively configure a graph. Components can be added or removed from the component list. Multiple SRGraphDisplay, SRGraphTitle, SRGraphBackground, SRGTextPanel, and SRGraphLegend components can be added. The SRGCompoundDisplay component is not supported.
The commonly used styles of these components can be modified by the Wizard. The effects of changing a check box status or making a selection from a list box are displayed immediately. Entries into edit boxes are realized when the Apply button is clicked. The Wizard is instructive because it readily shows the effect of the various style settings on the chart.
When you are satisfied with the chart, you can then dismiss the Wizard and save your newly enhanced graph. The graph object that the Wizard modifies and displays is actually a copy of your original. No changes you make inside the Wizard apply to your graph until you explicitly call the SaveGraph() function of the SRGWizSheet class after you dismiss the Wizard dialog.
The data values can be changed by dragging with the mouse. You can determine whether or not the changed data is saved to your graph by specifying a parameter of SaveGraph().
Using Chart Wizard
The Chart Wizard is included in the Objective Chart library. The Wizard consists of several classes derived from CPropertyPage and CPropertySheet. It is used just like a dialog or a property sheet class. In most cases, the SRGWizSheet class is the only class you have to work with.
To use the Chart Wizard in your application:
• Include wizres.rc in your resource file in addition to srgres.rc and extra.rc (optional bitmap support).
• Create a menu item with the predefined resource identifier, ID_GRAPH_WIZARD = 0xd104. The message map in the view classes connects this command message with the function OnGraphWizard(), which displays the Chart Wizard property sheet.
• Or, instantiate the SRGWizSheet dialog wherever you like in your application. The code segment below demonstrates how to incorporate the wizard into any Objective Chart application.
SRGWizSheet dlg(&m_Graph, _T("Sales Chart"));
if( dlg.DoModal() == IDOK )
{
dlg.SaveGraph();
}
The first line creates an SRGWizSheet object and passes it a reference to a preexisting graph object and a caption for the property sheet. The SRGWizSheet constructor has several optional parameters.
SRGWizSheet::SRGWizSheet(SRGraph* pGraph, LPCTSTR pszCaption,
CWnd* pParentWnd, UINT iSelectPage,
CSize viewSize, BOOL bUseGraphData)
pParentWnd is a pointer to the parent window of the property sheet, usually NULL. iSelectPage is the index of the property page to be displayed initially, usually 0. viewSize can be optionally used to set a view area larger than the Wizard’s view window. Then the Use ScrollView check box on the Misc page enables the display of scroll bars for viewing the entire chart. This is useful if the chart uses an absolute (not percentage) measurement mode. bUseGraphData specifies whether the data in the chart is to be copied into the Wizard. The default value is TRUE. Specify FALSE if the chart is using Dynamic or Structure data models or to avoid duplicating large amounts of data. If bUseGraphData is FALSE, a default data set is supplied to the Wizard’s internal chart.
SRGWizSheet() makes a local copy of the user’s chart. Any changes the user makes are applied to a local copy. The original chart is not affected. The Wizard's SaveGraph() routine is called to update the original chart when the DoModal() function returns with an IDOK status. The chart’s data values are not affected, unless SaveGraph(TRUE) is called. Of course, if the Wizard was constructed with bUseGraphData == FALSE, SaveGraph() can not save the data regardless of its parameter.
NOTE >> Because the Chart Wizard makes a copy of the original chart and its components via serialization, the components in the chart returned from the Chart Wizard are different from the originals. Any pointers to the components that you have stored are no longer valid.
NOTE >> Data stored using the Dynamic or Structure data storage models can not be copied into the Wizard. If these data models are used, the Wizard must be constructed with bUseGraphData = FALSE and terminated with SaveGraph(FALSE). A default data set is displayed.
Chart Wizard Property Pages
The Advanced section of the Wizard consists of four property pages: General setup, Fill style, Font style, and Misc. The first three pages have a combo box that lets you select a component (from a list of components in the graph) for modification.
The General setup page lets you set the measurement mode, component rectangle, border style, and shadow style. Table 19 shows the additional options that can be modified for selected components. The best combination of chart and axis types for representing your data can be quickly determined.
Table 19 – Chart Wizard Advanced Section -- General Chart Properties
Component type | Additional features that can be modified |
Background | None |
Title | Chart title |
Text Panel | Body and title text, Title orientation, Use Title flag, Body resize flag |
Display | Data scope and Relative Index flag, Chart type and Axis type, Always show zero flag, flags to enable tick marks and grid lines, Use Max Size flag and Max Size (MaxObjectWidth) – sets max width of bars, bubbles, and vectors |
Legend | Legend style, Key style, Key size, Key first flag, RCLock flag and the number of rows and columns |
The Fill style page determines how the background of the selected component is filled. You can choose a solid color, a horizontal, vertical or angled vignette (a gradient of colors across the area), or a bitmap image. For vignettes, the starting (top) and ending (bottom) colors can be selected. Bitmap images can come from the project’s resources or a file on disk. Enter the resource name or file path in the provided edit box. The images can be in bitmap, DIB, or JPEG format.
The Font style page determines how text appears in the selected component.
Chart Wizard User Interactions
The following user interactions are supported within the chart view window if the actions are enabled in the chart object:
• Pause the mouse over a data item to display Chart tips.
• Drag data items using the mouse.
• Click on an area that is not covered by a data item and drag to display a selection rectangle. When the mouse button is released, the axes are zoomed in to the selected area.
• With the SHIFT key depressed, click on a component to initiate a tracking mode so you can reposition or resize components.
• Right-click in the chart area to display a context menu with the following options:
— Zoom out
— Stop tracking mode
— Copy the chart to the clipboard as a bitmap
— Save the chart to a disk file as a DIB or in JPEG format
— Print the chart
— Save the chart layout
Customizing Chart Wizard
If you come up with a chart layout that you would like to reuse, the layout (component sizes and positions) can be appended to a text file. Then you can override SRGWizSheet::LoadCustomLayout() to add your new layouts to the Wizard’s selection list.
If you have created your own graph type or axis type, you can add your custom types to the wizard’s selection lists. You have to override the LoadCustomGraphType()and LoadCustomStandChart() or LoadCustomAxisType() functions of the SRGWizSheet class.