Step 1: Creating a Basic Chart Application
The easiest way to start any project using MFC is to build a basic application using the AppWizard. You may follow along and build your own application from scratch, or you can open the sample tutorial project
...\Chart\tutorial\Steps\Step1,within the self-extracting archive file,
Stingray Studio Additional Samples.exe, as explained in
“Location of Sample Code” in the
Getting Started part.
To create a basic chart application:
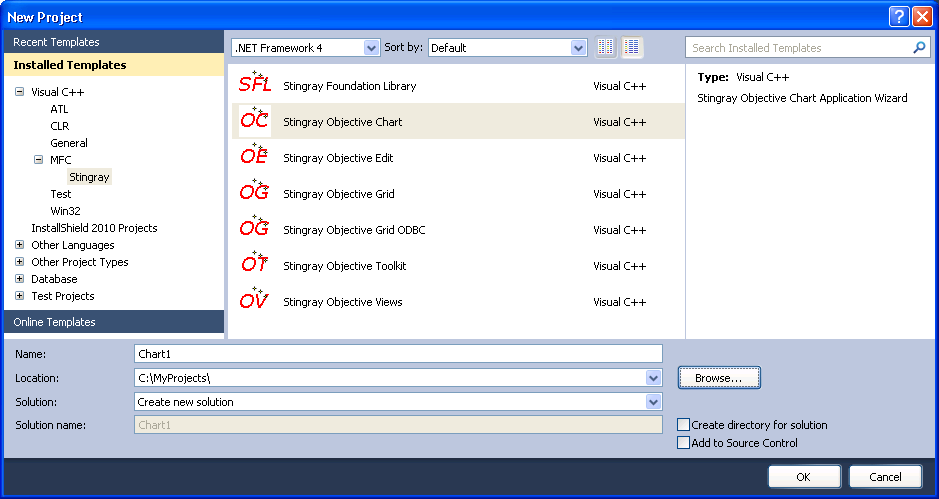
1. Choose File|New|Project in Microsoft Visual Studio.
2. Select Visual C++ Projects from the Project Types: frame and choose Stingray Objective Chart from the Templates: frame.
3. Enter a name for the project, select a location, and click OK. The AppWizard Overview dialog launches.
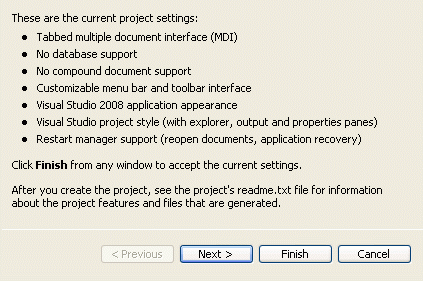
The AppWizard Overview page displays an overview of the current project. At this point, you have two options:
— Click
Finish to accept the default settings and generate the application. If you choose this option, please proceed to
“Modifying the View Class.” — Click through the different categories in the left frame, and select the respective settings in the right frame. If you choose this option, please proceed to step 4.
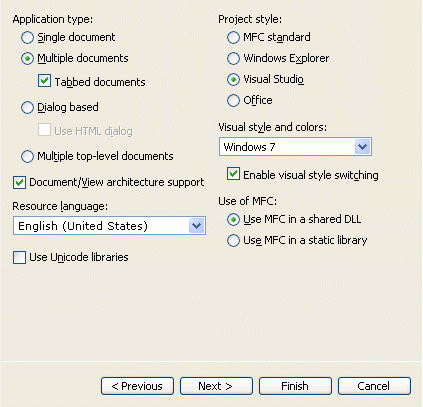
4. Select Application Type from the left frame.
In this dialog, select the application type, resource language, and the use of MFC.
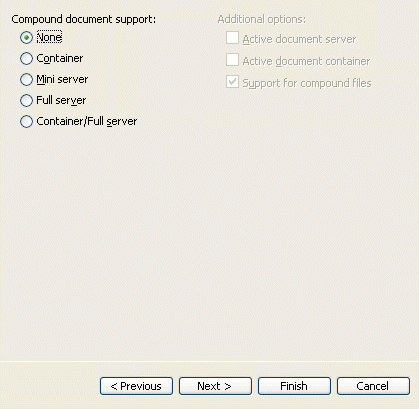
5. Select Compound Document Support and choose the type of compound document support you would like to use.
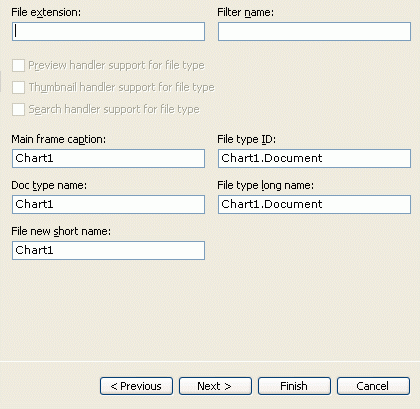
6. Select Document Template Strings from the left frame.
Here, you can modify your application’s document template naming conventions.
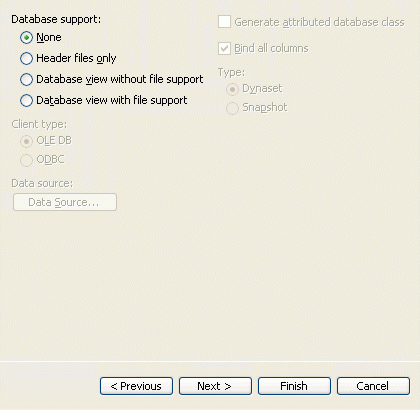
7. Select Database Support and choose the type of database support you would like to use for your application.
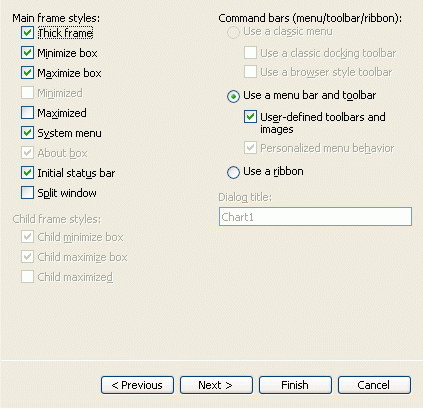
8. Select User Interface Features from the left frame.
This window allows you to customize different GUI options for your application.
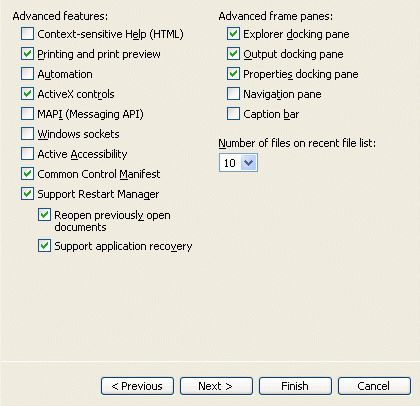
9. Select Advanced Features and choose any additional features you would like to build into your application.
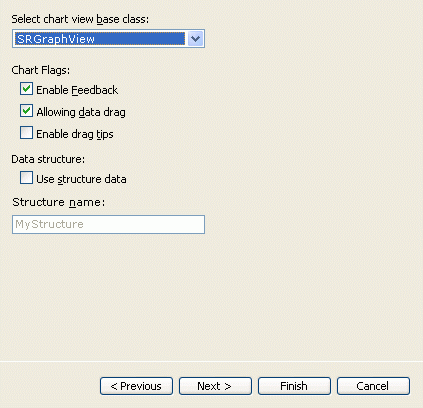
10. Select Chart Settings from the left frame.
This window allows you to select your chart base class and chart flags.
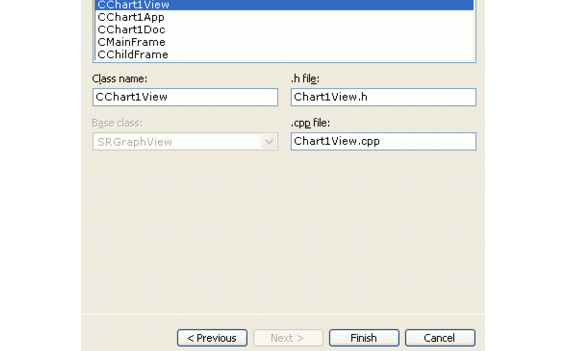
11. Select Generated Classes.
This is the last page of the wizard. From this window, you can edit the names of the generated classes, header files, and .cpp files.
If you are not satisfied with the selections you have made in the previous windows, you can go back and edit your changes by clicking through the links in the left frame.
12. When you are satisfied with your choices, click Finish to generate your project.
The wizard now creates the project for you.
In the following sections, you will learn how to modify the MFC AppWizard-generated files to create an Objective Chart application. The steps are simple and discussed in greater detail throughout the rest of this chapter:
Modifying the View Class
The view class provided by the AppWizard can be easily modified to include Objective Chart's capabilities. Objective Chart provides an alternative view class with some advanced features including data dragging, data feedback with chart tips, editing, printing, and print previewing. We recommend that you use all these features to their fullest advantage.
The view class for the standard MDI child window is based on CView. By changing the base class of the ready-made view (in this case CChartAppView) from CView to SRGraphView, you are inserting the capabilities of the Objective Chart system into the class ancestor list just before your newly created view. In this manner, you can still add your own custom handlers and routines without worrying about altering the Objective Chart sources.
Here's how to change your view class step-by-step:
1. Include the Objective Chart header file.
Find the stdafx.h file for the project and add the following line to the end of the file:
#include "chart\ochart.h"
Our stdafx.h file should look like this...
// stdafx.h : includes standard system include files,
// or project specific include files that are used
// frequently, but are changed infrequently
//
#define VC_EXTRALEAN // Exclude rarely-used stuff
// from Windows headers
#include <afxwin.h> // MFC core and standard components
#include <afxext.h> // MFC extensions
#ifndef _AFX_NO_AFXCMN_SUPPORT
// MFC support for Windows Common Controls
#include <afxcmn.h>
#endif // _AFX_NO_AFXCMN_SUPPORT
#include "chart\ochart.h"
By doing this, all of the files that we have created using the AppWizard now know about Objective Chart.
2. Change the base class of the view from CView to SRGraphView.
In both the header file (CChartAppView.h) and the implementation file (CChartAppView.cpp), perform a global search for “CView” and replace each reference with “SRGraphView.”
3. Modify the OnDraw() routine to perform chart drawing.
Note that the code below refers to a variable named m_Graph. This variable is the default graph object that will be stored in the CChartAppDoc document after suitable modifications to that class have been made.
////////////////////////////////////////////////////
// CChartAppView drawing
void CChartAppView::OnDraw(CDC* pDC)
{
CChartAppDoc* pDoc = GetDocument();
ASSERT_VALID(pDoc);
// Simply add a draw command for the Objective Chart
// object which is stored in the document
pDoc->m_Graph.DrawComponentList(pDC,this);
}
A second way of performing this task would be to simply remove the OnDraw() function from the CChartAppView.cpp file and CChartAppView.h files allowing the built-in handler in the base class (SRGraphView) to manage the drawing of the graph.
Now we can go on to add printing capabilities to this class.
4. Modify the OnBeginPrinting() member function.
The OnBeginPrinting() function is called when the document is printed or print-previewed. The base class (SRGraphView) provides a handler that must be called from our own handler. Again, an alternative is to simply remove all reference to the OnBeginPrinting() function from CChartAppView.cpp and CChartAppView.h and allow the base class to manage the call.
NOTE >> Remove the comments from the function declaration.
Here is the original code:
void CChartAppView::OnBeginPrinting(CDC* /*pDC*/, CPrintInfo* /*pInfo*/)
{
// TODO: add extra initialization before printing
}
And here, the edited version:
void CChartAppView::OnBeginPrinting(CDC* pDC, CPrintInfo* pInfo)
{
SRGraphView::OnBeginPrinting(pDC,pInfo);
}
This step completes the modifications to the CChartAppView code. Before we go on to modify the document, you may want to read some of the information regarding the SRGraphView class from which our CChartAppView is derived.
There are other standard command handlers provided by the SRGraphView:
• OnLButtonDown(), OnLButtonUp(), and OnMouseMove() handle data dragging, data zooming, and the initial phase of chart tip generation in concert.
• OnTimer() handles chart tip generation proper.
• OnEditCopy() copies the bitmap from your SRGraphView-based view onto the clipboard for pasting into other documents.
If your application overrides these handlers and you want to keep the SRGraphView capabilities, you must make sure that you either call the base class handlers or perform similar tasks in your own routines.
There are also several non-standard (i.e. unique to Objective Chart) command handlers that are available to you. These are built into SRGraphView in the same way that the standard OnFile??? commands are, and they have their own special command IDs.
The special handlers are:
• OnGraphZoomout() which returns zoomed displays to their normal state. The command ID, ID_GRAPH_ZOOMOUT, is defined in the Objective Chart resources.
• OnUpdateGraphZoomout() which enables or disables the graph zoom-out buttons and menu items according to the current state.
• OnGraphEdit() which invokes the built-in editor, Chart Explorer. The command ID, ID_GRAPH_EDIT, is defined in the Objective Chart resources.
• OnGraphWizard() which invokes the Chart Wizard allowing the user to interactively experiment with various chart types and add or modify components.
• OnGraphPagesetup() which invokes a dialog box that allows you to paginate your graph before printing. The command ID, ID_GRAPH_PAGESETUP, is defined in the Objective Chart resources.
• OnSaveAsDib() which stores the chart image in a disk file as a Device-Independent Bitmap. The command ID, ID_FILE_SAVE_AS_DIB, is defined in the Objective Chart resources.
• OnSaveAsJpeg() which stores the chart image in a disk file as a Device-Independent Bitmap. The command ID, ID_FILE_SAVE_AS_JPEG, is defined in the Objective Chart resources.
Later in this tutorial, you will see how to modify your resources for use with Objective Chart. Read on to see how to modify your document class to create a simple but useful graph object.
Modifying the CChartAppDoc Class
The document class provided with the Objective Chart kit is called
CGraphDoc. It is a derivative of
SECComDoc, which is a specialized document class designed to aid inter-document communications. For the moment, we will not be using any of the ComDoc features, but they are discussed in
step 20CGraphDoc has a member object, m_Graph, of the SRGraph class. The m_Graph object will contain the components and data for our graph.
To modify the CChartAppDoc Class:
1. Change the base class of the document from CDocument to CGraphDoc.
In the same way that we modified the view class, modify the document class by running a global search and replace on both the CChartAppDoc.cpp and CChartAppDoc.h files.
2. Modify the Serialize() member function. A single line must be added to the CChartAppDoc::Serialize() function to instruct the SRGraph member variable to save or load itself.
void CChartAppDoc::Serialize(CArchive& ar)
{
// The only change required.
m_Graph.Serialize(ar);
if (ar.IsStoring())
{
// TODO: add storing code here
}
else
{
// TODO: add loading code here
}
}
3. Modify OnNewDocument() to make a basic graph.
So that the document has something to display, we will add a simple data set. In the next step of this tutorial, we'll initialize the chart with real data.
BOOL CChartAppDoc::OnNewDocument()
{
if (!CDocument::OnNewDocument())
return FALSE;
// build a display component
SRGraphDisplay *pDisplay=new SRGraphDisplay;
// just a simple bar graph
pDisplay->GetStyle()-> SetGraphStyle(CX_GRAPH_VBAR);
// with a classic axis
pDisplay->GetStyle()-> SetAxisStyle(CX_AXIS_CLASSIC);
// and add the display to the list
m_Graph.AddComponent((SRGraphComponent *) pDisplay);
// let’s make up some data, 3 rows, 4 columns
for(int nGroup=0;nGroup<3;nGroup++)
{
for(int nIndex=0;nIndex<4;nIndex++)
m_Graph.SetValue(nIndex,nGroup,5.0*nGroup+nIndex);
}
return TRUE;
}
Modifying the ChartApp Resources
Objective Chart has its own resource file, SRGRes.rc. It holds the dialog boxes for the Chart Editor, the definitions of all the error reporting strings, and some specialized resources for drawing shapes and data points.
A second resource file, WizRes.rc, contains the property pages and dialog boxes for the Chart Wizard.
You need to add the Objective Chart resources to the compile-time directives of your Visual Studio project. The Objective Chart resources have been constructed so that the integer IDs it contains are unlikely to collide with the IDs that are generated by most normal MFC-based projects or other Stingray products. However, if you do have resource ID warnings, we strongly advise you to rectify them by modifying your own resources, not by changing SRGRes.rc. If you do change this file, your work could be undone when you receive Objective Chart updates in the future. To modify the ChartApp resources:
1. Click the View | Resource Includes menu command. Add SRGRes.rc to your project’s Compile-time Directives. If your project will utilize the Chart Wizard, add WizRes.rc also.
#include "chart\SRGRes.rc"
// optional Chart Wizard support
#include "chart\WizRes.rc”
The final list of directives should read something like this...
#define _AFX_NO_SPLITTER_RESOURCES
#define _AFX_NO_OLE_RESOURCES
#define _AFX_NO_TRACKER_RESOURCES
#define _AFX_NO_PROPERTY_RESOURCES
#if !defined(AFX_RESOURCE_DLL) || defined(AFX_TARG_ENU)
#ifdef _WIN32
LANGUAGE 9, 1
#pragma code_page(1252)
#endif
#include "res\ChartApp.rc2" // non-Microsoft Visual C++ edited resources
#include "afxres.rc" // Standard components
#include "afxprint.rc" // printing/print preview resources
#endif
#include "chart\SRGRes.rc"
// optional Chart Wizard support
#include “chart\WizRes.rc”
2. Add the Extra.rc file to the CChartApp resources. (OPTIONAL)
For demonstration purposes, an extra resource file is provided. It includes several tiling bitmap images, a pictograph polygon, and a pictograph image that can be used to decorate your graphs. You can use this resource as a basis for adding your own resources.
To add this resource file, insert the following line to the end of the compile-time directives list:
#include "extra.rc"
After you edit the compile-time directives, Visual Studio displays a warning that your changes can make your project uncompilable.
3. Add the menu items for print pagination, graph editing, and zoom restoration.
Using the resource editor, open the menu resource dedicated to CChartApp documents. Its menu identifier is IDR_CHARTATYPE. Access the File menu and insert a new menu selection just above the Print... menu item. The entry should be called “Page Setup...” Its ID must be set to 0xd103, the special Objective Chart menu code. You can do this by entering the text “ID_GRAPH_PAGESETUP=0xd103” into the ID box on the Menu Item Properties dialog.
Alternatively, set the text in the ID box to ID_GRAPH_PAGESETUP2=0xd144 to use the new dialog that allows arbitrary print sizes.
Similarly, add a Graph menu between the View and Window menus. Our Graph menu will have two commands. The first, Graph | Edit, allows you to edit the graph. The second, Graph | Zoom out, is enabled after a graph has been zoomed to allow the original state to be restored. These two menu items should also be identified by special command IDs too. The details are:
| Graph | Edit | ID_GRAPH_EDIT=0xd101 |
| Graph | Zoom out | ID_GRAPH_ZOOMOUT=0xd102 |
NOTE >> Do not add handlers for these commands. All three have special handlers built into the message map of the SRGraphView class.
4. Add toolbar buttons to correspond to the new menu items.
Three toolbar buttons can be added to the default (IDR_MAINFRAME) toolbar. The buttons are enabled when a graph document is opened in the main application frame.
You may design your own toolbar buttons or use the ones provided in this tutorial. After the button artwork is complete, select each new button and modify its properties by double clicking outside of the pixel area but inside the edit window. Change the button IDs to ID_GRAPH_PAGESETUP, ID_GRAPH_EDIT, and ID_GRAPH_ZOOMOUT appropriately.
Reviewing the Steps to a Functional Graph
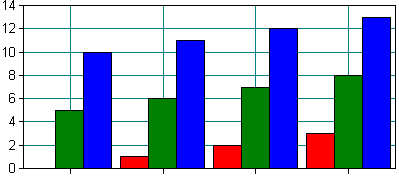
Now you should be able to compile and run the
ChartApp executable. The display should look like
Figure 28.
Here is a brief recap of what was done to turn a basic MDI application into a charting program:
• We included the ochart.h header file in the stdafx.h header for the project.
• Using search and replace, we changed the base class of the view from CView to SRGraphView and the base class of the document to CGraphDoc. A chart object is already a member of CGraphDoc.
• In the view class, we modified the OnDraw() routine to draw the chart object and edited the OnBeginPrinting() routine to call the base class version.
• In the document, we added a call to the chart object’s Serialize() function. In the OnNewDocument() routine, we set up a simple display component and created some dummy data to plot.
• In the resource’s compile-time directives, we included the SRGRes.rc file. We added a menu item for page setup and explicitly defined the menu item ID as 0xd103. Similarly, we added menus for the graph editor and the zoom-out function, and gave them IDs 0xd101 and 0xd102, respectively. Finally, we added three toolbar buttons and gave them IDs to match the new menu items.
Assessing the ChartApp’s New Capabilities
By adding only a few lines of code, we gave our new application some powerful features encapsulated in the enhanced document and view classes of Objective Chart. The application now has the ability to:
• Display graphs and charts.
• Edit both the chart components and the data with Chart Explorer.
• Save and load the chart via serialization.
• Drag data items using the mouse.
• Zoom in on data and zoom out again.
• Provide feedback with chart tips.
In the next section we give ChartApp the ability to read tab-delimited grid files.