DbQuery - Step 1
Create a New DbQuery Project
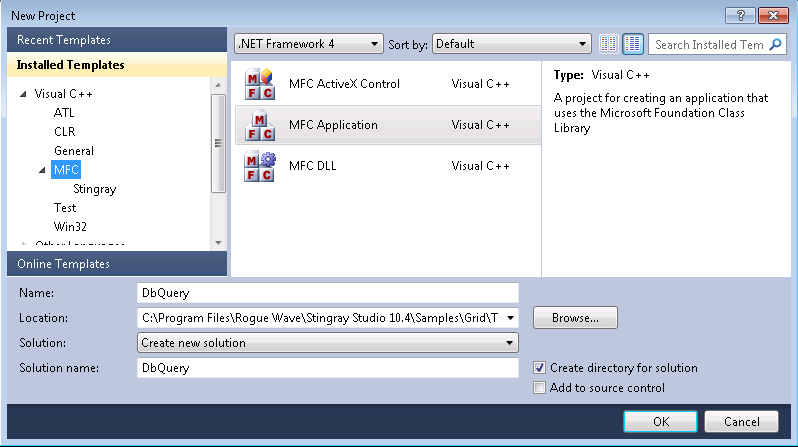
1. Launch Microsoft Visual Studio.
2. Select File|New |Project from the menu.
The New Project dialog box appears.
3. Enter DbQuery for the Project name and <stingray-installdir>\Samples\Grid\Tutorial\DbQuery\Mygrid for the Location.
4. Select MFC Application from the list box.
5. Click OK.
DbQuery AppWizard Options
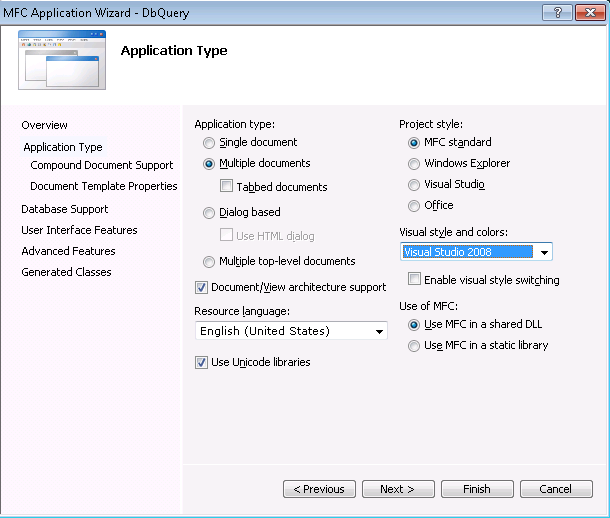
1. The MFC Application Wizard dialog box appears.
2. Select Multiple documents for MFC AppWizard under Application type.
3. Click Database Support.
4. Select Header files only for MFC Application Wizard under Database Support and Client Type as ODBC.
5. Accept the defaults for all other steps. You can scan through the settings by clicking the links, or click Finish to create the project.
DbQuery Project Settings
This step specifies that the application should use Objective Grid as a shared library. You should skip this step if you want to link statically to the Objective Grid libraries.
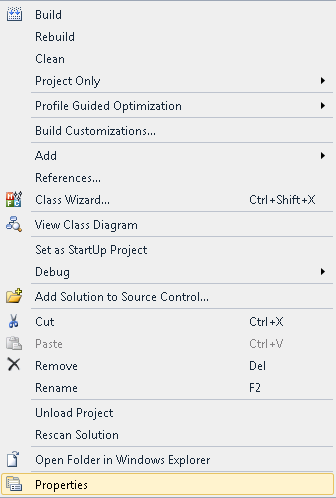
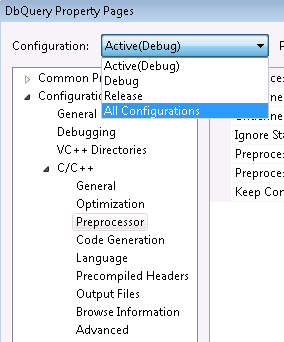
1. Select Solution Explorer from the View menu.
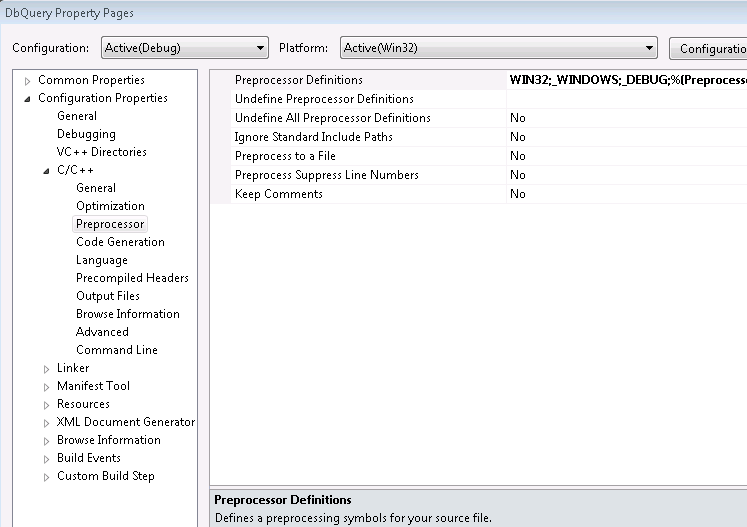
2. Right click on DbQuery and select Properties to get the Property Pages window.
The Property Pages window appears.
3. Choose All Configurations in the Configuration: combo box in the top-left corner of the dialog.
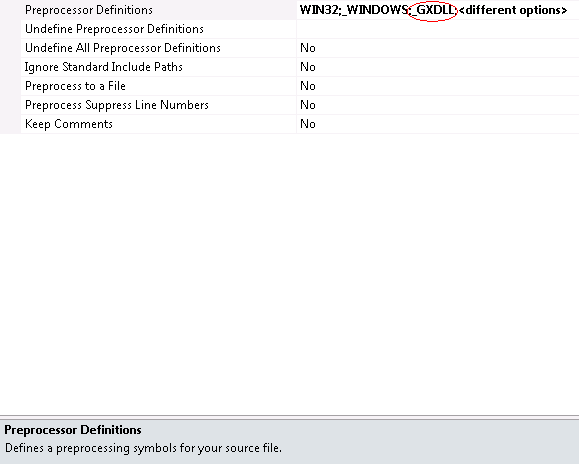
4. Select the C/C++ tab and add _GXDLL to the Preprocessor definitions. This step indicates that the application will link dynamically to Objective Grid. Do not specify _GXDLL if you wish to link to Objective Grid as a static library. _GXDLL is similar to the _AFXDLL preprocessor in that _AFXDLL specifies that the application will link to MFC as a dynamic library.
5. Click OK.
Modify DbQuery's stdafx.h
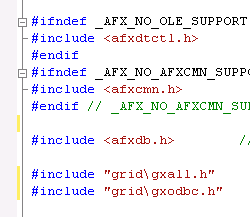
Gxall.h is the core Objective Grid header file. Once this file is added, all required classes will be available to you inside your application. This is similar to including afx*.h. Gxodbc.h is the Objective Grid ODBC header file.
1. Open stdafx.h
2. Add the following lines at the end of the file:
#include "grid\gxall.h"
#include "grid\gxodbc.h"
3. Save and close stdafx.h.
Include Objective Grid Resources in DbQuery
Including the Objective Grid resource header file in your application's resource script gives your application access to the Objective Grid Resources. When linking statically to the Objective Grid libraries, it is also necessary to include the Objective Grid resource script. The following steps demonstrate how to add the Objective Grid resource files to your project.
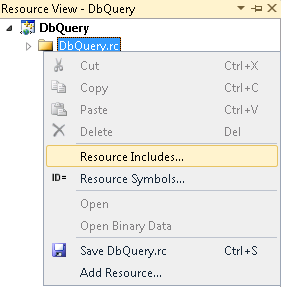
1. Select Resource View from the View menu.
2. Right-click on the root of the Resource View tree (DbQuery.rc).
3. A context menu pops up.
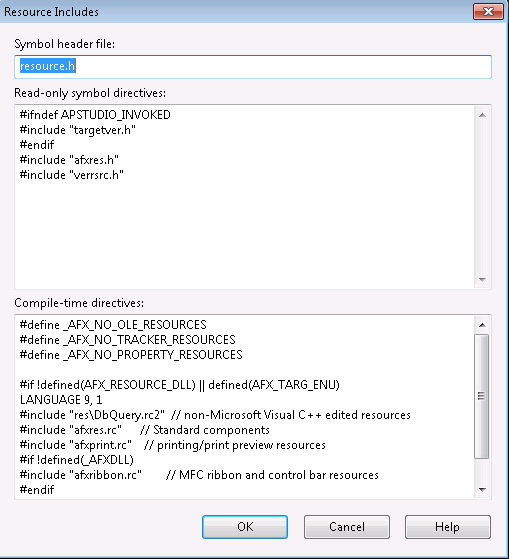
4. Choose Resource Includes.
The Resource Includes dialog box appears.
5. Add the following line to the Read-only symbol directives box.
#include "grid\gxresrc.h"
6. Add the following line to the end of the Compile-time directives box.
#include "grid\gxres.rc"
NOTE >> Skip this step if your application is linking to Objective Grid as a shared library (DLL). Including the grid\gxres.rc file will not upset the function of your application, but it will cause unnecessary bloat to the final application file size. The Objective Grid resources are already included in Objective Grid DLLs and therefore do not need to be included in the application.
7. Click OK.
8. A message box pops up warning you that the "Directive text will be written verbatim into your resource script and may render it uncompilable." This is fine. You can safely choose OK.
Modify the DbQuery Application Implementation File
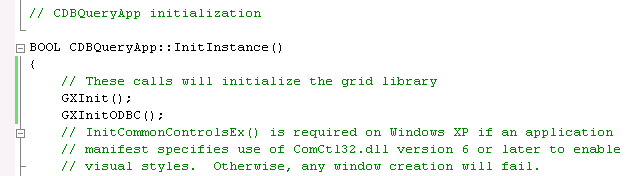
GXInit() initializes resources and variables used by Objective Grid. It should be called from your application's InitInstance() to be sure Objective Grid is initialized before calling any Objective Grid functions. GXInitODBC() initializes the ODBC support for Objective Grid. For more information about GXInit() or GXInitODBC(), please refer to the Objective Grid Class Reference.
1. Open dbquery.cpp and search for InitInstance().
2. Add the following lines to the beginning of InitInstance():
// These calls will initialize the grid library
GXInit();
GXInitODBC();
Register a Database
Use the ODBC Data Source Administrator to register the
stdreg32.mdb database file as
Student Registration.
“Add a CRecordset Derived Class” uses this data source, so you’ll need to register this data source before continuing with the tutorial.
NOTE >> This section gives you step by step instructions. If you don’t need the details, skip this section.
1. Locate the stdreg32.mdb file in the <stingray_installdir>\Samples\Grid\Database folder. Make sure your copy of stdreg.mdb is not read-only.
2. If Windows 2000 is your operating system, start the ODBC Data Source Administrator by double-clicking the Data Sources (ODBC) icon in the Control Panel\Administrative Tools.
NOTE >> If your machine is running a different OS, you may need to search around a bit to locate the icon for the ODBC Data Source Administrator.
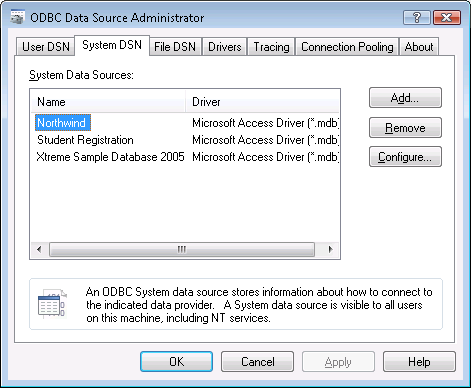
3. Click the tab corresponding to the category of data source you want to register. For example, choose the System DSN tab if the data source should be visible to all users on the machine including NT services.
Figure 85,
Figure 86, and
Figure 87 show the difference between the different categories of ODBC data sources.
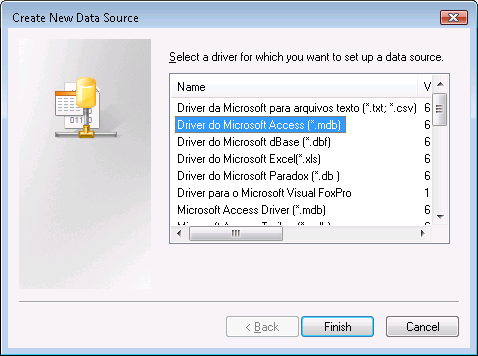
4. Click the Add button.
5. Select the driver that corresponds to Access (*.mdb).
6. Click Finish.
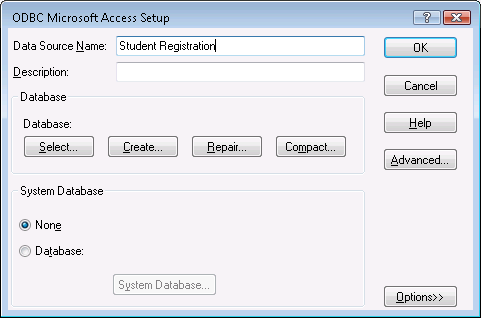
7. In the ODBC Microsoft Access Setup dialog, type Student Registration as the Data Source Name. (You don’t need to add a description.)
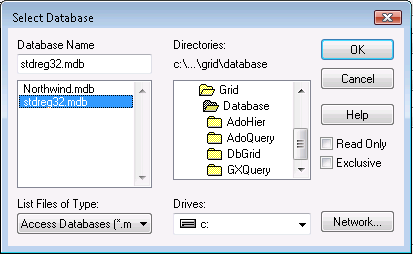
8. Click Select.
9. Navigate to the samples\grid\tutorial folder and select the name of the database (stdreg32.mdb).
10. Click OK.
11. Make sure the Student Registration database shows up correctly.
12. Click OK.
Add a CRecordset Derived Class
NOTE >> The following steps use the Student Registration database (stdreg32.mdb). Make sure that you’ve registered the database as described in
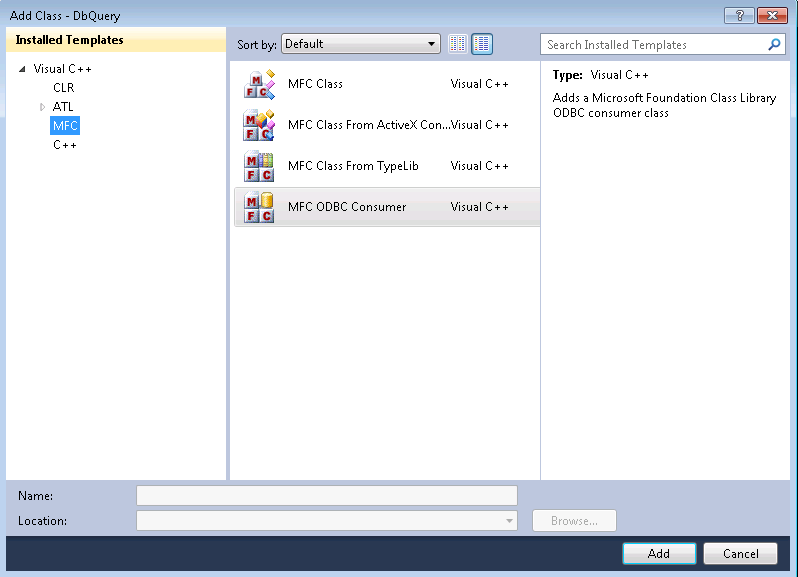
“Register a Database.” 1. Select Class View from the View menu.
2. Right click on DbQuery and click Add, then Class.
3. Select MFC from the tree node, and MFC ODBC Consumer from the list box.
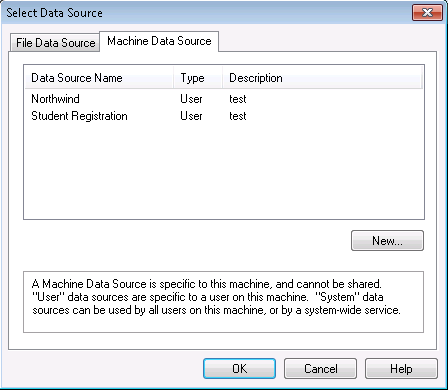
4. Click the Data Source... button and select Student Registration under the Machine Data Source tab.
5. Press OK.
The Login dialog box for the selected DataSource appears.
6. Enter the Login and Password if applicable.
7. Click OK to open the Select Database Object dialog box.
8. Select the Student table and press OK.
9. Click OK.
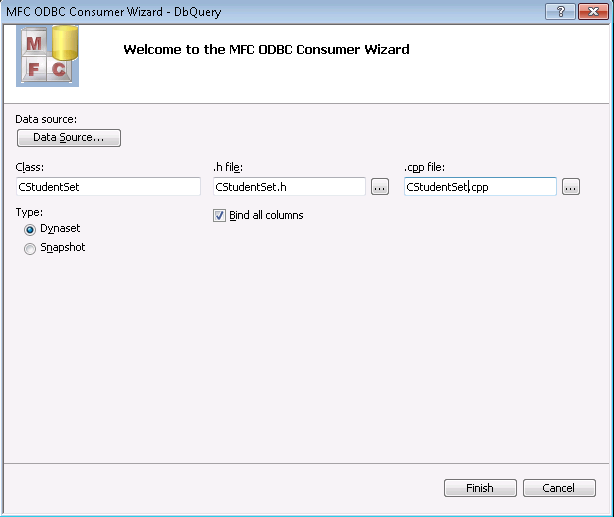
10. Enter CStudentSet in the Class: field, StudentSet.h in the .h file: field, and StudentSet.cpp in the .cpp file: field.
11. Place a checkmark in the Bind all columns check box, and select the Dynaset radio button.
NOTE >> If Snapshot is selected and a Unicode build is used, recordset is read-only.
12. Click Finish to generate the necessary files.
13. The wizard may put an error message in the StudentSet.cpp file as follows:
#error Security Issue: The connection string may contain a password
//The connection string below may contain plain text
//passwords and/or other sensitive information. Please remove //the #error after reviewing the connection string for any
//security related issues. You may want to store the password //in some other form or use a different user authentication.
This error message can be removed for the purpose of this tutorial.
Modify DbQuery View's Header File
In this step, the application's view class is changed from a CView derivative to a CGXGridView derivative.
1. Open DbQueryView.h.
2. Add the line:
class CStudentSet;
as a forward declaration before the class declaration and add:
CStudentSet* m_pSet;
as a member variable to CDbqueryView's attributes section.
The completed code should look like this:
// dbquevw.h : interface of the CDbqueryView class
//
/////////////////////////////////////////////////////////
class CStudentSet;
class CDbqueryView : public CView
{
protected: // create from serialization only
CDbqueryView();
GRID_DECLARE_DYNCREATE(CDbqueryView)
// Attributes
public:
CDbqueryDoc* GetDocument();
CStudentSet* m_pSet;
...
3. Change the derivation of the view by replacing all occurrences of CView with CGXRecordView.
Modify DbQuery View's Implementation File
1. Open DbQueryView.cpp.
2. Add:
#include "studentset.h"
The completed code should look like this:
// DbQueryView.cpp : implementation of the CDbQueryView class
//
#include "stdafx.h"
#include "DbQuery.h"
#include "DbQueryDoc.h"
#include "DbQueryView.h"
#include "studentset.h"
...
3. Replace all occurrences of CView with CGXRecordView.
4. Change the view's constructor and destructor as follows:
CDbQueryView::CDbQueryView()
{
m_pSet = new CStudentSet;
}
CDbQueryView::~CDbQueryView()
{
delete m_pSet;
}
5. Add a new method, OnGetRecordset():
CRecordset* CDbQueryView::OnGetRecordset()
{
return m_pSet;
}
Also insert the definition for this method in DbQueryView.h:
virtual CRecordset* OnGetRecordset();
6. Modify OnDraw(), OnBeginPrint(), and OnEndPrinting():
void CDbQueryView::OnDraw(CDC* pDC)
{
CDbQueryDoc* pDoc = GetDocument();
ASSERT_VALID(pDoc);
CGXRecordView::OnDraw(pDC);
}
void CDbQueryView::OnBeginPrinting(CDC* pDC,
CPrintInfo* pInfo)
{
CGXRecordView::OnBeginPrinting(pDC, pInfo);
}
void CDbQueryView::OnEndPrinting(CDC* pDC, CPrintInfo* pInfo)
{
CGXRecordView::OnEndPrinting(pDC, pInfo);
}
Compile and Run DbQuery - Step 1
At this point, you can compile and run the DbQuery application.
1. Compile the application and run it.