Example: Setting Up a Scanner
With this bit of background information under our belt, let us now look at how we setup a scanner.
NOTE >> It would help to compile the Deals sample at this point. This sample does not ship with the product. If you need this sample, please submit a request to Stingray customer support.
Introduction to the Deals Sample
The Deals sample retrieves the main page from http://www.thedailydeals.com (a Web site that has information on Web deals). It parses the information available at the site and populates a list control. Clicking on a link in the list control will take you directly to that link. This sample can automatically run every few minutes to gather this data, parse it, and populate the list control.
Declaring the Processor
When using the data extraction framework, you will usually need to concern yourself with only two major classes—the data processor class (CRgProcessor), which contains and drives the data extraction process, and the listener class (CRgDefListener), which acts as a stub for any feedback generated from the scanning process.
In the Deals sample, Class CDealProcessor (derived from CRgProcessor) is declared as shown below:
class CDealProcessor : public CRgProcessor
{
public:
enum states
{
estateNormal,
estateDeals,
};
enum tokens
{
etokenDealName,
etokenExpired,
etokenNotExpired,
etokenRef,
};
// required override
// put all your initialization code here using the
// provided macros for easy maintenance
void Initialize();
};
NOTE >> Typically, this is how we recommend that you declare your own processors. There should be an enum declaration for tokens that will be recognized by the scanner. There should be an enum declaration for states that the scanner will traverse.
The steps for writing code to scan a text stream are:
1. Identify the tokens that you want to read from the stream.
2. Define an enum and add a value for each of these tokens.
3. Consider how you will extract the information, thinking ahead about the states and sub states to use to facilitate implementation.
For example, if you are looking at stock information from www.Yahoo.com you may be looking at data much like the listing below. (A series of three dots indicates where code has been deleted for brevity.)
<html>
.
.
.
<td nowrap>Div Date<br>N/A</td>
<td nowrap rowspan=3 valign=bottom width="1%" bgcolor=white>
<a href="/q?s=RWAV&d=1y">
<img border=0 width=192 height=96 src=
"http://chart.yahoo.com/c/0b/r/rwav.gif" alt="Chart"></a><br>
<small>Small: [<a href="/q?s=RWAV&d=1b">1d</a> |
<a href="/q?s=RWAV&d=2b">5d</a> | <b>1y</b> |
<a href="/q?s=RWAV&d=nc">none</a>]<br>
Big: [<a href="/q?s=RWAV&d=1d">1d</a> |
<a href="/q?s=RWAV&d=5d">5d</a> |
<a href="/q?s=RWAV&d=3m">3m</a> |
<a href="/q?s=RWAV&d=1y">1y</a> |
<a href="/q?s=RWAV&d=2y">2y</a> |
<a href="/q?s=RWAV&d=5y">5y</a>]</small></td></tr>
<tr align=center valign=top>
<td nowrap>Day's Range<br>5
<sup>3</sup>/<sub>4</sub> - 6 <sup>3</sup>/<sub>16</sub></td>
<td nowrap>Bid<br>5 <sup>3</sup>/<sub>4</sub></td>
<td nowrap>Ask<br>5 <sup>7</sup>/<sub>8</sub></td>
<td nowrap>Open<br>6 <sup>1</sup>/<sub>8</sub></td>
<td nowrap>Avg Vol<br>49,818</td>
<td nowrap>Ex-Div<br>N/A</td></tr>
<tr align=center valign=top><td nowrap>52-week Range
<br>3 - 12 <sup>7</sup>/<sub>8</sub></td><td nowrap>Earn/Shr<br>-0.06</td>
<td nowrap>P/E<br>N/A</td><td nowrap>Mkt Cap<br>63.3M</td>
<td nowrap>Div/Shr<br>N/A</td>
<td nowrap>Yield<br>N/A</td></tr></table>
</td></tr><tr><td><small>
.
.
.
<tr valign=top>
<td nowrap>Thu</td><td nowrap>Aug</td>
<td align=right nowrap>10</td><td>RWAV</td>
<td><a href="http://biz.yahoo.com/e/000810/rwav.html">
ROGUE WAVE SOFTWARE INC /OR/ - Quarterly Report (SEC form 10-Q)</a> -
<i>Other</i></td>
</tr>
<tr valign=top>
<td nowrap>Mon</td>
<td nowrap>Aug</td>
<td align=right nowrap> 7</td>
<td>RWAV</td>
<td><a href="http://biz.yahoo.com/prnews/000807/co_rogue_w.html">
Rogue Wave Software Embraces Japanese C++ and XML Components
Market</a> - <i>PR Newswire</i></td>
</tr>
<tr valign=top>
<td nowrap>Mon</td>
<td nowrap>Jul</td>
<td align=right nowrap>17</td>
<td>RWAV</td>
<td><a href="http://biz.yahoo.com/snp/000717/rwav_dtp_i.html">
ROGUE WAVE SOFTWARE INC., posts 3Q EPS $0.02 vs. $0.04</a> -
<i>Standard & Poor's</i></td>
</tr>
</table>
<p>
.
.
.
</html>
In the HTML above, we have highlighted (in bold) the portions of interest—the stock quote area and the news area. To scan these areas you need different regular expressions. This usually implies that you should have these two areas denoted by different states.
Within each state, you may need to extract each needed token in a different manner. On the Yahoo! page, for example, you have to extract the title heading of the news link in a different manner than you will extract the article reference. Each of these would be sub states within the encompassing state. Sub states are not important when you define the token enum values; however, thinking about the sub states ahead of time makes implementing the scanner easier.
Implementation Details
Now that you understand the rationale for the two enum definitions, consider the data that we scan when interacting with http://www.thedailydeals.com. If you make a request to http://www.thedailydeals.com and click View|Source (or the equivalent command in your browser) you will see the entire HTML stream that returns from the server. The sample makes an HTTP request for the default page using the Microsoft Wininet library.
Token Definitions
Based on the data available at the Web site, we determined the information to extract (shown in
Table 42). This should lead us to the token definitions. Therefore, the following tokens correspond to the three pieces of information we want.
Table 42 – Information and token definitions
Information Required | Token Definition |
The description of the deal. | etokenDealName |
The link to it on the Daily Deals Web site. | etokenRef |
Whether the deal has expired or not. | etokenExpired |
To make the interpretation of the feedback data a little easier in the sample, we have a separate token for the expired state and the not expired state. We could have passed the token as it is and then looked at the string to see if it was expired or not expired. However, because we have two different tokens, the regular expression engine will do the work for us.
This leads us to define the following four tokens:
enum tokens
{
etokenDealName,
etokenExpired,
etokenNotExpired,
etokenRef,
};
States
The next part is kind of heuristic in nature; each person may come up with a different solution. Looking at the chunk of data returned from the site, we came up with the following states:
{
estateNormal,
estateDeals,
};
estateNormal is the state that we start with. When we see the start of the deal listings we go into estateDeals. If we find another deal, we continue in estateDeals. If not, we exit the scanner.
The next step is to decide how we go about shifting between the states and what data we collect in each state. The conclusions of this exercise are translated into code using macros provided in the body of the Initialize() function (in the processor).
Each individual state is started with the macro rg_start_state(). This macro takes two parameters—the name of the state variable and the name of the state identifier token (one of the possible values of the state enum that we defined earlier). Inside the state declaration we can add sub states as desired. Each sub state is defined by an rg_sub_state()macro. This takes a token ID (from the enum that we defined earlier for this purpose) and the regular expression that extracts the data.
Sub Expressions
Be sure to place any data that you wish to collect inside parentheses so that a sub expression is defined. See
Table 43 for an example.
Table 43 – Defining a sub expression
General sample form... | Regular expression should be... |
My name is John. | My name is (.*) |
Any token that is scanned will have the sub expressions available. These can be used to initialize our data easily.
You can add any number of sub states within each state. Each of these sub states will be OR’d (combined) with the others to create a composite expression for that state. This implies that you should not try to gather data using separate regular expressions (defining two sub states) when there is overlap. Instead, combine these into the same expression. For example, consider:
Table 44 – Using separate regular expressions
For example... | Don’t do this... | Do this... |
My name is happyface; my e-mail address is happyface@roguewave.com. | My name is ([a-z]*); my e-mail address is happyface@roguewave.com.andmy e-mail address is (.*) | My name is ([a-z]*); my e-mail address is (.*) |
Each sub state also takes a third parameter that specifies the action that should be taken when a scan is complete. This can be one of three possible values.
• CRgSubState::stateContinueImplies that no change in state will take place if that expression is matched. The next scan will also be with the same effective state.
• CRgSubState::stateNoNextImplies that as soon as this sub state is matched the scanning process will terminate.
• Custom Tokens—These can be any of the state tokens that have been defined earlier. After a match is made, processing will shift to the state that is denoted by this state identifier.
End the state with rg_end_state(). You can have any number of states within the processor.
The Deals sample implements the required Initialize() function as shown below:
void CDealProcessor::Initialize()
{
rg_start_processor(this)
rg_start_state(stateNormal, estateNormal)
rg_sub_state(CRgSubState::tokenNone,
_T("(class=\"show\">This Month</a>)"), estateDeals)
rg_end_state()
rg_start_state(stateDeals, estateDeals)
rg_match(match_any)
rg_sub_state(etokenRef, _T("(href=\"(.*)\")"),
CRgSubState::stateContinue)
rg_sub_state(etokenDealName,
,_T("(class=\"newsquick\">([^<>]*)</a>)"),
CRgSubState::stateContinue)
// ignore the date
rg_sub_state(CRgSubState::tokenNone,
,_T("(class=\"newsquick\">([0-9/]*)</span></td></tr>
<tr bgcolor=\"#FFFFFF\")"), CRgSubState::stateContinue)
rg_sub_state(etokenExpired, _T("(<font color=\"#CC0033\"
size=\"1\"> Expired</font></td></tr>)"),
CRgSubState::stateContinue)
rg_sub_state(etokenNotExpired,
_T("(</td></tr>)"), CRgSubState::stateContinue)
rg_sub_state(CRgSubState::tokenNone,
_T("(View Deals From </font><SELECT)"),
CRgSubState::stateNoNext)
rg_end_state()
rg_end_processor(stateNormal)
}
We should mention two other macros used in the Deals sample:
rg_start_processor()
This macro, which denotes the start of the processor information, takes a pointer to the enclosing processor class.
rg_end_processor()
This macro, which terminates the processor code, provides state information. When processing starts, the state provided by rg_end_processor() will be used initially.
Defining the Listener
The next step is to define the listener. The listener class defines the feedback interface through which we get information from the processor. For the Deals sample the listener is declared in the dealscan.h header file. The declaration is shown below:
struct CDealListener : public CRgDefListener
{
struct DEAL
{
DEAL(){
}
DEAL(const DEAL& deal){
m_strDealName = deal.m_strDealName;
m_bExpired = deal.m_bExpired;
m_strRef = deal.m_strRef;
}
bool operator=(const DEAL& deal){
return (
m_strDealName == deal.m_strDealName &&
m_bExpired == deal.m_bExpired &&
m_strRef == deal.m_strRef
);
}
CRgString m_strDealName;
bool m_bExpired;
CRgString m_strRef;
};
typedef std::list<DEAL> CDealList;
CDealListener(){
}
virtual ~CDealListener(){
}
void Cleanup();
// overrides
virtual void OnMatch(RGTOKENID tokenid, CRgString::const_iterator citbegin,
CRgString::const_iterator citend,
DWORD dwOffset, const CRgMatch& actualMatch, CRgProcessor* pProcess);
// operations
// add any additional operations here
void TraceData();
void ProcessData();
const CDealList& GetDealList() const{
return m_dealList;
}
protected:
CDealList& GetDealListRef(){
return m_dealList;
}
CDealList m_dealList;
DEAL m_currentDeal;
};
Optional Overrides
The only override that is directly tied to the scanner is the OnMatch() override. After the listener has been added to the scanner, the OnMatch() function will be called when a match takes place. Other optional overrides that you can use, if necessary, are listed below (with a brief description of each one):
• OnMatchStart() will be called when the matching process starts.
• OnMatchEnd() will be called when the matching process ends.
• OnChangeState() will be called when a state change happened as the result of a match.
• Override Cleanup() to add any code that clears internal data structures specific to your application.
• Override Destroy()as appropriate to de-allocate memory allocated to the listener. The default implementation just performs a delete this.
OnMatch() Implementation
Let us now look at the OnMatch() implementation for the CDealListener class in a little more detail. It looks like this:
rg_start_token(tokenid)
rg_assign_string(CDealProcessor::etokenDealName,
m_currentDeal.m_strDealName, 1);
rg_assign_string(CDealProcessor::etokenRef,
m_currentDeal.m_strRef, 1);
rg_end_token()
You start with the rg_start_token() and rg_end_token() macros. Use the rg_assign_string() macro to assign the scanned sub expressions to strings. This macro takes a token ID and a string that is to be used for the assignment. It also takes a number that specifies the 0 based index of the sub string that you want to assign. Pass 0 if you want the entire match to be assigned.
You can also check the token ID directly and write any additional code as seen in the code shown below.
// do any additional work
if(tokenid == CDealProcessor::etokenExpired)
{
m_currentDeal.m_bExpired = true;
this->GetDealListRef().push_back(m_currentDeal);
}
Additional code in the listener is application specific and simply declares and allocates structures to deal with the data that we collect.
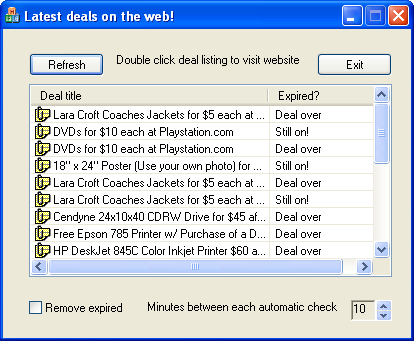
Figure 141 shows the
Deals sample in action.