Building Objective Toolkit
You can build Objective Toolkit in many different ways to support a variety of operating systems and VC++/MFC configurations. For example, you can build Objective Toolkit for any of the latest Visual Studio compilers. (For a full support matrix, go to the Stingray product page on the Rogue Wave web site, www.roguewave.com/products/stingray.aspx, and click on Supported Platforms.) In addition, your build configuration may specify any combination of build flags such as debug or release, Unicode or ANSI, static or DLL.
You can obtain prebuilt versions of the libraries by request to Rogue Wave technical support. Libraries are available for Windows XP and Vista with the currently supported compilers. We recommend, however, that you build the libraries yourself. The prebuilt libraries are built with a particular instance of Visual Studio and the Windows operating system. Building the libraries yourself ensures that they are compatible with your version of the compiler and the operating system they are built on.
A Build Configuration Wizard is included with Objective Toolkit (utils\ToolkitBuildWiz.exe). The Build Wizard is a powerful tool that allows you to build various versions of the Objective Toolkit library with different configurations. For example, you can build a version of the library that only includes the features that pertain to your project. This is an effective technique for reducing the binary size of the resulting Objective Toolkit libraries and DLLs.
Objective Toolkit is distributed with build files for the default configuration that includes all the Toolkit features. You do not need to run the Build Wizard to build the default configuration.
The SRC subdirectory contains build files for every version of Visual Studio that Objective Toolkit supports. To build Objective Toolkit, open the appropriate build file. After you load it, examine the different build configurations that specify the settings such as debug or release, Unicode or ANSI, static linking or DLL, and more. You can choose a particular configuration and build only that library variant, or select the All configuration and build every variant of the Objective Toolkit library in one build session. To choose a build configuration, select an item from the Set Active Configuration combo box in Visual Studio or start a Batch Build and select several variants to be built at once.
Using the Build Wizard
The Build Configuration Wizard is a wizard dialog that allows you to select every feature you want to include in the resulting library. After you answer a few simple questions, the Build Wizard automatically generates a custom tailored makefile that you can build to create the Objective Toolkit library in the configuration you specified. You can customize the names of the libraries to avoid any potential name collisions or versioning problems.
You can generate multiple library configurations with the Build Wizard. For example, you could generate one with just a tree control and another with only the docking windows code. Several different configurations can coexist on your hard disk simultaneously. The Wizard dialogs describe this procedure. Give the target libraries of different build configurations different target names to avoid name collisions.
The Objective Toolkit components are now built into two libraries: Stingray Foundation Library (SFL) and OT. If you want to create a set of libraries with a special configuration, you should run the Build Wizard for both libraries, specifying the same configuration name.
To build a custom configuration version of the library
1. Run the SFL Library Build Wizard.
2. On the second panel, specify the configuration name (for example, MyConfig). Use the Build Wizard to specify custom library names for the common library.
3. Run the Objective Toolkit library Build Wizard. After you enter the configuration name (for example, MyConfig), select the components you want to include in the build of the library, and then enter names for your custom library.
4. Rebuild the Objective Toolkit library to automatically build the Objective Toolkit and SFL libraries.
The Build Wizards automatically generate custom linking header files that you can include in your project. These header files are located in the include\toolkit\config directory for the Toolkit library and include\foundation\config directory for the SFL library. The Build Wizard created these files when you rebuilt the library. They have the same name as the library to which they link, with the added prefix sfl_ or ot_ .
To link to the custom configuration in your application, insert the following lines into stdafx, before you include toolkit\secall.h or any Objective Toolkit component headers.
#include "foundation\config\sfl_MyConfig.h"
#include "toolkit\config\ot_MyConfig.h"
#include "toolkit\secall.h"
NOTE >> If you are working with the default configuration, you do not need to include the xxx_Default.h header files.
DLL naming issues
When you build a custom configuration of Objective Toolkit, you must specify a unique DLL target name. When you build a subset of the Objective Toolkit features or make a change to the Objective Toolkit source or header files, the signature of the library changes. So, when you build a DLL that incorporates a subset of Objective Toolkit features or your own changes, you need to treat the target DLL like a completely unique DLL. If you change the signature of Objective Toolkit and do not specify a new DLL target name, other applications that link to the Objective Toolkit DLL may fail.
Compiler Flags
The Objective Toolkit build files and header files use #ifdef’s on several compiler flags to define the configuration variants described above.
You can use the standard symbols, _DEBUG, _UNICODE, and _AFXDLL, to select support for debugging, Unicode characters, and linking to MFC as a DLL.
The flags in
Table 1 are specific to Objective Toolkit.
Table 1 – Objective Toolkit flags
Flag | Definition |
_SECDLL | Links to the Objective Toolkit library as a DLL. |
_SECNOAUTOLIB | Prevents the Objective Toolkit autolink mechanism from working. If this is defined, you need to explicitly list the Objective Toolkit libraries you want to link to in your project's link settings. |
_SECNOMSG | Prevents the output of Objective Toolkit related messages when you build. |
SEC_NO_TLB | Objective Toolkit automatically includes its ScriptHost.tlb as resource 1 when the ActiveScript headers are included in an application. This can conflict with applications containing ActiveX components. Defining SEC_NO_TLB prevents this problem from occurring. |
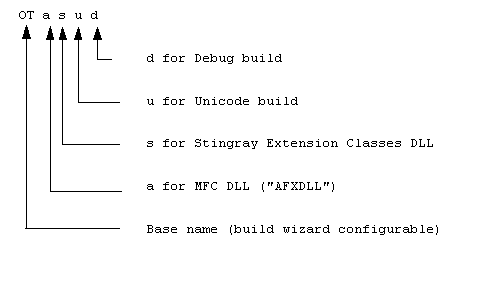
Build Target Naming Conventions
The library naming conventions are illustrated in
Figure 1.
Build Configuration Options
The following table shows the default library names for the various configurations, where <ver> stands for the current product version number. Refer to the naming convention described above.
Library name | Objective Toolkit library configuration | MFC configuration | Unicode supported | Build Type |
OT<ver> | Static | Static | No | Release |
OT<ver>d | Static | Static | No | Debug |
OT<ver>a | Static | DLL | No | Release |
OT<ver>ad | Static | DLL | No | Debug |
OT<ver>as | DLL | DLL | No | Release |
OT<ver>asd | DLL | DLL | No | Debug |
OT<ver>u | Static | Static | Yes | Release |
OT<ver>ud | Static | Static | Yes | Debug |
OT<ver>au | Static | DLL | Yes | Release |
OT<ver>aud | Static | DLL | Yes | Debug |
OT<ver>asu | DLL | DLL | Yes | Release |
OT<ver>asud | DLL | DLL | Yes | Debug |
NOTE >> Objective Toolkit makefiles place .lib, .dll and .pdb files into the directory OT\lib\<VCVer>\<Plat>\ (where <VCVer> is either vc71, vc8, or vc9, and <Plat> is x86 or x64). Add this directory to your executable path, or manually copy the DLLs to your Windows directory.
To build the 32-bit or 64-bit libraries
1. Start Visual Studio.
2. Check the Visual Studio environment directory paths for both Win32 and x64 settings to ensure that the Include, Source, Library and Executable paths contain the appropriate Stingray Studio include, source, library and executable directory paths. Please refer to
“Stingray Studio Paths in Property Sheets” in the
Getting Started part for pathing details.
3. Open the solution file appropriate to the compiler version you are using.
4. Choose the platform, i.e. Win32 or x64, and then choose the build configuration to build.
5. Start the build.
NOTE >> Intermediate files use approximately 250 Mb of space, and library files use approximately 80 Mb of space.
Miscellaneous Build Issues
Using Multiple Library Configurations
Whenever you run the Build Wizard, it overwrites sflversion.h in the SFL (include\foundation) include directory or secver.h in the Objective Toolkit (include\toolkit) include directory with the names of the libraries. This information is used to link the libraries to your project automatically.
If you are maintaining more than one library configuration on your system, this can cause problems. Your projects link to whatever configuration was last set up by the Build Wizard.
To avoid problems when switching library configurations, run the Build Wizard specifying the desired configuration for each of the Objective Toolkit libraries.
Make Files and Building Directly with nmake
When you build the Stingray libraries in Visual Studio, Visual Studio invokes make files that ship with the product. For information on these underlying make files, and how to build the libraries by invoking
nmake on these files directly, see
“Building from the Command Line with nmake” in the
Getting Started part.
This section also discusses the issue of building the libraries with 1-byte structure alignment rather than the default 8-byte structure alignment.
Components Requiring RTTI Support
Run-Time Type Information (RTTI) support is required for some components. When you run the Build Wizard, RTTI support must be enabled if you include:
• Layout Manager
• Advanced docking windows (ADW) components
• Full Screen view components
• Outlook bar
• SECMultiDocTemplate and related code
• Microsoft Agent
To learn more about this requirement, see our Knowledge Base at (kb.roguewave.com/kb/).
Building the Samples
Each sample project has a variety of build options to show you how to use the various build configurations. All 32-bit and 64-bit samples build with the following targets:
Table 2 – Build Configurations for Samples
Build Configuration | Description |
WIN32 or x64 – Lib MFC Lib Debug | Objective Toolkit as a static library, MFC as a static library, ANSI, Debug |
WIN32 or x64 – Lib MFC Lib Release | Objective Toolkit as a static library, MFC as a static library, ANSI, Release |
WIN32 or x64 – Lib MFC DLL Debug | Objective Toolkit as a static library, MFC as a DLL, ANSI, Debug |
WIN32 or x64 – Lib MFC DLL Release | Objective Toolkit as a static library, MFC as DLL, ANSI, Release |
WIN32 or x64 – DLL MFC DLL Debug | Objective Toolkit as a DLL, MFC as a DLL, ANSI, Debug |
WIN32 or x64 – DLL MFC DLL Release | Objective Toolkit as a DLL, MFC as a DLL, ANSI, Release |
WIN32 or x64 – Lib MFC Lib Uni Debug | Objective Toolkit as a static library, MFC as a static library, Unicode, Debug |
WIN32 or x64 – Lib MFC Lib Uni Release | Objective Toolkit as a static library, MFC as a static library, Unicode, Release |
WIN32 or x64 – Lib MFC DLL Uni Debug | Objective Toolkit as a static library, MFC as a DLL, Unicode, Debug |
WIN32 or x64 – Lib MFC DLL Uni Release | Objective Toolkit as a static library, MFC as a DLL, Unicode, Release |
WIN32 or x64 – DLL MFC DLL Uni Debug | Objective Toolkit as a DLL, MFC as a DLL, Unicode, Debug |
WIN32 or x64 – DLL MFC DLL Uni Release | Objective Toolkit as a DLL, MFC as a DLL, Unicode, Release |
NOTE >> To build the samples, you need to build the appropriate Objective Toolkit library configuration first.
Automatic linking
If you check the Project Settings|C/C++ tab|Preprocessor Definitions for several target configurations, you can see how the compiler flags link to the appropriate Objective Toolkit library variant automatically.
You indicate exactly which Objective Toolkit library you want to link by defining a combination of _DEBUG, _AFXDLL, _UNICODE, and _SECDLL in your project’s preprocessor definitions.
To incorporate Objective Toolkit into your application
After you build the libraries, you can start using Objective Toolkit classes in your own applications. Follow the steps below to add Objective Toolkit to an existing application.
1. Load your project into Visual Studio.
2. Add the following the line to the end of your stdafx.h header file. Because stdafx.h is normally included in all your source files, this makes the Objective Toolkit classes available throughout your project. You can optimize your application’s build speed by using the Objective Toolkit component-specific headers instead of secall.h.
#include “toolkit\secall.h”
If you are linking to a custom library configuration, include the custom headers before the secall.h include. For example:
#include "foundation\config\sfl_MyConfig.h"
#include "toolkit\config\ot_MyConfig.h"
#include “toolkit\secall.h”
Finally, add includes for these header files, common to all Stingray Studio products:
— Add #include <SupportedPlatforms.h> at the top of the includes.
The conditional platform information is displayed in the application's output window. The output information is helpful when developing and deploying across one or more platforms.
— Add #include <ManifestDefs.h> at the end of the includes.
This file facilitates the inclusion of manifest definitions for Windows Visual Styles.
3. Open the View|Resource Includes dialog and add the following line to the list of read-only symbol directives.
#include “toolkit\secres.h”
4. Add the next line to the list of compile-time directives.
#include “toolkit\secres.rc”
Add a combination of _DEBUG, _UNICODE, _AFXDLL, and _SECDLL to the Project Settings|C/C++ tab|Preprocessor Definitions. This automatically causes the correct variant of the Objective Toolkit library to be included in your project. _AFXDLL and _DEBUG may be defined automatically by other project settings.
If you have any problems using a specific class, refer to the online Objective Toolkit Class Reference. Each section of the Class Reference discusses one class or a group of related classes and includes an overview, step-by-step instructions, and important member functions. We also cite Objective Toolkit samples that demonstrate the use and capabilities of the class.
For information on creating an application with our AppWizard, see
Chapter 3, “The Objective Toolkit AppWizard.” For information on using component headers, see
“The Component Headers”.