Placing Symbols on a Toolbar
Using a toolbar or a similar control is an easy and effective way to give the end-user access to your library of symbols. The Objective Views samples use the standard CToolbar control extensively to place new symbols on the canvas; however, you do not need to use a toolbar control. Anything that can execute a command message is adequate. For example, the list bar control in Objective Toolkit could be used as well.
To use a toolbar as a means for accessing symbols, you need to create a toolbar resource that has buttons that represent your symbols. Then, you need to put command handlers in your CODController-derived class, which manages creating and inserting the symbols onto the canvas.
To add a symbol to a toolbar button, complete the following steps:
1. Draw a new button for it (the ‘X‘ in
Figure 83).
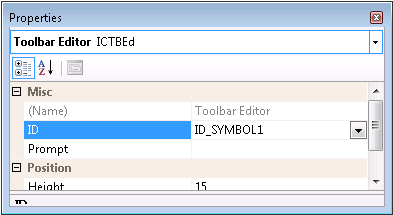
2. Then, give the toolbar button a meaningful resource ID and prompt, as in
Figure 84.
3. Before you add a symbol to a button, ensure that you have a
CODController-derived class in your application. If you do not have a
CODController-derived class, you need to create one in which to place the message handler. You can use the Class Wizard to create a new message handler for
ID_SYMBOL1. In this message handler, place the code for creating the symbol and then hand it to the default controller implementation so that the user can place the symbol onto the canvas. The code in
Example 15 loads a symbol from the application’s resources and then allows the user to add it to the canvas:
Example 15 – Adding a symbol to the canvas
void CMyController::OnSymbol1()
{
CODSymbolComponent* pSymbol1 = new CODSymbolComponent();
pSymbol1->Create(ID_SYMBOL1);
OnInsertSymbol(pSymbol1);
}
This message handler is called every time the end-user clicks the X button. It loads the symbol into memory so it is ready to be dropped onto the canvas.