Getting Started with Image Processing Navigator
This topic lists the basic procedure for using the Image Processing Navigator.
1. Open a graphics file.
To open a graphics file, choose File=>Open.
2. Select an image variable to process.
Click
MB1 on a variable name in the variable list.
To ensure that the variable list is up to date, select
Tool=>Update Variable List. This command displays the names of all variables on the
$MAIN$ program level of PV-WAVE in the variable list. The list is also updated whenever you select a variable in the list.
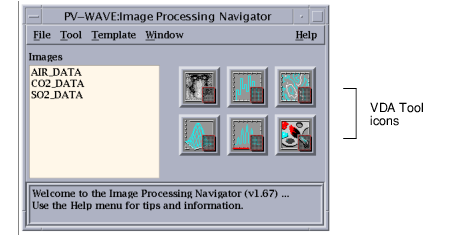
3. Display the selected variable in a VDA Tool.
To do this, click on one of the VDA Tool icons to the left of the variable list, as shown in
VDA Tool Icons. The VDA Tools that can display a variable are: Image Tool, Histogram Tool, Contour Tool, Surface Tool, and Plot Tool.
4. Save your work.
You can save an image variable to a file at any time using the
File=>Save (or
Save As) command. The Image Processing Navigator supports many commonly used graphics formats. Click
here for a list.
Use the
File=>Save Session command to save selected VDA Tools. The VDA Tools are saved in their current state, including image data,
attributes, and
graphical elements.
Creating a New Image Variable
To create a blank test image, select File=>New. This function brings up a dialog box that lets you define the name, dimensions, pixel values, and color type of the new image variable.
The new image variable is placed on the
$MAIN$ level of PV-WAVE.
Opening an Existing Image From a File
To open an image file, select File=>Open.
The Open dialog box appears. This dialog box lets you choose a graphics file that is currently stored on your system.
For a list of supported file types, click
here.
The Open dialog box has a Preview option that lets you view the image before reading the data into PV-WAVE.
When you read the image, the image data is stored in a
$MAIN$ level variable and its name is displayed in the Navigator variable list.
Saving an Image in a File
You can save any image in the variable list to a file.
First, select the name of the image variable in the variable list.
Next, use the
File=>Save or
File=>Save As command to save the image in a file. The Save dialog box lets you choose a graphic format for the file. Click
here for a list of supported graphics formats.
note | The File=>Save command overwrites the original image file. |
Display Variable in Image Processing VDA Tool
To display an image variable in a VDA Tool, do the following:
First, select the variable that you want to display. To select a variable, click MB1 on the variable name in the variable list.
Next, click on one of the VDA Tool icons to the right of the variable list, as shown in
VDA Tool Icons. The VDA Tools that can display a variable are: Image Tool, Histogram Tool, Contour Tool, Surface Tool, and Plot Tool.
The VDA Tool opens and displays the selected variable.
Updating the Variable List
Anytime a new image variable is created at the
$MAIN$ program level in PV-WAVE, you must select
Tool=>Update Variable List to display the new variable in the IP Navigator variable list. The list is also updated whenever you select a variable in the list.
In general, new variables can be created at the
$MAIN$ level of PV-WAVE in these ways:

Typing PV-WAVE commands to read data into a variable, or
Exporting selected data from a VDA Tool.
Performing Image Tool operations that save results in a variable.
Accessing Online Help
To access online help, use the Image Processing Navigator Help menu. The help menu contains the following commands:
On Window—Displays the Table of Contents topic for the Image Processing Navigator.
On PV-WAVE—Displays the main PV-WAVE help contents.
On Help—Displays instructions on how to use the online help system.
On Version—Displays the current software version number and technical support information.
Summary of Image Processing VDA Tools
The Image Processing Navigator allows you to start individual
VDA Tools, associate VDA Tools with
templates, and save and restore sessions.
Most of the VDA Tools are variable-dependent. This means that they can only be started if a variable has been previously selected in the
variable list. The VDA Tools that do require a selected variable include:
The
Color Tool is variable-independent. This means that it can be started without a variable being previously selected.
Creating Customized Templates
If you typically perform the same kinds of Visual Data Analysis tasks using the Image Processing Navigator, you might want to customize the Image Processing Navigator with certain default settings.
For example, you might want all 2D plots to have a red background, a title, an axis on the bottom, and a legend in the upper right corner.
The steps for customizing the Image Processing Navigator are:
1. Open a VDA Tool.
2. Configure the VDA Tool. To configure the tool means modifying the default settings in dialog boxes and adding
graphical elements.
3. From the VDA Tool menu, choose File=>Save Template As to save the VDA Tool as a template.
4. In the Image Processing Navigator, choose Template=>Toolname to associate a saved template with a particular VDA Tool. Thereafter, when you open that VDA Tool, the template configures its defaults.
See Also
These steps are described in more detail in the following Help topics:
Setting Up and Saving VDA Tool Defaults
The first step in customizing the Image Processing Navigator is to set defaults for the VDA Tools you plan to use most often, and save these defaults as templates.
For example, if you work mainly with the Image Tool, you might do the following:
1. Open the Image Tool. Change some default settings. Add graphical elements, such as a project logo or other graphics.
2. Select File=>Save Template As to save these settings in a template file.
3. If you wish, repeat the first two steps with other VDA Tools.
Now you are ready to associate the templates with their corresponding VDA Tools in the Image Processing Navigator.
Exporting Variables
You can export one or more variables from the IPNavigator to another VDA Tool. The only caveat is that the target VDA Tool must be able to import the exported data. For example, the WzIPContour Tool will not accept a 1D variable, because WzIPContour only accepts 2D data.
The general procedure for exporting a variable includes these steps:
1. Select one or more variables in the Navigator Variable List.
2. Choose File=>Export Variable(s) to bring up the Variable Export dialog box.
3. Click
MB1 on the variable(s) you wish to export in the upper list box.
4. Click MB1 on the VDA Tool(s) that you wish to export the variables to in the lower list box.
5. Click OK or Apply to export the selected variable(s) to the selected VDA Tool(s). The exported variables are immediately displayed in the target VDA Tool(s).
See Also
Associating VDA Tools and Templates
When you have configured VDA Tools with the defaults that you want, and saved template files for each Tool, you can associate each of these template files with their corresponding VDA Tools.
Use the Template menu to associate a VDA Tool with a template file. Subsequently, whenever you open a VDA Tool from the Image Processing Navigator, the associated template is opened with the VDA Tool.
For example, if you have configured the Image Tool, Contour, and Surface Tool and saved template files for those Tools, do the following:
1. Select Template=>Image Tool. The Template Setting dialog box appears.
2. In the Template Setting dialog box, enter the name of the template file that you saved for the Image Tool.
3. Follow the same procedure for the Contour Tool and Surface Tool.
Now, whenever you start any of the VDA Tools that you customized with templates, the Tools will open with default settings taken from the associated template file.
note | It is best always to associate a template with the type of tool for which the template was created. |
For additional tips on creating templates, click
here.
Tips for Using Templates
To use templates effectively, keep the following tips in mind.
Use normal coordinates for titles, legends, and other graphical elements that you want to appear in the same position on all plots. To select normal coordinates for a graphical tool, such as the Plot Tool, select
Attributes=>View Attributes and choose
Normal from the
Coordinates option menu.
Associate templates only with their corresponding VDA Tools. In other words, if you save a template for the Plot Tool, it is best to associate this template only with the Plot Tool. If you associate a template that was created from the Plot Tool with the Image Tool, for instance, you might get unexpected side effects.
Starting the Image Processing Navigator
To start the Image Processing Navigator:
Type
@ip_startup at the PV-WAVE command line. This initializes the Image Processing and related software components.
Type
IPNAVIGATOR at the PV-WAVE command line.
Keywords
You have the option of supplying one or both of the following keywords when you start the Image Processing Navigator:
Position—A two-element array specifying the x (horizontal), y (vertical) coordinates in pixels for the starting location of the upper-left corner of the Image Processing Navigator window.
Template—A string containing the name of a Navigator template file. For more information on templates, see
Creating Customized Templates.
NoPlotColors—Specifies that no colormap entries be reserved for plot colors.
PrivateColormap—Allocates a 256-element colormap for the session. Setting this keyword will result in color flashing on some displays.
Examples
; Starts the Image Processing Navigator.
WAVE> IPNAVIGATOR
; Starts the Image Processing Navigator and positions the
; upper-left corner at screen coordinates (100, 50).
WAVE> IPNAVIGATOR, Position=[100, 50]
; Starts the Image Processing Navigator, positions the upper-left
; corner at screen coordinates (100, 50) and opens a template
; file for use with the Navigator.
WAVE> IPNAVIGATOR, Position=[100, 50], Template=’nav.tpl’
Saving a Image Processing Navigator Session
When you save a Image Processing Navigator session, the following things happen:
Specified VDA Tools are saved in their current configuration
Template associations are saved
To save a Image Processing Navigator session, do the following:
1. Select File=>Save Session. The Save Session dialog box appears.
2. In the Save Session dialog box, click on the names of the VDA Tools that you want to save. You do not have to select all of the VDA Tools that are currently open. When you restore the session, only those VDA Tools that you selected in this dialog box will be restored.
3. In the Save Session dialog box, enter a name for the save file, or use the
Browse button to specify the file. The
Browse button brings up a
file selection tool that you can use to specify the directory and filename for the save file.
Restoring Image Processing Navigator Session
Restoring a session means opening a file that was created with the File=>Save Session command.
The restored session will be identical to the saved one—the VDA Tools are restored with the data, graphical elements, and setups that were in effect when the session was saved.
To restore a Image Processing Navigator session, do the following:
1. Select File=>Restore Session. The Restore Session dialog box appears.
2. In the Restore Session dialog box, enter a name for the save file (the file containing the saved session information), or use the
Browse button to specify the file. By default, session save files have a
.sav extension. The
Browse button brings up a
file selection tool that you can use to specify the directory and filename for the save file.
note | You can restore the same session more than once during a Image Processing Navigator session. The VDA Tools from multiple restored sessions are completely independent of one another, even though they look the same and may display the same data. |
Closing Image Processing Navigator
To close the Image Processing Navigator, select File=>Close.
Version 2017.0
Copyright © 2017, Rogue Wave Software, Inc. All Rights Reserved.